When you go to install Skype for Business Server, there are quite a few steps to follow. If you’re not paying attention, you can end up with application or database files in unexpected places.
In this post, you’ll learn how to get all your files installed where they should be, including application and database files.
Placing the Skype Server Application Files
First, let’s start with the application files. These are pretty easy, but if you make one small error at the beginning of your build process, it can be tough to backtrack. When you first start to install Skype for Business Server, it will ask where to install the core components. This is the only opportunity to select where the rest of the application files will go. In fact, the installer warns that any future components will go to this folder.
Here’s quick example of switching from the C: drive to the D: drive:

If you install the Skype for Business Server administrative tools or other components from the Deployment Wizard, you should see that it will auto-install to the same directory.
Administrative Tools:

Server Components during Step 2:

The key here is to select the correct directory at the beginning as the Deployment Wizard or any other installers will not prompt you for it again.
Managing SQL Server Express Installation
The next issue is SQL Server Express. It is required on all Skype for Business Servers as it holds a local copy of the topology and any other database information needed for its role. It does not follow the same path where Skype for Business Server is installed.
If you run the steps in the Deployment Wizard as is, it will detect that SQL Express is missing and install it to the C: drive. You can avoid this by pre-installing SQL Express before starting the Skype for Business Server installation process.
Depending on which Skype for Business Server role you are installing, the following local SQL Instances are required:
Standard Edition Front End
- RTC
- RTCLocal
- LyncLocal
Enterprise Edition Front End
- RTCLocal
- LyncLocal
Persistent Chat, Mediation, Director, Edge
- RTCLocal
To install from the command line, you will need a copy of the SQL Express 64-bit installer. An installer is included in the Skype for Business Server installation media, but you should download the latest, up-to-date version from Microsoft. You can choose option 1 for only the database components or option 2 that will include SQL Server Management Studio:

There are quite a few SQL Server command-line install options, but here are the ones I use to install the instances. Make sure to change the instance directory in bold as well as the value for the INSTANCENAME:
SQLEXPR_x64_ENU.EXE /QUIETSIMPLE /IACCEPTSQLSERVERLICENSETERMS /HIDECONSOLE /ACTION=Install /FEATURES=SQLEngine,Tools /TCPENABLED=1 /SQLSVCACCOUNT=”NT AUTHORITY\NetworkService” /SQLSYSADMINACCOUNTS=”Builtin\Administrators” /BROWSERSVCSTARTUPTYPE=”Automatic” /AGTSVCACCOUNT=”NT AUTHORITY\NetworkService” /SQLSVCSTARTUPTYPE=”Automatic” /INSTALLSHAREDDIR=”D:\Program Files\Microsoft SQL Server” /INSTALLSHAREDWOWDIR=”D:\Program Files (x86)\Microsoft SQL Server” /INSTALLSQLDATADIR=”D:\Program Files\Microsoft SQL Server” /INSTANCENAME=<InstanceName>
I avoid a silent installation as I’ve run into issues when an error occurred that didn’t allow the install to complete. When I suppressed the installer interface, I didn’t know what was going on when the instance failed to install. Running the command above requires some manual install clicks but will avoid this headache.
After running the command for each instance, go to File Explorer to verify the installation path. The screenshot below is for a Standard Edition server, so it has all three. I also recommend installing updates for SQL Express to move it to the latest version available.

Once SQL Server Express is installed, you can continue to Step 1 of the Deployment Wizard. Here the wizard will install a local copy of the Central Management Store (CMS) database to the RTCLOCAL instance default file path:

However, the real fun begins for Step 2. If you’re not paying attention, Step 2 does something really interesting: the installer will use a built-in algorithm to determine the best storage to put the database and log files. The C: drive could be the drive you want; it could be that extra drive you use for log files. You end up losing a bit of control here.
For example, I ran Step 2 without any prior modifications and it put the database files onto my D: drive in the CsData folder:
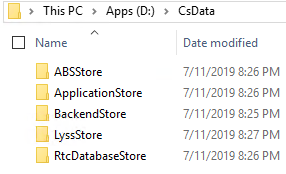

If you’re fine with having it in the CsData folder on the D: drive as long as it made it off the C: drive, then you’re good here! However, if you want to have the database and log files installed in the same place as the instance defaults, you have to drop out to the command line and run Install-CsDatabase using the parameter UseDefaultSqlPaths BEFORE running Step 2. This will install the files to where SQL is configured for its default paths.
Install-CsDatabase -LocalDatabase -UseDefaultSqlPaths -Verbose
You should see the database files being installed to the instance defaults, in this case to the D: drive under Program Files:

Once this is complete, continue to run Step 2, and the installer will verify that the database files are already created and skip their installation.
Customizing Skype Server Install in Topology Builder
Another detail to watch out for is in Topology Builder. In this example, I am deploying a new Standard Edition server. If you ever see a screen about installing databases, click the Advanced button to bring up the Select Database File Location window. This will give the same options as the command for letting the installer choose the location or using the SQL Server instance defaults.
In this case, I selected to use the instance defaults as this is the same as using the UseDefaultSqlPaths parameter.

Updating Databases with Cumulative Updates
After installing cumulative updates (CU), there are usually database updates installed from the Front End server via the command Update-CsDatabase. If you want to keep the databases in the instance default path, then I always add the UseDefaultSqlPaths parameters to keep them there.
This switch is critical since the back-end SQL Server may have specific files and folders to store the database files if shared with other application databases (note: not a best practice for Skype for Business).
If you want to verify the database and log file paths in SQL Management Studio, connect to the instance and run the following query:
SELECT Name, Physical_Name AS Current_File_Location
FROM sys.master_files

The Install-CsDatabase command also has a third option to install the files to a completely different path with the DatabasePaths parameter. Use this parameter to specify the log and database file path to store the files (specify the log path first, then the database path separated by a comma). A scenario for this might be installing SQL Express to the C: drive but placing the files on a separate drive, or putting the database and log files on separate drives, like this example:
Install-CsDatabase -ConfiguredDatabases -SqlServerFqdn sql01.domain.com -DatabasePaths "D:\Logs","E:\Data"
Pat Richards has a script named Set-CsFeatures that can assist with pre-installing SQL Express. I have never used this script myself, but Pat is well known in the Lync/Skype for Business community and is a solid script writer. You can check out his script at this link:
Summary
Installing the database files can be tricky, but realize that they are just regular database files. If they end up in the wrong location, it is usually an easy fix by shutting down the Skype for Business services, moving the database files, and updating SQL to point to the correct location. Of course, this is always easier before putting the server into production.
Enjoyed this article? Check out more of my Skype for Business articles!
Did you find this article helpful? Leave a comment below or follow me on Twitter (@JeffWBrown) for further discussion.
References:
Microsoft Blog: Preinstalling SQL Express 2012 SP1 for Lync Server 2013
Microsoft Docs: Install SQL Server from the Command Prompt
Microsoft Docs: Install-CsDatabase