Last week, I covered Getting Started with Microsoft Teams and Graph API that highlights Graph API basics and creating an Azure Application Registration. In this post, you’ll learn how to use Graph API with PowerShell to create Microsoft Teams teams and channels.
Before I jump into the technical details, I want to point out that it is entirely possible to create teams and channels using the MicrosoftTeams PowerShell module. This post aims to introduce how you can use the Microsoft Graph API and PowerShell in building your own tools for use with Microsoft Teams.
For example, I’ve been building Power Automate flows that trigger off new items in a SharePoint list used for managing new teams creation requests. While Power Automate has quite a few connectors available, it does not have a native way to create Microsoft 365 groups and teams.
However, I can add this behavior using the HTTP connector and use Graph API calls to create these resources. Making API calls to the Microsoft Graph service can fill this void or use the functionality in a custom application.
Storing Azure App Information
I probably should have covered this in the previous article, but remember how I said you needed to save that app secret? Here’s a quick way you can do that. It may not be 100% secure, but for development purposes, I’m going to save my app ID and secret to environmental variables on my system. Environmental variables are just variables that store information about the operating system environment. In PowerShell, these variables start with $env followed by a colon.
Using this prefix, I’m going to save my app id and secret into their own variables like this:
$env:graphApiDemoAppId = “<app id GUID>” $env:graphApiDemoAppSecret = “<app id secret>”

Note: Although I’m creating environmental variables here, by default, they will not persist past this PowerShell session. If I want to continue using these in the future, I would need to make them persistent.
Setting Graph API Permissions
Next, I need to configure permissions for my app registration. This is the great thing about using app registrations in Azure: I can set the permissions so the app can only do the things I want it to. No need to give it any kind of full access or administrator permissions.
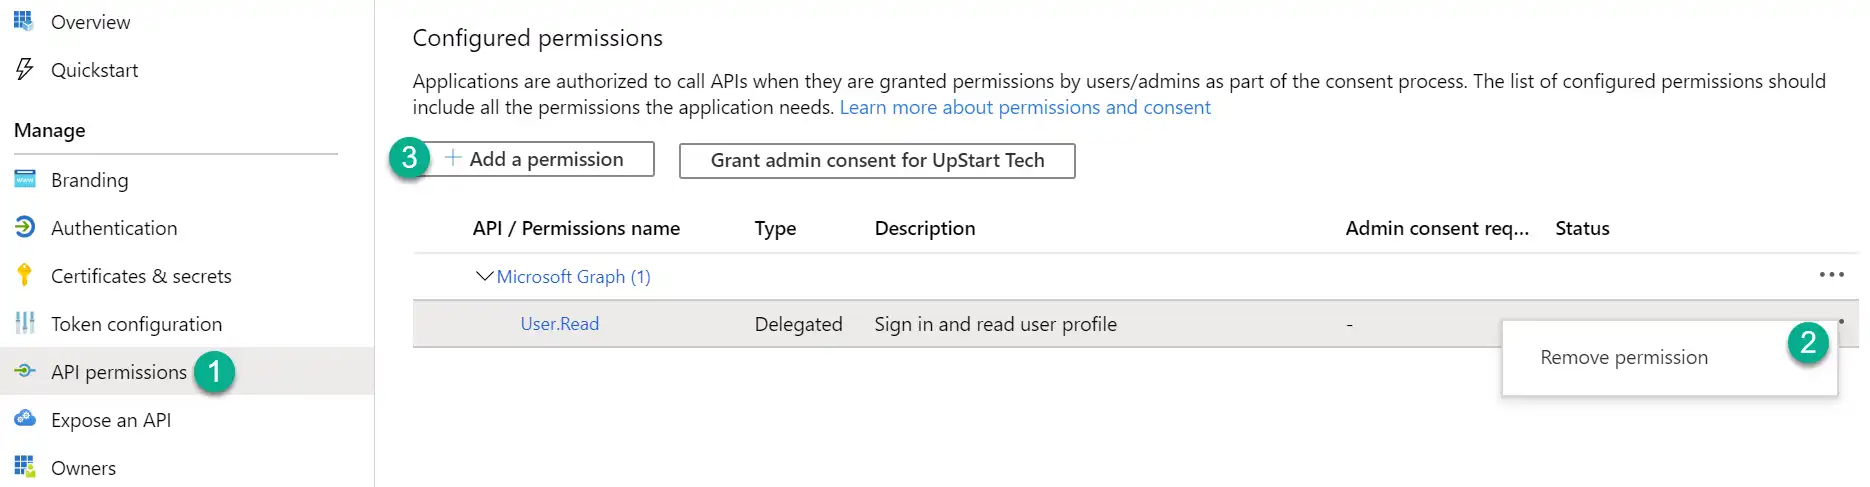
Back in the Azure portal in the app registration, select API permissions from the left menu. By default, the app registration is given the ability to read the user’s profile. I’m going to remove this permission by selecting the three dots to the right and choosing Remove permissions. After that, I’m going to select + Add a permission to select new ones for the app.
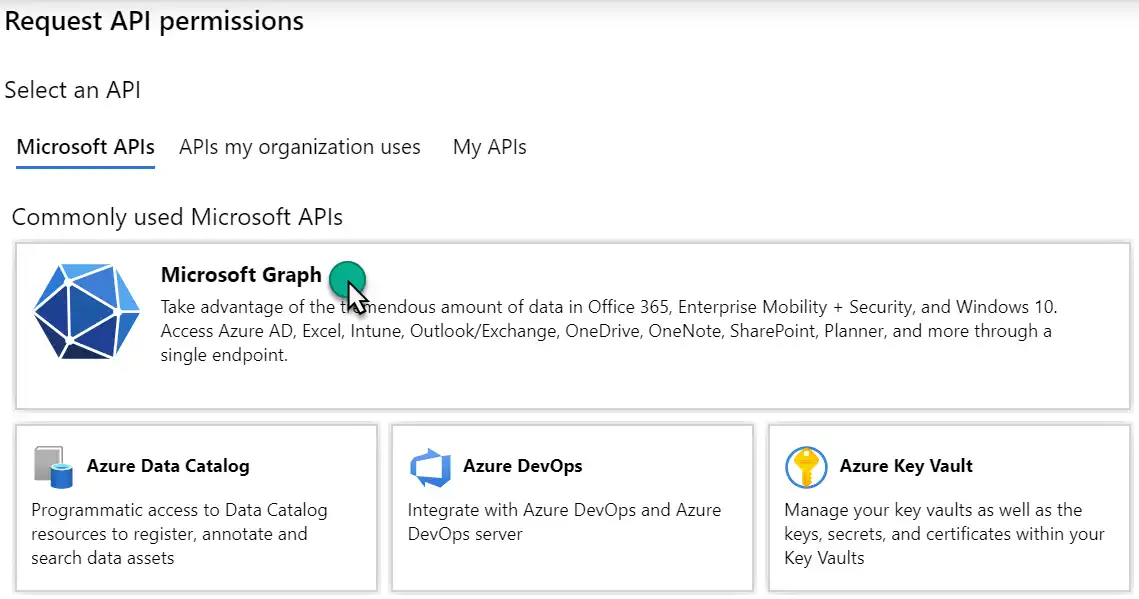
In the Request API permissions window, there are a ton of Microsoft and custom APIs to choose from to interact with. For my application, I’m going to choose Microsoft Graph.
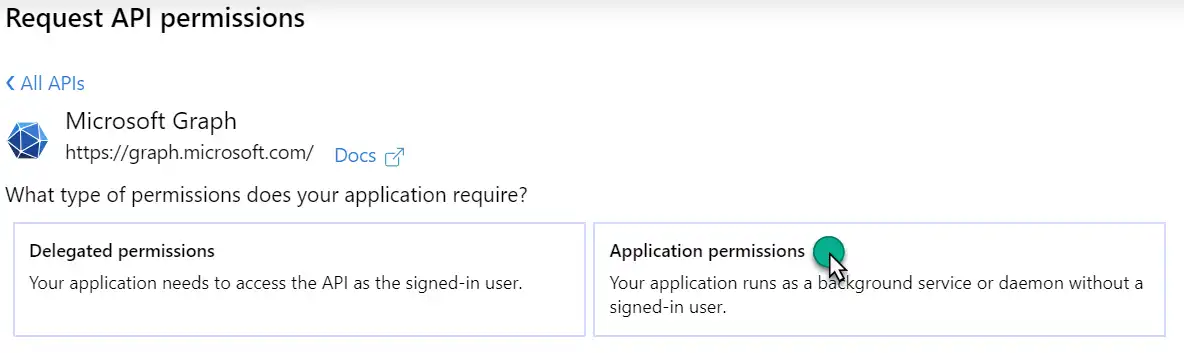
Next I need to choose the kind of permissions my application requires. The first is Delegated permissions. These permissions are for applications that are going to have a signed-in user. For these types of apps, the user or an administrator consents to the app permissions to allow it to make calls to Microsoft Graph on the user’s behalf. The signed-in user will need to be a member of any permission groups necessary to perform the action.
The second kind of permissions is Application permissions. Apps like these run without a signed-in user present, like a background app or a service. Application permissions would also be used in Power Automate flows that I mentioned earlier. These app permissions can only be authorized by an administrator. For this demo, I’m going to choose the application permission option.
Once I select this option, the request of the window is populated with the permissions I can add. There are a lot of options here, where do I begin? I need to think about what tasks I am trying to accomplish.
First, I need to create a Microsoft 365 group before I can create a team, so I need to reference the Microsoft Graph documentation for groups that illustrates what permissions are needed for my Application permission type to create Microsoft 365 groups. Each page shows the minimum requirements for both the delegated and application permission types to accomplish the task. These permissions for each permission type are listed from least to most privileged.
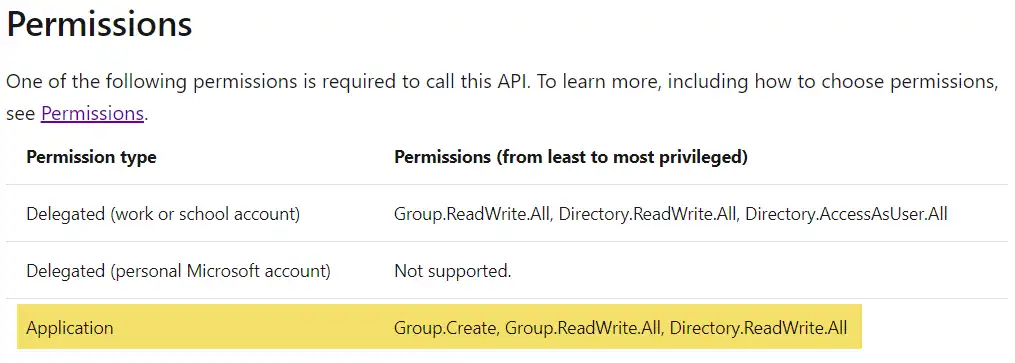
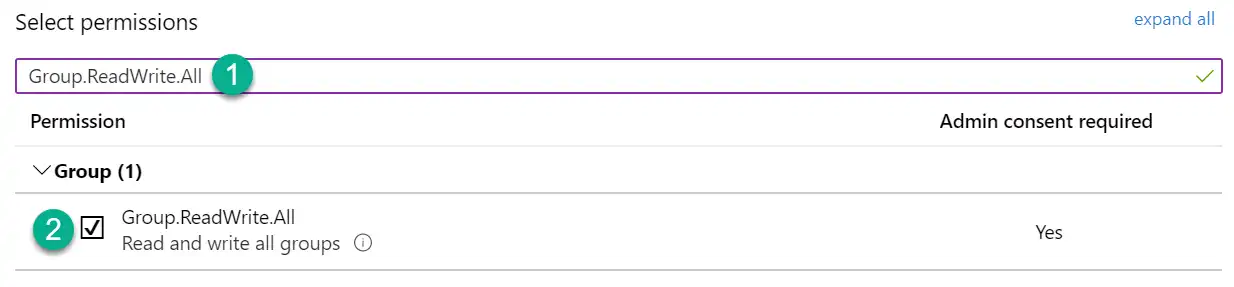
So back in the Azure portal, I’m going to search for Group.ReadWrite.All and select it. Although this isn’t the least privileged option, I know coming up that in order to turn this group into a team I’ll need this permission level.
I will need to continue to research each action that I need to accomplish and the permissions outlined in the documentation to do so:
- Create Team : Group.ReadWrite.All
- Create Channel : Group.ReadWrite.All
Based on the documentation, it looks like Group.ReadWrite.All is all I will need for my application. However, I know from experience that I also need to add Directory.Read.All. I believe this is because I’m going to be adding an owner when I create the group and the app will need permissions to read users in the directory. Once I have searched and selected all the required permissions, I will select Add permissions.
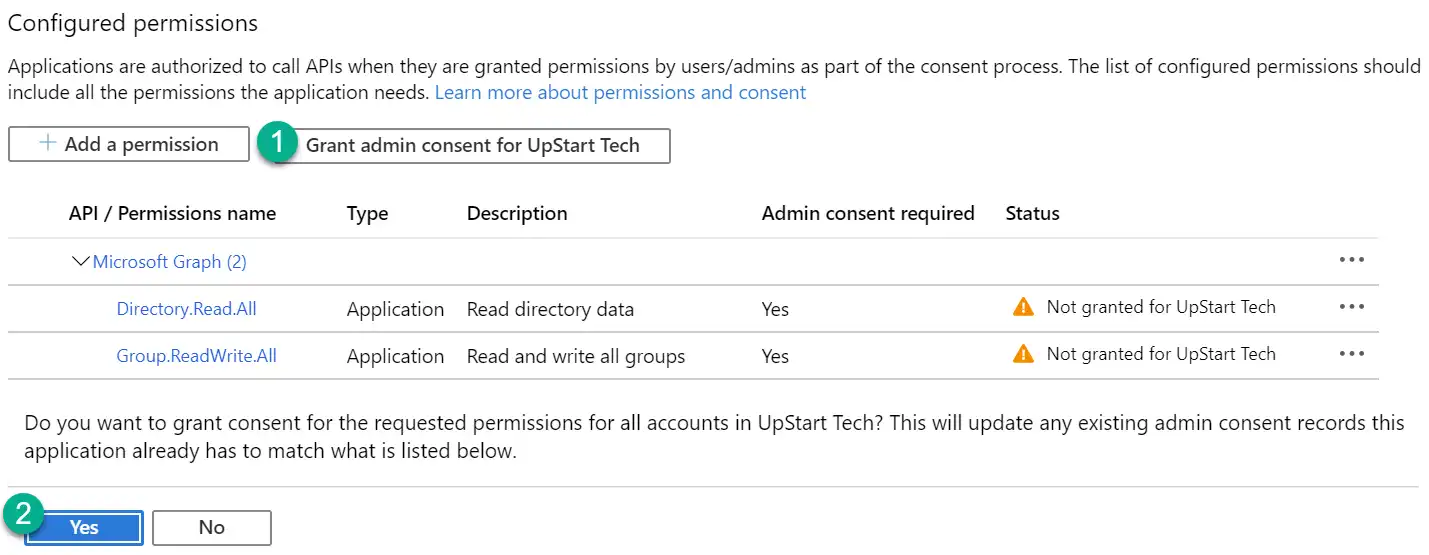
Back in the list of configured API permissions, it is going to warn me that even though I have assigned these permissions to my application, I need to grant admin consent for the tenant. When I select the Grant admin consent button, I will need to click Yes to grant it. Once approved, the Status column will update to reflect the API permissions have been granted for the tenant.
Getting a Graph API OAuth Token using PowerShell
So to recap: I have the app registration and secret along with configured permissions. Now I can get into programming my PowerShell application to create the group. The first thing I need to do is request an OAuth token using PowerShell so I can make requests to the Microsoft Graph API to manage Teams. The method I’m using below is specifically for requesting a token when using application permissions.
When requesting this OAuth access token, I will need the app ID and client secret I already saved into my variables earlier. I will also need the tenant ID for my Azure Active Directory instance, which can be found in the Properties blade in the Azure portal. I saved this to another environmental variable named $env:tenantId.
Next, I use the tenant ID variable to set the OAuth URI that I will be making the request to, followed by the body of my request:
- client_id: this is the app ID saved to my variable
- client_secret: this is the secret value created for the app
- scope: the scope that the token will used against (Microsoft Graph service)
- grant_type: when requesting an access token, this should be set to client_credentials
$env:tenantId = "12345678-abcd-efgh-ijkl-987654321wxyz"
$oauthUri = "https://login.microsoftonline.com/$env:tenantId/oauth2/v2.0/token"
# Create token request body
$tokenBody = @{
    client_id     = $env:graphApiDemoAppId
    client_secret = $env:graphApiDemoAppSecret
    scope         = "https://graph.microsoft.com/.default"
    grant_type    = "client_credentials"
}
I then use Invoke-RestMethod to make the request for the access token to the OAuth URI using a POST method, saving this to my $tokenRequest variable. I’ve seen other examples use Invoke-WebRequest but I found that when using the Rest method I did not have to convert the response from JSON format in order to get the access token. Finally, I save just the access token value to a variable named $accessToken.
Here is the full code sample including creating the environmental variables from earlier:
If I look at the value of $tokenRequest, it has a property for expires_in. This represents the lifetime of the token in seconds, so here is looks like my token will last 1 hour or just under 3600 seconds:

Creating the Microsoft 365 Group
Finally, everything is set to make my request to the Microsoft Graph API using PowerShell service to create a Microsoft 365 Group for Teams. I need to create the header for my request using the access token value from the previous section along with specifying the format of the data in the request body, in this case JSON.
$headers = @{
  "Authorization" = "Bearer $accessToken"
  "Content-type" = "application/json"
}
Next I need to create the body of my request in JSON that specifies the properties of my Microsoft 365 Group. More properties are available but these are the important ones for creating the group for now:
- displayName – The display name for the group
- mailNickname – The first part of the email address before @domain
- description – Description of the group
- owners@odata.bind – The owners of the group using a Graph API formatted URL; in order to turn this into a team later, it needs at least 1 owner but multiple can be specified in this list; designate the user by their object ID or UPN
- groupTypes – “Unified” is the previous name of Microsoft 365 groups from Exchange
- mailEnabled – set to true to create a mailbox
- securityEnabled – this will not be a security group, so setting to false
- visibility – options include Public, Private, HiddenMembership, or Empty (which is interpreted as Public)
$groupBody=
'{
    "displayName":  "Team from Graph API Demo",
    "mailNickname":  "teamfromgraphapidemo",
    "description":  "Demo making a group from Graph API",
    "owners@odata.bind":  [
        "https://graph.microsoft.com/v1.0/users/{id}"
    ],
    "groupTypes":  [ "Unified" ],
    "mailEnabled":  "true",
    "securityEnabled":  "false",
    "visibility": "Private"
}'
You might notice that $groupBody looks a bit different from my other objects like $headers. I had a hard time figuring out the correct syntax using equal signs and PowerShell formatting. When I would invoke the request against the Graph API, I kept getting errors about invalid JSON. I believe this was due to using a list of items for the owners and group types. If you know how to make this work using a PowerShell-type object, please leave a comment below.
Finally, I can use the Invoke-RestMethod command again to make my request to the Microsoft Graph service to create my Microsoft 365 group. Notice I’m still using the same $headers variable I created earlier as it still has a valid access token in it to authorize my request. Here’s the code sample for this next task:
Note in the Invoke-RestMethod command that I specified “/groups” at the end of the URL indicating the type of resource in the Graph API I want to work with and make the request against.
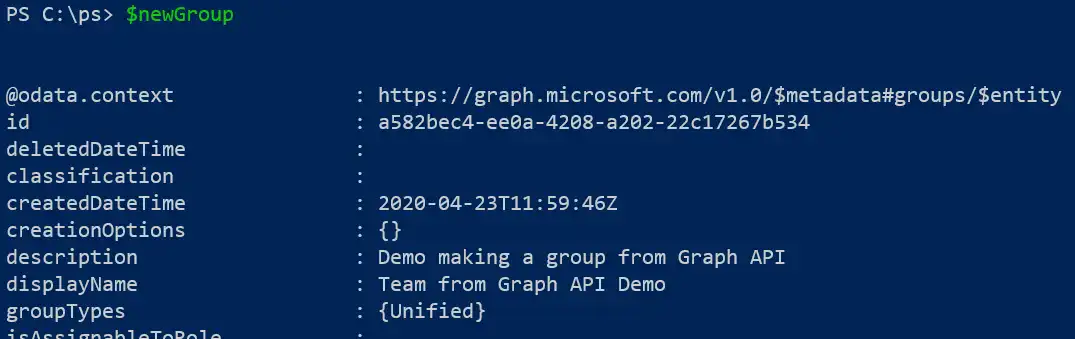
I saved the response into $newGroup so I can access it’s information later. If I look at its value, I can see a new group was created:
Converting the Group into a Team
Next, I need to make another call to the Graph API using PowerShell to convert the group for use with Teams. For this, I need to make a PUT request against the group I just created to indicate I want to make a change or modification to this existing resource. The request will be made against the group ID, which is why I saved the new group information into $newGroup so I can access the ID later.
When I make the request to create the team from the group, I can specify in the body of my request different team settings, such as if members can create or delete channels, if users can edit or delete their messages, and fun settings like the Giphy rating. Here’s an example of all the settings:
{
   "memberSettings": {
      "allowCreateUpdateChannels": true,
      "allowDeleteChannels": true,
      "allowAddRemoveApps": true,
      "allowCreateUpdateRemoveTabs": true,
      "allowCreateUpdateRemoveConnectors": true
   },
   "guestSettings": {
      "allowCreateUpdateChannels": true,
      "allowDeleteChannels": true
   },
   "messagingSettings": {
      "allowUserEditMessages": true,
      "allowUserDeleteMessages": true,
      "allowOwnerDeleteMessages": true,
      "allowTeamMentions": true,
      "allowChannelMentions": true
    },
    "funSettings": {
      "allowGiphy": true,
      "giphyContentRating": "strict",
      "allowStickersAndMemes": true,
      "allowCustomMemes": true
    }
}
You don’t have to configure every setting or even include any of them; our request body can be an empty JSON set using curly brackets { }.
Much like creating the group, I need to make another request to the Graph API using PowerShell Invoke-RestMethod using the existing header with my access token and new request body with the team settings. I also need the ID of my previously created group in the URI, and I’ll access this using my $newGroup variable.
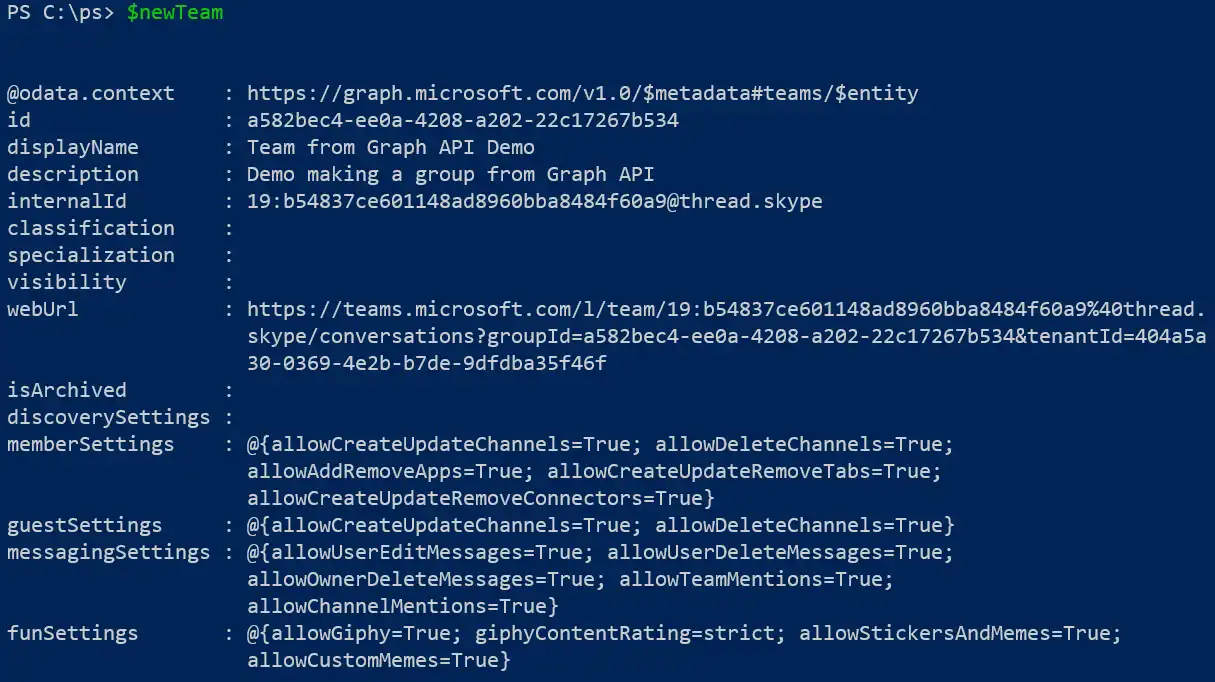
Looking at the results of my $newTeam variable, it shows the team successfully created with the settings I configured:
Creating a Microsoft Teams Channel with Graph API and PowerShell
I’ll continue with these same concepts by creating a channel in the team. I’ll make a POST HTTP request to the “/teams/{id}/channels” URL with the display name and channel description in the request body while reusing my $headers variable.
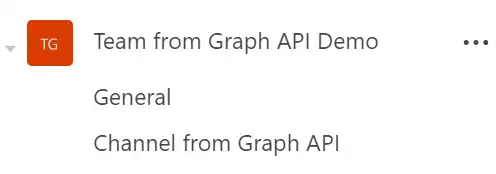
And since I was made the owner of the M365 group, the team is automatically added to my Teams client as well as the new channel:
Summary
As shown above, before being able to create a team, you have to create a Microsoft 365 group first, then build a team from it. This is how the current 1.0 version works (remember the version number in the URI), but it looks like in the beta version currently available is the ability to create a team without creating the group first. However, until the beta is released and supported in production, the method above is the process to follow.
Hopefully, this will help you get started working with the Microsoft Graph API in Graph Explorer, PowerShell, or your favorite programming language when working with Microsoft Teams. That’s what is great about working with an API, it doesn’t matter which language you use as long as you can make a web request!
References:
Alex Asplund: Using the Microsoft Graph API with PowerShell
Eran Hertz: Getting Access Token for Microsoft Graph Using OAuth REST API
Lee Ford: Getting started with Microsoft Graph and PowerShell
Microsoft Docs: Create group
Microsoft Docs: Create team
Microsoft Docs: Create channel
Here is the full code for reference:
Questions or comments? If so, drop me a note below or find me on LinkedIn to discuss further.