Microsoft Graph is the latest way of getting access to the many points of data and products inside Microsoft 365. There is a tremendous amount of data available in Office 365, Windows 10, and Enterprise Mobility and Security service. In addition to data, the Microsoft Graph API also has many controls; in particular, creating teams and channels inside of Microsoft Teams. In this post, I’m going to cover the basics of APIs, how to get started with Graph Explorer, and how to create an app registration so you can get started using Graph API.
Microsoft Graph API Explained
Microsoft Graph exposes REST APIs to access the data and make changes inside the different Microsoft 365 services. REST API stands for Representational State Transfer Application Programming Interface. This means that other developers don’t need to install a client library or additional components in order to interact with the Graph service.
Developers can make calls to an HTTP endpoint to get data or to make a change. The developer doesn’t need to know what programming language the service is written in nor do they need to write their program in any specific language. REST APIs allow developers to code in any language they want in order to interact with the other service.
These calls to the REST API occur over HTTP or HTTPS (preferably HTTPS), and Microsoft Graph has a single endpoint of https://graph.microsoft.com. Using your programming language, you can invoke a web request to the URL endpoint and specify an HTTP request method. HTTP methods can be thought of as verbs or what action you want to take against the resource. The common HTTP request methods include:
- GET – retrieves the requested data on a resource
- POST – creates a resource
- PUT – makes updates or modifications to a resource
- PATCH – alternative to PUT to update partial resources
- DELETE – removes a resource
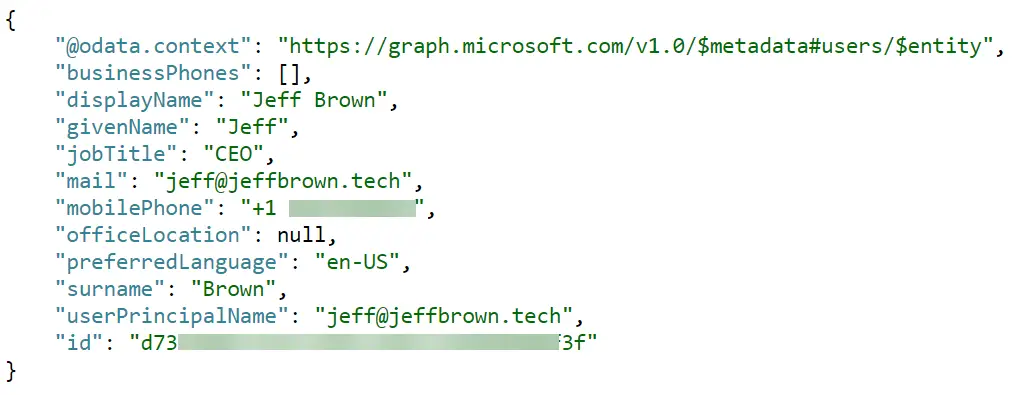
So let’s say I want to get basic information about my profile. I could make the following request to the Graph endpoint:
GET https://graph.microsoft.com/v1.0/me
Since I am just retrieving information, I used the GET method against the Graph endpoint URL while also specifying the version of the API I want to use with v1.0. Finally, I specify /me to get the profile of the signed in user, which is me. The result of the request is a return object in JSON format. You can see basic information about my profile including contact information, job title, and office information:
You can accomplish additional tasks using Graph such as:
- Create or delete user accounts
- List a user’s group memberships
- List calendar events
- Retrieve or upload a user’s photo
- List and send mail messages
Using the Graph Explorer
If you’re not quite ready to start programming using the Graph API, you can explore some sample queries using the Graph Explorer (https://developer.microsoft.com/graph/graph-explorer). The Graph Explorer allows you to get familiar with how API calls are structured and what services you can access using it.

You can use the Graph Explorer without signing into the application as it will return some sample data. However, on the left side, you can sign into the Graph Explorer in order to return personalized information about your account.
The top of the Graph Explorer has three components to pay attention to: the HTTP method for the API call, the version of the API being used, and the URL of the HTTP request being made. Below the query is the results of our HTTP request in JSON format.
Finally, on the bottom left are sample queries to get different information. This is a great learning tool to see how the API requests are formatted and how to return just the information you need. For example, I can add query parameter
?$select=displayName
to the end of the HTTP request to just return the displayName property:

Another thing to note is the HTTP Status Code that is returned. Just like visiting a website, the Graph service will return a status code if the query was successful or not. Here I got a 200 status code, meaning it was successful, but you might run into permission issues or invalid data responses as well.
Getting Started with Programming with Graph API
In order to make these HTTP requests against Microsoft Graph from my application, I’ll need an access token from the Microsoft identity platform. This access token will have information about my application and the permissions it has to access resources and actions through Microsoft Graph. To get started, I need to create an app registration inside Azure Active Directory and create a secret for the app.
First, navigate to the Azure portal admin page (https://portal.azure.com) and sign with an administrator account. In the search bar, type in “Azure Active Directory” and select the resource from the results.

In Azure Active Directory, select App registrations on the left under Manage. Once inside App registrations, select the + New registration button at the top to create a new app registration.

In the Register an application page, enter a display name for the registration as well as selecting the supported accounts type. For this there are three options:
- Accounts in this organizational directory only – this is for line-of-business applications that is mapped only to my Azure AD tenant; this is the default and most common option
- Accounts in any organizational directory – this targets any business and educational customer with a tenant in Azure or Microsoft 365; this is for if the app is going to be used in multiple tenants
- Accounts in any organizational directory and personal Microsoft accounts – this includes the above multi-tenant customers as well as ones with personal Microsoft accounts
My application is only going to be used by accounts within my tenant, so I’m going to stick with the first option.
Finally, there is the optional setting of Redirect URI. Azure Active Directory will return an authentication response to this URL after successfully authenticating a user. This is primarily for web or public applications. For this demo, this is not applicable, so I will leave it blank. Once completed, click on Register.

When the app registration is created, I’m taken to the Overview page. Here I see the display name, application or client ID, my directory or tenant id, and the object ID. The important piece of information here is the application or client ID. I will need this later when authenticating to the Microsoft Graph service as it will act as a username.

Finally, I need to go create an app secret that I can use to authenticate against Microsoft Graph. Think of this secret like a user password and treat it with the same security measures. Having this secret will allow my application to authenticate against the Graph service and perform the necessary actions I need it to. On the left menu under Manage, select Certificates & secrets. Inside this next page select + New client secret. In the Add a client secret window, give the secret a description and an expiration date, then click Add.


The client secret is created and appears under the Client secrets heading with the name, expiration date, and string value of the secret. The next part is the most important part:
Document and save this secret value as you won’t be able to retrieve it again!

If I were to leave this page and return, I would not be able to get the client secret string value again. Treat this value like it is a password to the domain or global administrator and save it in a secure password vault.
Summary
In this post, I covered the basics of what an API is, how to get familiar with Microsoft Graph using Graph Explorer, and how to create an app registration so you can use Graph inside your application.
Next week I will follow up with giving my app registration the required permissions to create Microsoft 365 groups and teams. I will then use PowerShell to create a Microsoft 365 group and a team based on that group.
Check out part 2 of this series where I demonstrate how to use the Graph API to create a Microsoft 365 group, team, and channel.
Creating Microsoft Teams and Channels with Graph API and PowerShell
Questions or comments? If so, drop me a note below or find me on Twitter or LinkedIn to discuss further.