An Azure DevOps service connection enables secure connections to external resources. You can use service connections in your build and deploy pipelines to deploy Azure resources. In this tutorial, you will learn how to use service principals and managed identities to authenticate to Azure, including using the new workload identity federation option.
To follow along with this tutorial, you will need:
- An Azure DevOps organization and project
- An Azure tenant with permissions to manage Entra ID, such as Global Administrator
What is an Azure DevOps service connection?
A service connection provides connections to external services for your Azure DevOps pipelines to use. The service connection securely stores and manages the connection details needed to access the service. A common service connection for Azure DevOps is to your Azure tenant for deploying resources and application code. Examples of other external services include GitHub Enterprise Server or Jenkins.
You can limit the scope of Azure service connections to management groups, subscriptions, or resource groups. Other security options include restricting access to specific users, pipelines, or additional projects in your Azure DevOps organization.
This tutorial focuses on using service principals and managed identities to create connections to your Azure tenant.
Service connection using service principal secret
The first portion of this tutorial uses a service principal and a secret for the Azure DevOps service connection. A service principal is an identity in Entra ID used with applications, services, and automated processes. It is essentially a user account meant for non-human entities. Service principals can authenticate using a secret, which you will use in this first example.
When creating a service connection using a service principal, there are two options:
- Automated method, where Azure DevOps creates the service principal and assigns permissions.
- Manual method, where you provide the service principal and secret for authentication.
Automated method
To create a service connection with a service principal using the automated method:
- Sign into your Azure DevOps organization at https://dev.azure.com.
- Select the Azure DevOps project where the service connection should live.
- In the project, select the Project settings icon in the lower left.
- In Project Settings, under Pipelines, select Service connections.
- If this is your first service connection, choose Create service connection; otherwise, select New service connection.
- In the New service connection flyout, select Azure Resource Manager, then click Next.

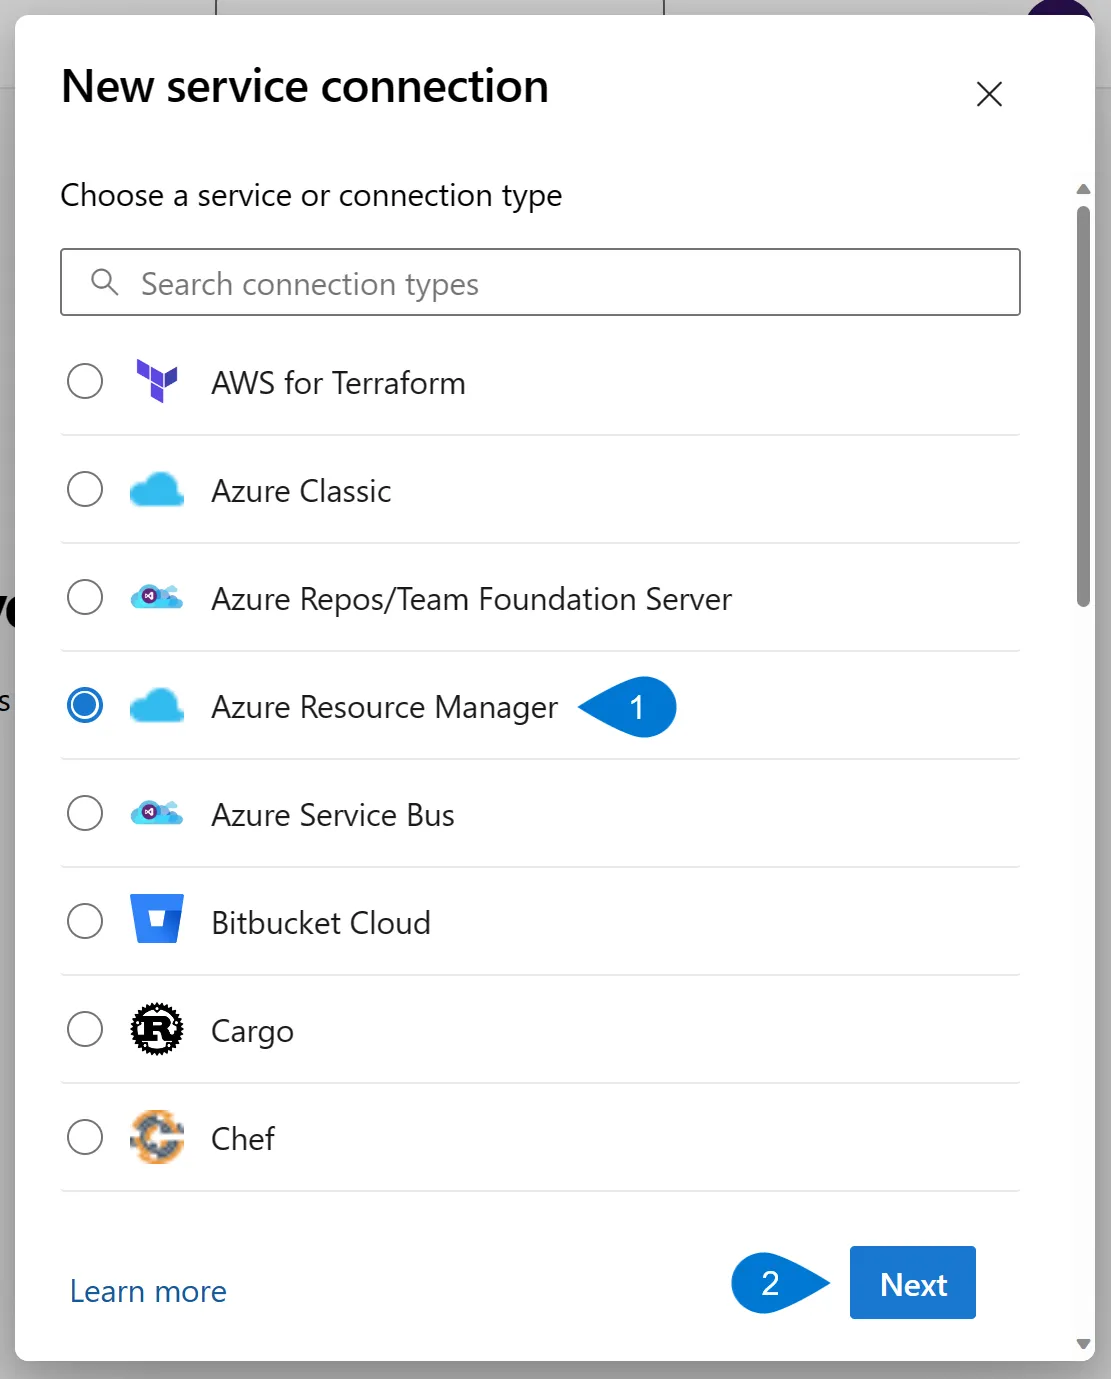
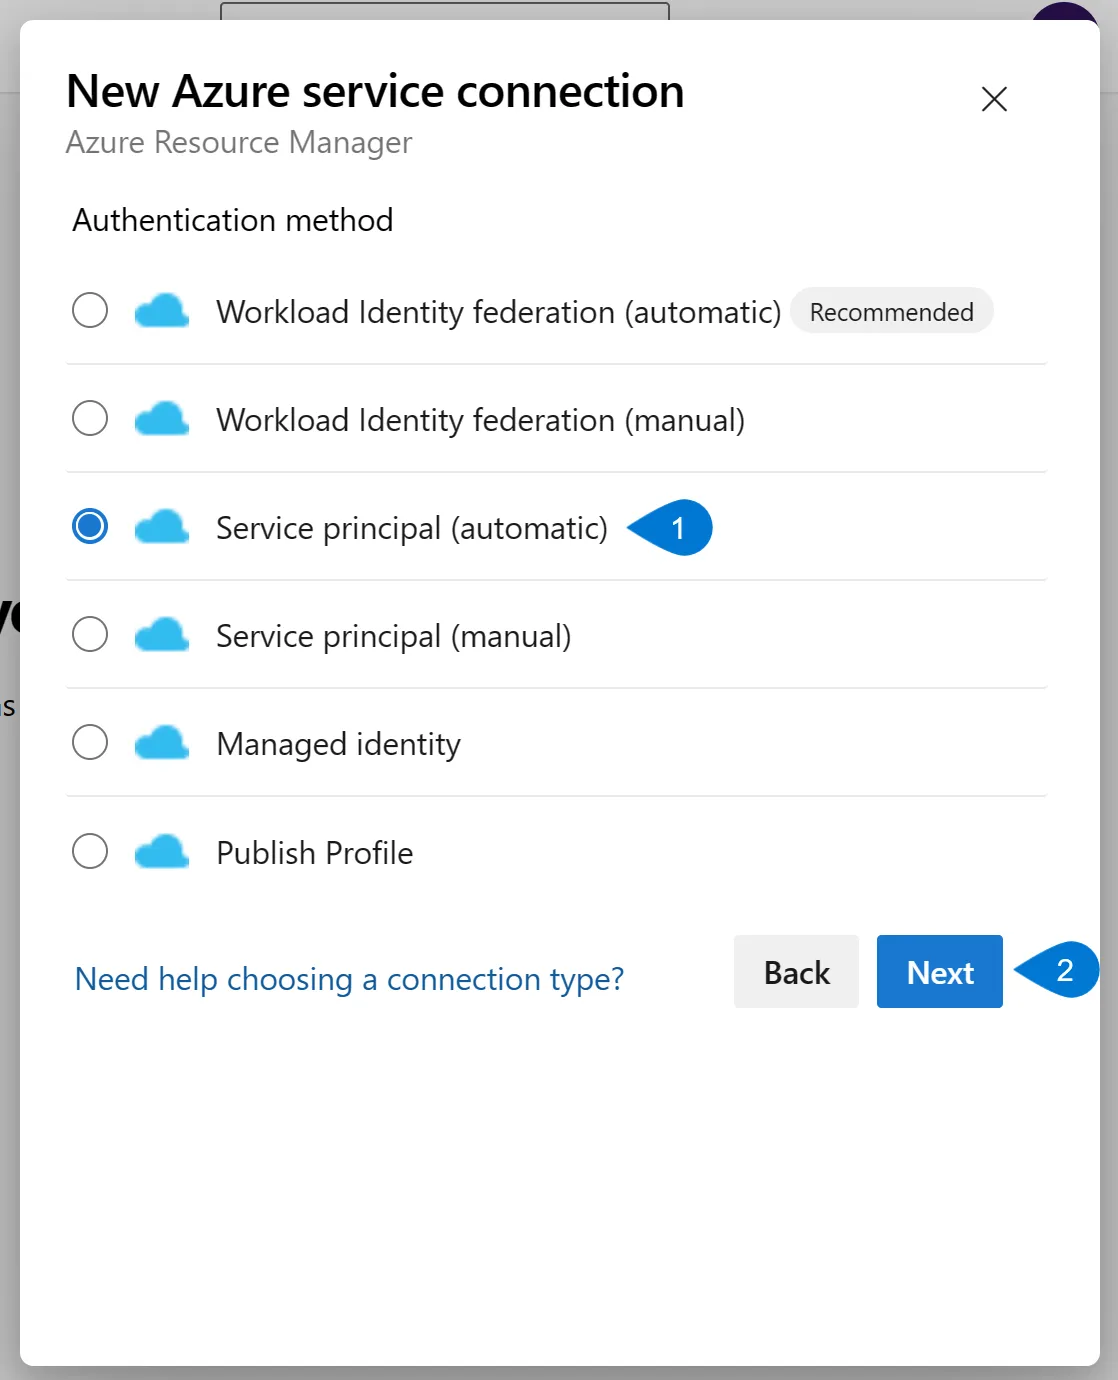
- On the Authentication method page, select Service principal (automatic). Click Next.
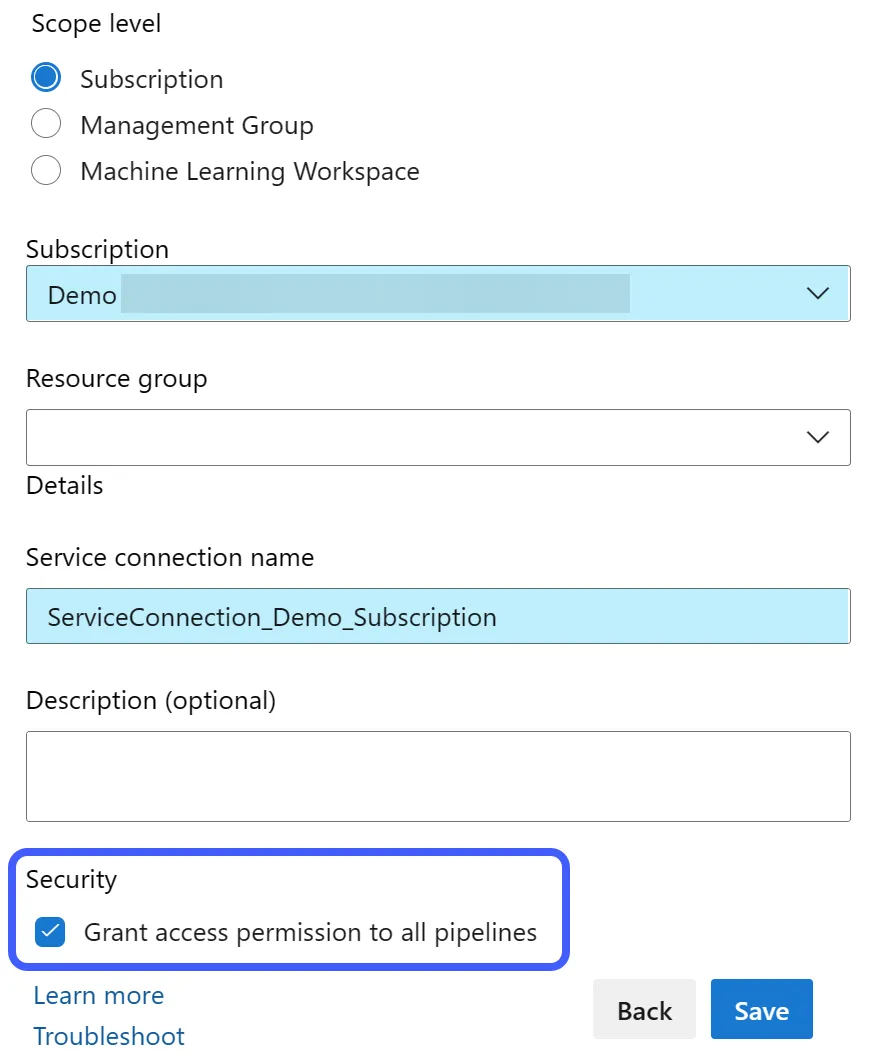
- Select the service principal’s scope level (Subscription or Management Group). This example sets the scope to a subscription named Demo. You can select a resource group within that subscription if you want to limit the service principal’s permission scope.
Enter a Service connection name and optional description. You will use this name in your deployment pipelines. You can grant this service connection access to all pipelines in the project or limit it to specific pipelines. Click Save.
This automated process has completed a few activities:
- Service principal: Azure DevOps created a service principal in your Entra ID tenant. The service principal has an auto-generated name based on the Azure DevOps organization name, the project name, and a unique identifier.
To view this service principal, select the service connection name on the Service connections page, then select the link for Manage Service Principal. A tab will open to the service connection so you can view the name. - Credentials: Azure DevOps configured a secret credential in the generated service principal. This secret value is automatically managed and renewed by Azure DevOps. This action reduces manual administration for you to renew the secret before it expires.
When viewing the service principal in Entra ID, navigate to Manage, then Certificates & secrets. Select the Client secrets tab to view the automatically generated secret and its expiration date. - Access Control: Azure DevOps automatically assigns the service principal Contributor rights to the scope selected during creation (subscription or resource group), allowing any pipelines enough authorization to perform deployments.
The benefits of using the automated include not creating the service principal, creating and managing the secret credential, or assigning permissions to a subscription or resource group.
However, the drawback is you do not get to set the name of the service principal. This auto-generated name may not meet your naming standards. You may also want to use fewer permissions than the Contributor role (however, you can change this manually after deployment).
These drawbacks are where the manual method comes in.
Manual method
The manual method requires that you have an existing service principal created in your Entra ID tenant. An existing service principal:
- Allows you to set the service principal name to your naming standard.
- You manage the authentication mechanism (secret or certificate).
- You assign permissions for the service principal to the management group, subscription, or resource group for deployments.
Additional Reading: Learn how to create service principals using different methods.
Create a Microsoft Entra app and service principal in the portal
Use Azure service principals with Azure PowerShell
Create Azure service principals using the Azure CLI
With your service principal created:
- Navigate to Entra ID and find your service principal to use in the Azure DevOps service connection. The example service principal in this tutorial is named AzDo-ServiceConnect-Demo-Subscription.
- In the Overview section, notate the Application (client) ID and the Directory (tenant) ID. You will need these values later when creating the service connection.
- Navigate to Manage > Certificates & secrets.
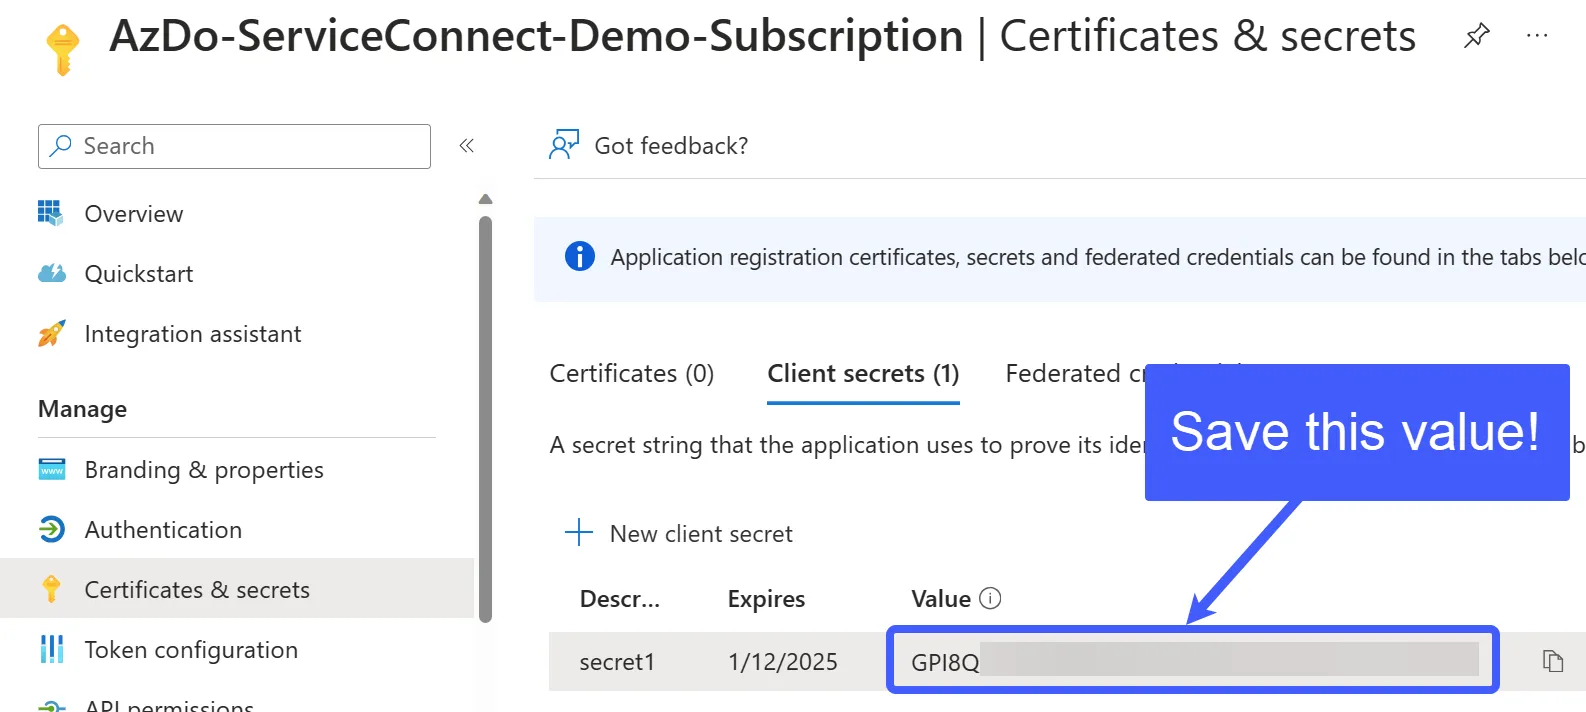
- On the Client secrets tab, select New client secret. Enter a description and the expiration date of the secret, then click Add.
- Copy and save the secret value. When you navigate away from this page, the value will be masked, and you won’t be able to retrieve the secret value.
With the service principal and secret created, next, assign the service principal permissions to the resource scope where your deployments will occur. This scope can be on a management group, subscription, or resource group. You also need to assign enough permissions for the service principal to create and manage resources. This role-based access control or RBAC role is typically the Contributor role, but you can use any equivalent built-in or custom role.
Learn More: Steps to assign an Azure role
To create a service connection with a service principal using the manual method:
- Sign into your Azure DevOps organization at https://dev.azure.com.
- Select the Azure DevOps project where the service connection should live.
- In the project, select the Project settings icon in the lower left.
- In Project Settings, under Pipelines, select Service connections.
- If this is your first service connection, choose Create service connection, otherwise select New service connection.
- In the New service connection flyout, select Azure Resource Manager, then click Next.
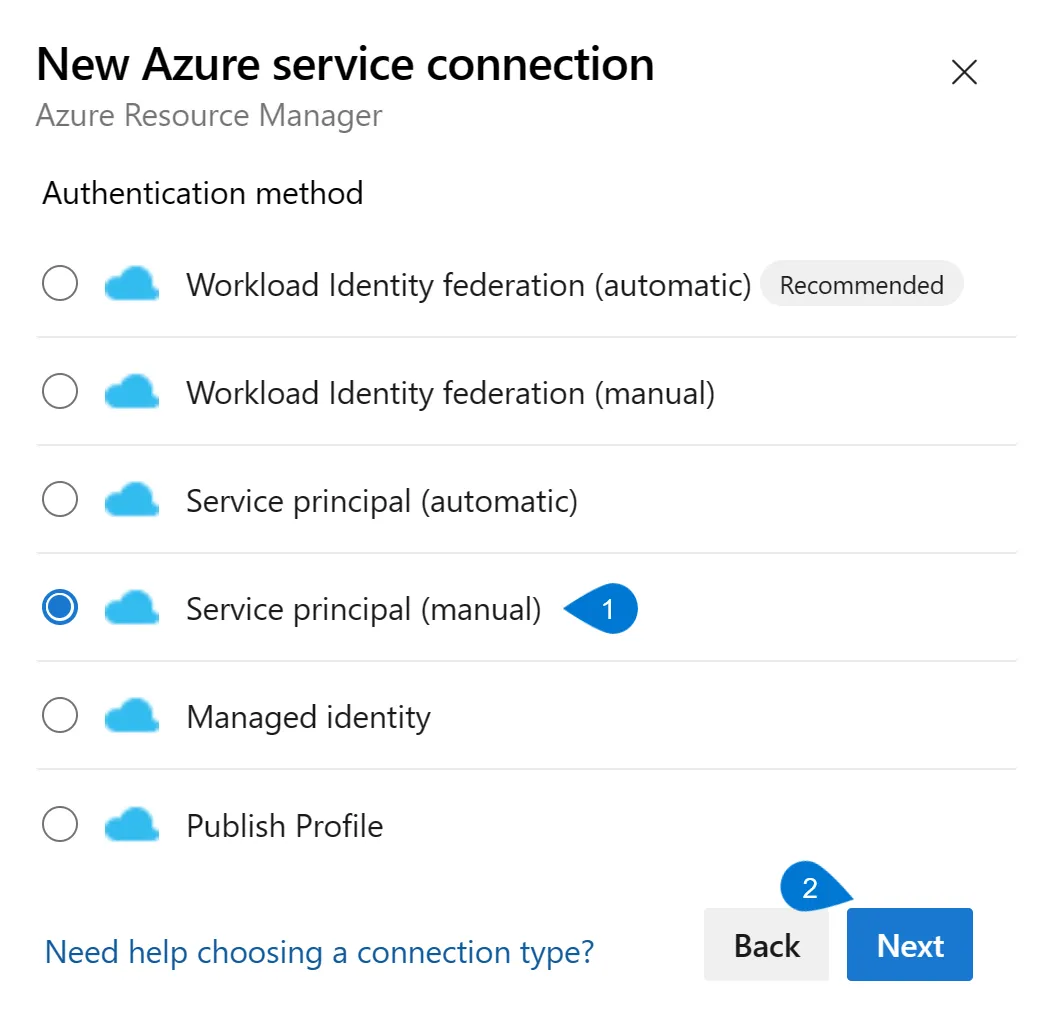
- On the Authentication method page, select Service principal (manual). Click Next.
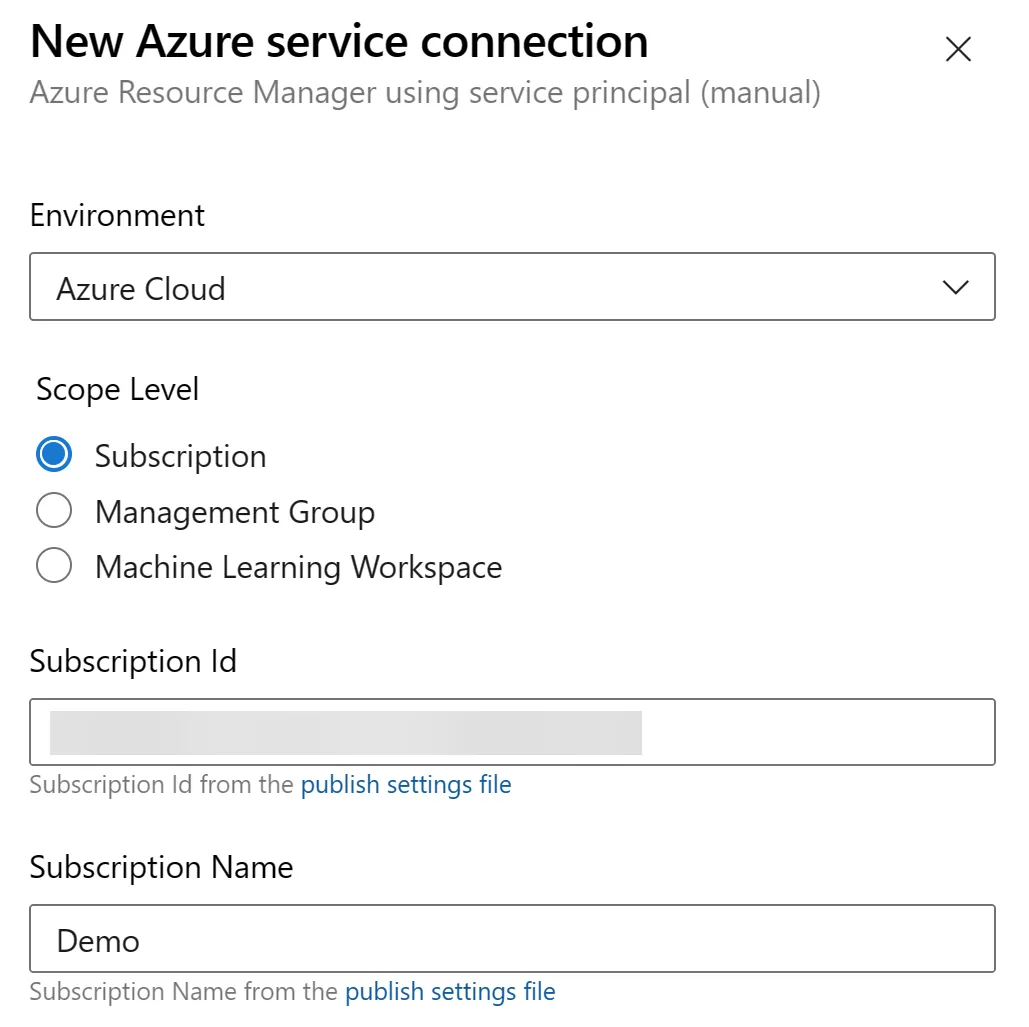
- Specify the following information for the connection:
- Environment: Select the cloud environment you are connecting to.
- Scope Level: Select the scope level for the service connection.
- Subscription Id: Enter the subscription Id that the service connection is deploying into.
- Subscription Name: Enter the subscription name that the service connection is deploying into.
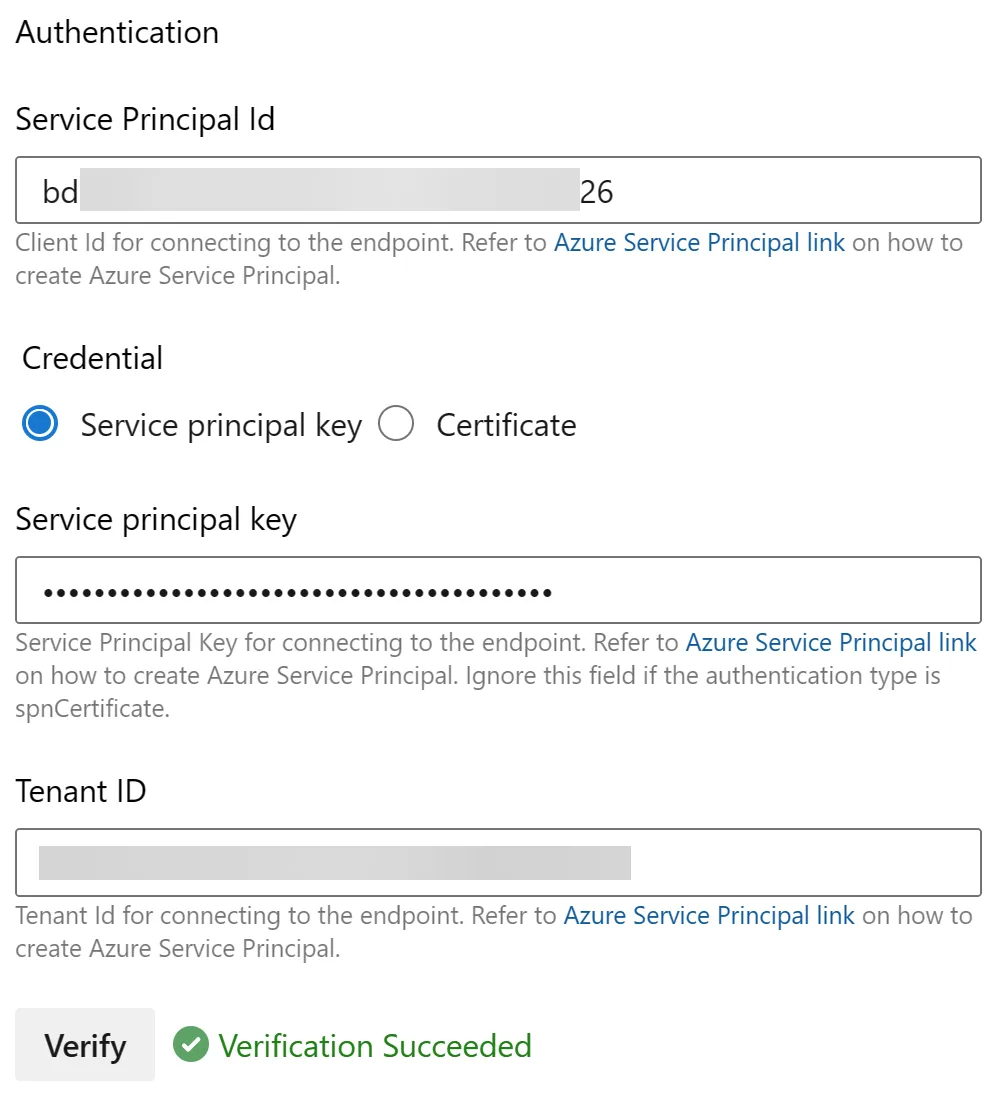
- Authentication: Enter the service principal Id, credential type (secret or certificate), and tenant ID. Select Verify to verify the connection.
- Details: Enter a service connection name, description (optional), and pipeline access option.
The manual method provides more administrator involvement in setting up the service principal, configuring the authentication method, and assigning permissions to the service principal, but this method provides more control to the administrator over the manual method.
The biggest takeaway from the manual method is you are responsible for managing and renewing the authentication credentials, such as creating a new secret key or certificate. You will then need to modify the service connection with this new information.
Service connection using workload identity federation
An Azure DevOps service connection using a service principal relies on a secret or certificate for authentication. These secrets and certificates have expiration dates, and, in the case of a manual configuration, rely on you to maintain those secrets.
Another option for authentication is workload identity federation. Workload identity federation uses OpenID Connect to authenticate with Azure resources without using secrets by configuring Entra ID to trust tokens from an external identity provider, such as Azure DevOps or GitHub. The external service exchanges trusted tokens for access tokens from Entra ID. These short-lived access tokens allow access to the Azure resources to which the external workload has been granted access.
Learn More: Connect GitHub and Azure using OpenID Connect | Jeff Brown Tech
Workload identity federation can create this trusted relationship using service principals or managed identities. You can also use an existing service principal created previously in this tutorial. The new service connection wizard does have automated creation options, but the remainder of this tutorial focuses on using an existing service principal or creating a managed identity.
Service principal
To use an existing service principal in your service connection using workload identity federation:
- Sign into your Azure DevOps organization at https://dev.azure.com.
- Select the Azure DevOps project where the service connection should live.
- In the project, select the Project settings icon in the lower left.
- In Project Settings, under Pipelines, select Service connections.
- If this is your first service connection, choose Create service connection, otherwise select New service connection.
- In the New service connection flyout, select Azure Resource Manager, then click Next.
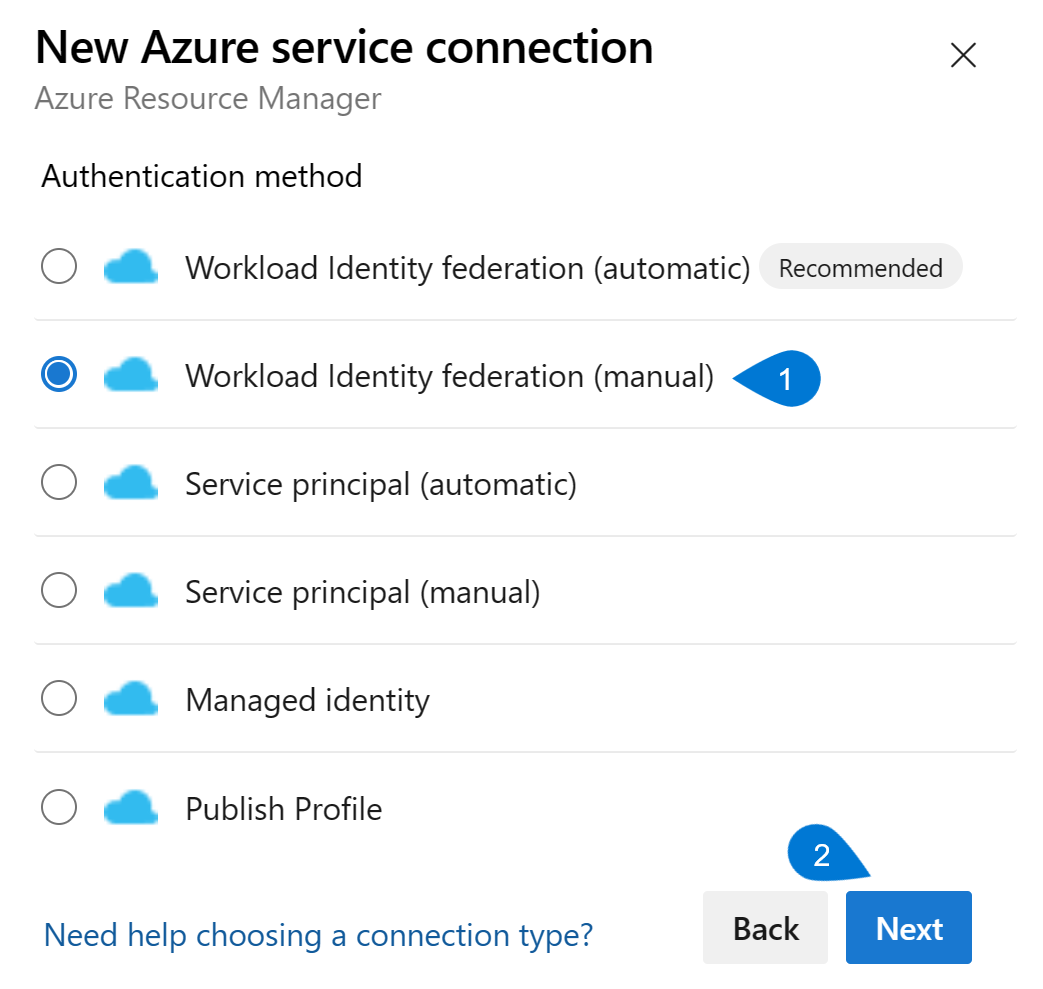
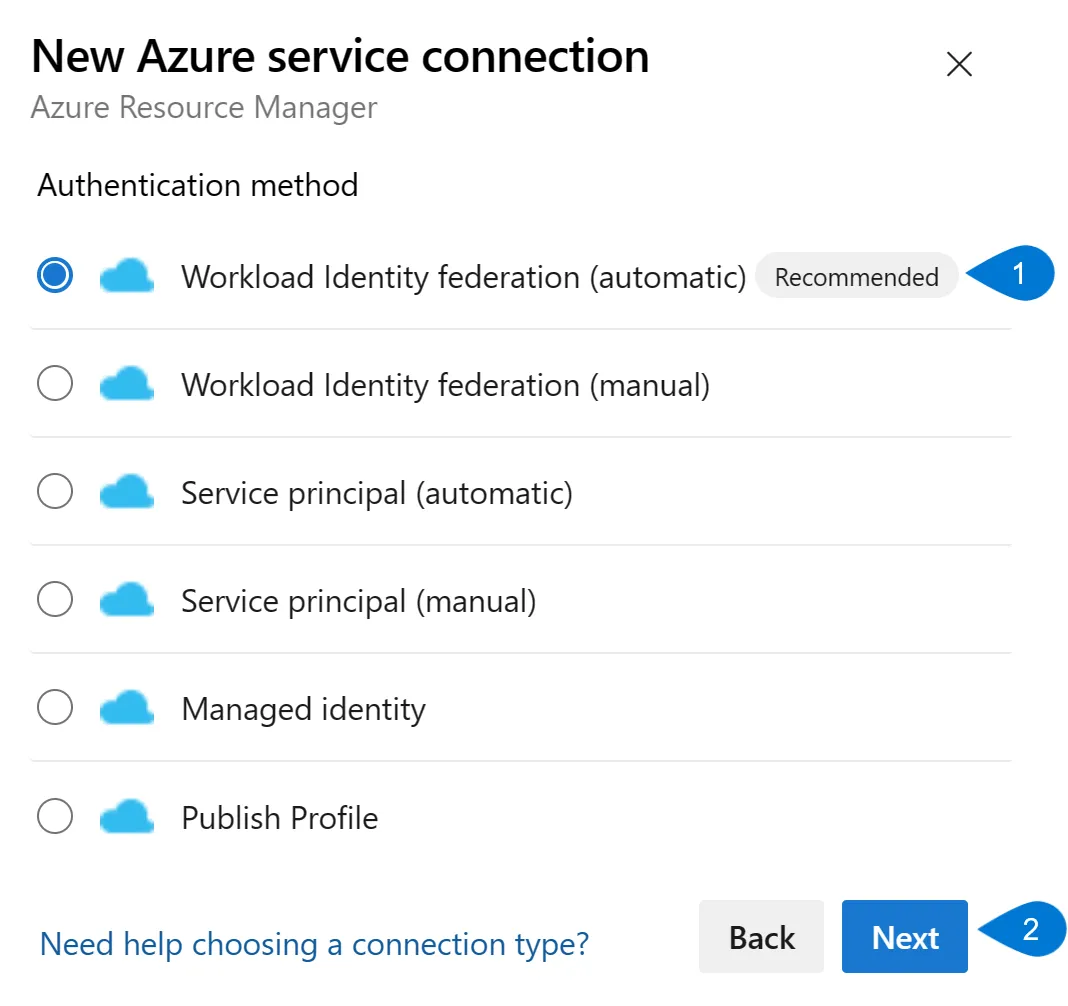
- On the Authentication method page, select Workload Identity federation (manual). Click Next.
- Enter a Service connection name and optional Description. Also, select if you want to grant permission to all pipelines. Click Next.
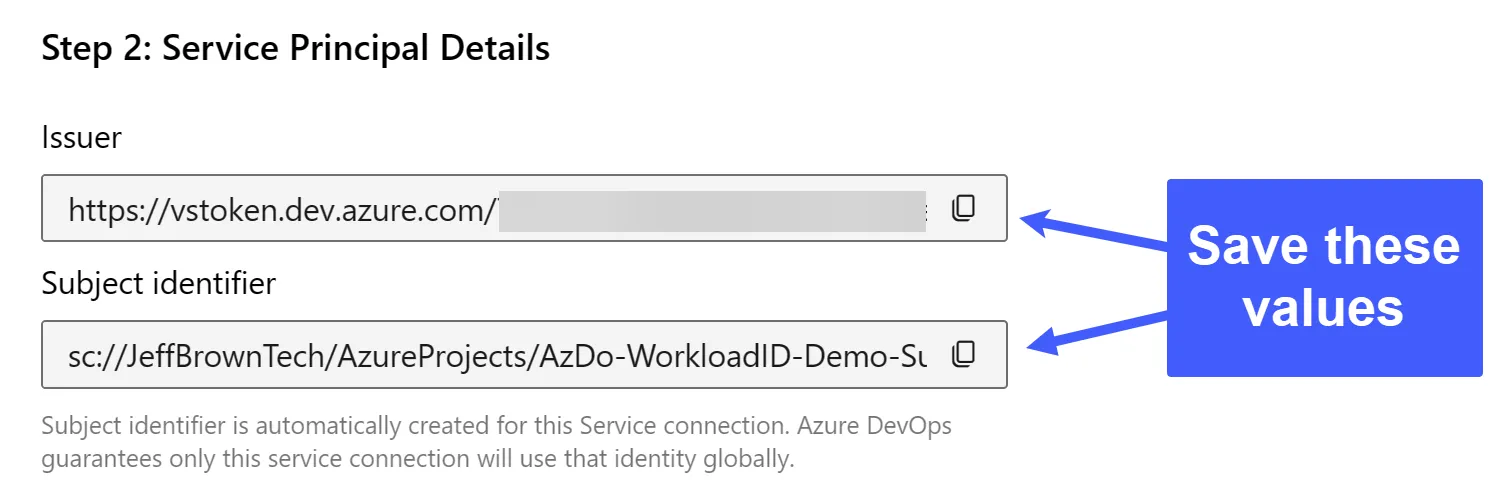
- On the Service Principal Details page, copy the values for Issuer and Subject identifier. You will need these in the next step for configuring the service principal.
- In Entra ID, navigate to the existing service principal you want to use for the service connection.
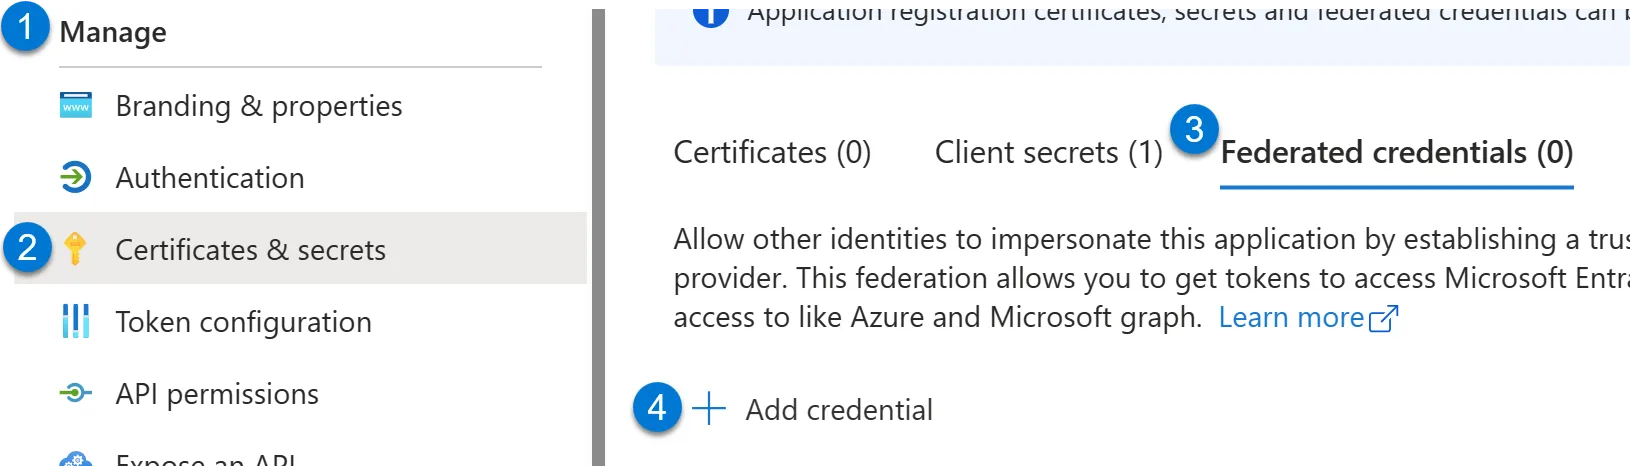
- Navigate to Manage > Certificates & secrets, then select the Federated credentials tab. Select Add credential.
- In the Add a credential page, select Other issuer for the Federated credential scenario. Paste the values saved from Step 9 for the Issuer and Subject identifier. Enter a credential name, then click Add.
- Back in the Azure DevOps service connection wizard, enter the Environment information, including Scope Level, Subscription Id, and Subscription Name.
- In the Authentication section, enter the existing Service Principal Id and the Tenant ID.
- Finish creating the connection by selecting Verify and save.

Managed identity
If you do not have an existing service principal that you want to convert to using workload identity federation, you can use a managed identity instead. A managed identity provides an identity for applications or services to authenticate within Azure without storing credentials.
To create a service connection with a managed identity using the automated method:
- Sign into your Azure DevOps organization at https://dev.azure.com.
- Select the Azure DevOps project where the service connection should live.
- In the project, select the Project settings icon in the lower left.
- In Project Settings, under Pipelines, select Service connections.
- If this is your first service connection, choose Create service connection, otherwise select New service connection.
- In the New service connection flyout, select Azure Resource Manager, then click Next.
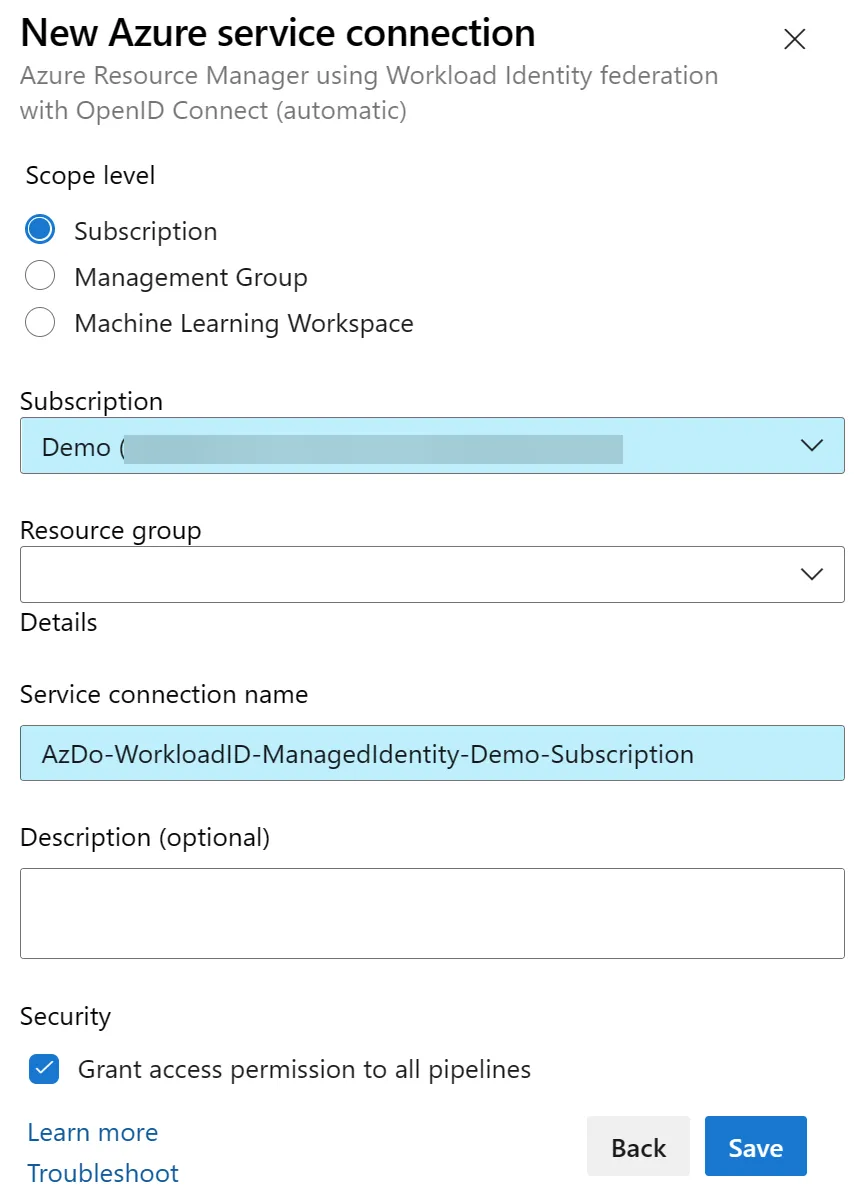
- On the Authentication method page, select Workload Identity federation (automatic). Click Next.
- Select the Scope level, Subscription, and optional Resource group. Enter a Service connection name and security option for pipeline access. Click Save.
The automatic method performs many of the same tasks as the automatic service principal method:
- Creates a managed identity using a pre-formatted name.
- Assigns contributor access to the managed identity to the subscription and optional resource group.
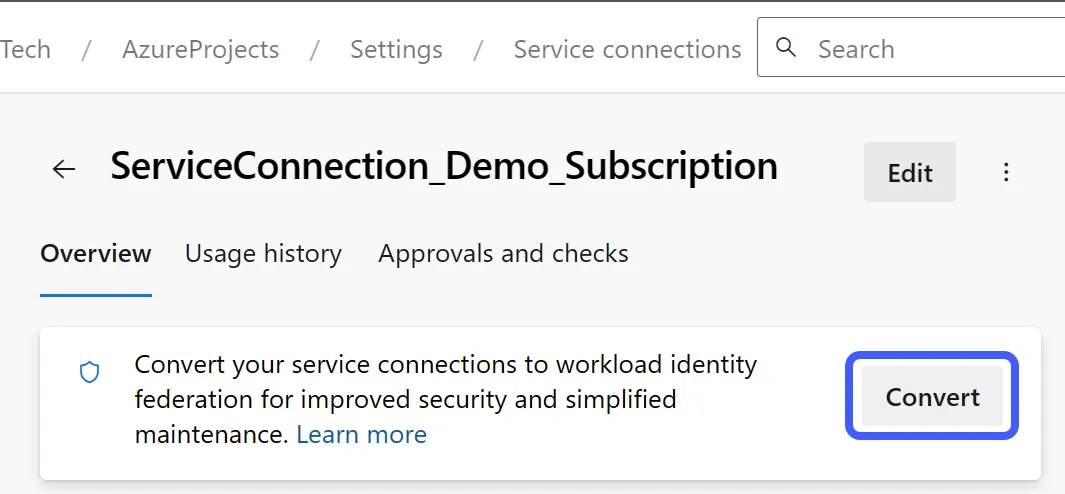
Convert to workload identity federation
You can also convert existing ARM service connections to use workload identity federation instead of a service principal. This conversion only applies to service connections originally created by Azure DevOps. If you created the service account manually, you cannot convert it, as Azure DevOps does not have permission to modify its credentials.
To convert a service connection:
- Navigate to the service connection for the project and select it to view its information.
- Select the Convert option within the service connection page.
- Azure DevOps will display a warning that secrets associated with the service connection will be deleted in 7 days. Click Convert.
Azure DevOps Service Connections Summary
Azure DevOps service connections are the key to connecting to external services for your pipeline deployments. If you use service principals, you will need to maintain secrets for authentication. However, the preferred method moving forward is to use workload identity federation, either with service principals or managed identities. If you have existing service principals using secrets, you can easily convert the service connections to use workload identity federation.
Additional Reading:
Connect to Microsoft Azure with an ARM service connection
