If you’re writing really long Terraform configurations deploying multiple components, you can break these out into smaller modules. If you are using Terraform modules, you might need to pass output from one module to the other.
In this post, you’ll learn what a module is, how to create a module and outputs, and how to reference module output as input to another module.
Check out more of my Terraform content here!
What is a Terraform Module?
First, let’s cover the basics. A Terraform module is a collection of configuration files that represent a single resource or multiple resources that are used together. You may have written a Terraform configuration file that deployed multiple cloud resources, like a network, public IP address, and virtual machine.
While you can define all these resources in a single configuration file, you can also break out different components into their own modules. For example, you have a module for deploying network components and a different module for deploying virtual machines. By separating out each resource configuration, you can standardize how each resource is created and easily share the module with others.
Creating the Root Module
If you’ve been creating Terraform configurations, you are already creating modules! Every Terraform configuration has at least one module called the root module. The root module is any .tf and/or .tf.json files stored in the main working directory.
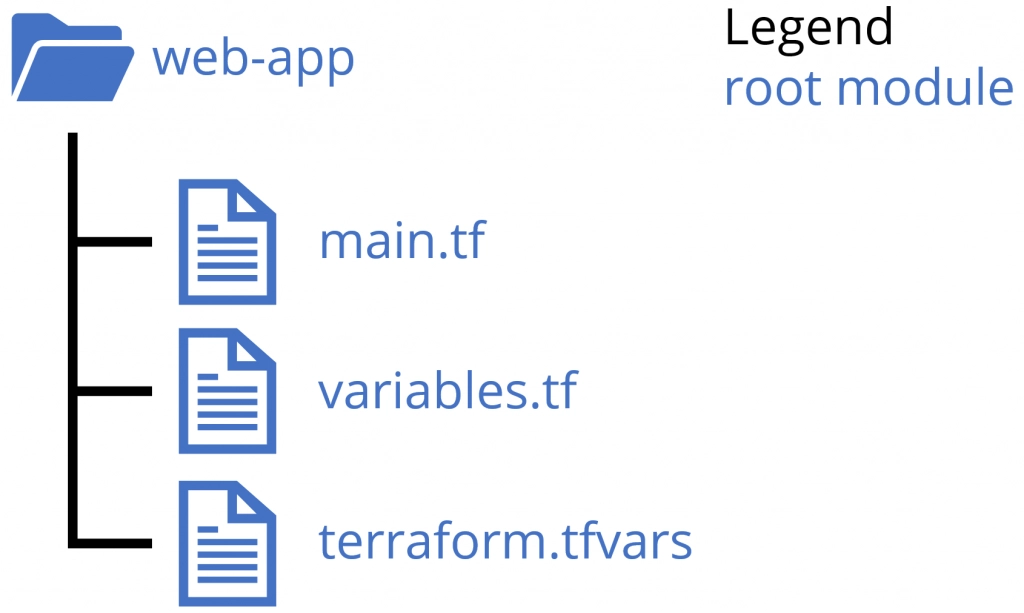
Let’s say you have a Terraform configuration saved in a root module folder named web-app consisting of three files:
- main.tf – used to define providers, remote backend state file.
- variables.tf – used to define input variables used in the configuration.
- terraform.tfvars – used to define values for input variables defined in variables.tf
The directory structure for this root module looks something like this:
Adding a Child Module
The root module can incorporate other modules called child modules into the root configuration. The root module calls the child module and includes the child module’s resources. You can call a child module multiple times within the same configuration, and multiple root configurations can use the same child module.
Terraform can load modules from the local filesystem or from a public or private registry. This article focuses on local filesystem modules.
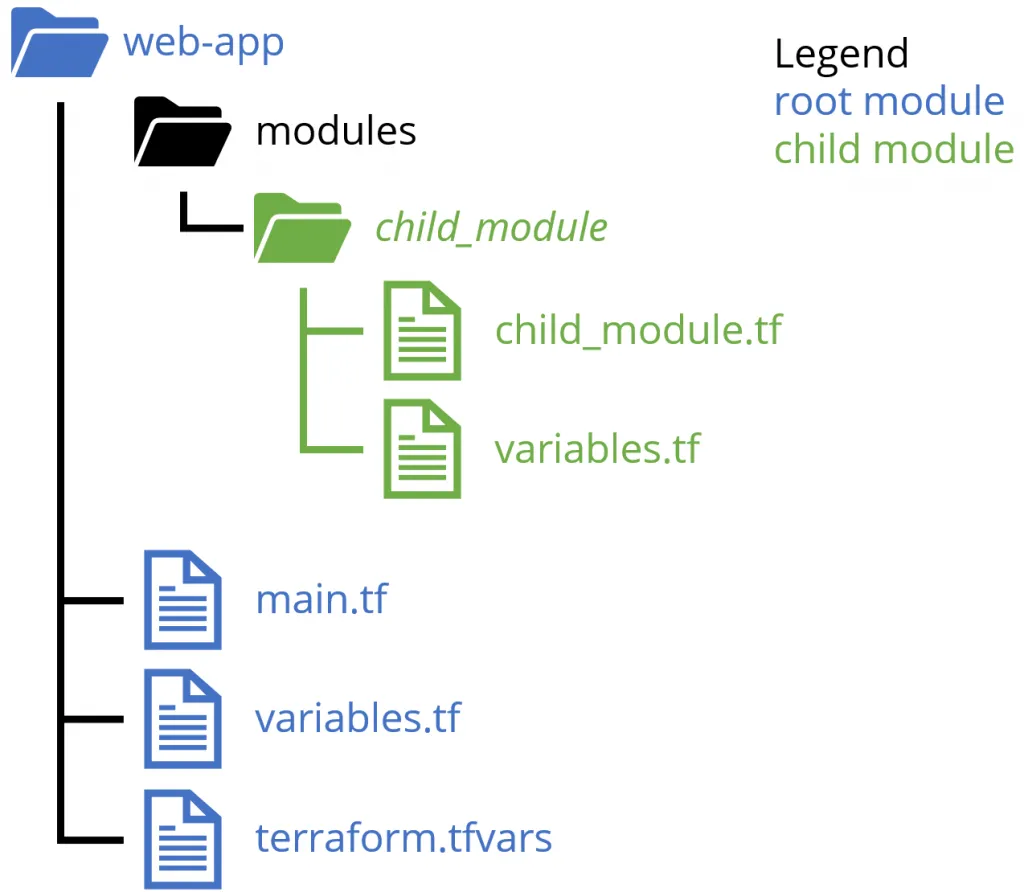
The child module can be stored in a directory outside of the root module. However, Hashicorp recommends storing nested modules inside a nested directory named modules. The modules sub-directory contains folders named for each child module, and each child module contains additional .tf files.
Here is the updated directory structure diagram showing the modules sub-directory and child modules. In the child module folders, the child_module.tf contains the code that deploys the resource, much like the main.tf file in the root module.
Working with Terraform Module Output
Module output represents resources found in a Terraform module. Both root and child modules can have outputs. Only root module output is displayed when running Terraform commands like plan or apply. When working with modules, outputs allow passing information from one module to another.
For example, say you have a child module that creates a virtual machine. This virtual machine has an IP address you need to use in another child module to create a firewall rule. From the virtual machine module, create an output for the IP address, then use the IP address as an input value for the firewall child module.
Below is an example of adding an output value to a Terraform configuration. Use the output keyword followed by an identifier for the output. For a root module, the identifier is displayed in the shell environment during the plan and apply commands. For a child module, you use the identifier to access the output’s value. In this example, the identifier is vmIPAddress.
Next, use the value argument and assign an expression to return. In this example, the expression references the private_ip_address attribute of an azurerm_linux_virtual_machine resource named server defined in the module (not shown).
output "vmIPAddress" {
  value = azurerm_linux_virtual_machine.server.private_ip_address
}
Creating Modules for Azure Storage Accounts
With a basic understanding of module structure and output, it’s time to create a Terraform configuration with multiple modules! The goal of this tutorial is to create modules and use the output from each module as input for the next. This tutorial creates a module for an Azure storage account and a storage account container.
Note: Creating individual modules for a storage account and a container is not practical in real life. You shouldn’t abstract every component out into separate modules like this. However, this tutorial uses this configuration as a way to demonstrate modules and output.
If you want to skip to looking at the completed code, check out the modules-output-example GitHub repository.
GitHub / JeffBrownTech / tf_module_output_example
In order to follow along with this tutorial, you will need:
- An Azure subscription with sufficient resource creation permission, like Owner or Contributor
- The latest version of Terraform availabile on your local system. This tutorial uses v1.0.0.
- A code editor, such as Visual Studio Code or equilvalent
- PowerShell v5.1 or higher. This tutorial uses v7.1.3.
- Azure CLI. This tutorial uses v2.25.0.
Creating the Root Module
To begin, create a root module that sets up the Azure provider, defines our variables, and creates the resource group to hold the resources. In a directory on your local system, create a folder named tf_modules_output_example. In this directory, create three Terraform files:
- main.tf
- variables.tf
- terraform.tfvars
Open all the files in your code editor. In the main.tf file, add the following code. The terraform block specifies that this configuration uses the azurerm provider to deploy Azure resources and sets the version requirements. The provider block set the azurerm provider features and settings.
Finally, the resource block defines the resource type (azurerm_resource_group) and the symbolic name (rg). The resource has two properties: name (var.resource_group_name) and location (var.location).
terraform {
  required_providers {
    azurerm = {
      source  = "hashicorp/azurerm"
    }
  }
}
provider "azurerm" {
  features {}
}
resource "azurerm_resource_group" "rg" {
  name     = var.resource_group_name
  location = var.location
}
Next, open the variables.tf file and add the three variable definitions (resource_group_name, location, and storage_account_name). All three variables are strings.
variable "resource_group_name" {
  type = string
}
variable "location" {
  type = string
}
variable "storage_account_name" {
  type = string
}
Finally, open the terraform.tfvars file and enter the variable names and their values. In this example, the resource group name is tfmoduledemo-rg, the location is WestUS2, and the storage account name is jbttfmoduledemo. Be sure to use different names for your configuration.
resource_group_name  = "tfmoduledemo-rg"
location             = "WestUS2"
storage_account_name = "jbttfmoduledemo"
Deploying the Root Configuration
With your root module configuration completed, it is time to deploy! In the following steps, you will log into Azure from PowerShell using the Azure CLI, then perform a Terraform initialization, plan, and deployment of the Azure resource group.
- In your PowerShell window, use the
az logincommand to authenticate to your Azure tenant. - Next, if necessary, use the
az account setto specify the Azure subscription to use during deployment. This example sets--subscriptiontoDemo.
az account set --subscription 'Demo'
- In the PowerShell window, navigate to the modules-output-example created in the previous section.
- In the root of the folder, run the following Terraform commands to initialize the providers and plug-ins, create a deployment plan, and deploy the planned configuration.
# Initialize the providers and plug-ins
terraform init
# Create a deployment plan
terraform plan -out tfplan
# Deploy the configuration
terraform apply tfplan
- Log into the Azure portal (https://portal.azure.com) and navigate to Resource Groups. Verify Terraform created the resource group and that the resource group is currently empty.
Creating the First Child Module
With the root module written and deployed, you can now start creating child modules. As mentioned previously, you will create two child modules for deploying a storage account and a container.
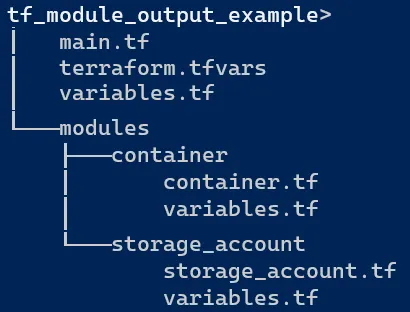
- In the root directory of your existing files, created a new directory called modules.
- In this new modules folder, create two additional directories for each child module named storage_account and container.
- In the storage_account child module directory, create the storage_account.tf and a variables.tf files.
- In the container child module directory, create the container.tf and a variables.tf files.
Here is what the directory structure should now look like:
Open the storage_account.tf and variables.tf files for the storage_account module. This module takes three inputs from the root module: resource_group_name, location, and storage_account_name. You still need to define these variables in the child module even though the variables are defined in the root module. The child module does not inherit variables from the root module. The variables defined here in the child module will be inputs from the main module later on.
Add the following code to the variables.tf file to declare these variables.
# storage_account variables.tf file
variable "resource_group_name" {
  type = string
}
variable "location" {
  type = string
}
variable "storage_account_name" {
  type = string
}
In the storage_account.tf file for the storage_account module, use the random_integer resource to create a 4-digit random number. You will append this random integer to the end of the storage_account_name variable to generate a unique storage account name. The min value is 1000 and max value is 9999.
# Define a random integer
resource "random_integer" "unique_id" {
  min = 1000
  max = 9999
}
Below this code, use the azurerm_storage_account resource to create a storage account. The name argument uses string interpolation of ${var.storage_account_name} and ${random_integer.unique_id.id} to create a final storage account name.
To continue the example, use the input variables to define the resource_group_name and location of the storage account. Finally, set the remaining properties of account_replication_type (LRS), account_tier (Standard), and min_tls_version (TLS1_2).
# Define the storage account properties
resource "azurerm_storage_account" "sa" {
  name                     = "${var.storage_account_name}${random_integer.unique_id.id}"
  resource_group_name      = var.resource_group_name
  location                 = var.location
  account_replication_type = "LRS"
  account_tier             = "Standard"
  min_tls_version          = "TLS1_2"
}
Finally, in the last part of the storage_account .tf file for the storage_account module, add an output definition for the storage account name property. Since this child module is generating the random integer to add to the end of the storage account name, you won’t know the full name of the storage account until Azure creates the resource. Adding an output returns the name back to the root module for use.
Note the name of the output is sa_name. You will use this name back in the root module when calling other child modules that require the storage account name. Once added, save all your changes.
# Create an output of the storage account name
output "sa_name" {
  value = azurerm_storage_account.sa.name
}
Back in the root module main.tf, add a module block using the module keyword that calls the storage_account module. In the module definition, set the source argument to the relative path of the storage_account directory (./modules/storage_account). Also, add each input variable and its value to pass to the storage_account module.
Note: The use of azurerm_resource_group.rg ensures that the sa module waits for Terraform to create the resource group prior to deploying the storage account. Read more about resource dependencies here:
Utilizing Terraform Resource Dependencies with Azure Examples
module "sa" {
  source = "./modules/storage_account"
  storage_account_name = var.storage_account_name
  resource_group_name  = azurerm_resource_group.rg.name
  location             = azurerm_resource_group.rg.location
}
With the first child module completed and added to the root module configuration, it is time to redeploy! Since you added a module to the configuration, you need to initialize Terraform again so it knows about the storage account module. After that, perform another plan and apply for the configuration.
# Initialize the providers and plug-ins
terraform init
# Create a deployment plan
terraform plan -out tfplan
# Deploy the configuration
terraform apply tfplan
Creating Another Child Module
Continue to the next child module by opening the container.tf and variables.tf files in the ./modules/container folder. Add the following code to the variables.tf file to define the incoming storage account name from the root module.
variable "storage_account_name" {
  type = string
}
In the container .tf for the container module, use the random_pet module to create a random pet name. Use the output of the random_pet resource for the name of the new container resource using azurerm_storage_container. Finally, create an output to send the new name of the container back to the root module.
# Create a random pet name
resource "random_pet" "random_name" {
  separator = "-"
}
# Create the container referencing the new random pet name
resource "azurerm_storage_container" "container" {
  name                  = random_pet.random_name.id
  storage_account_name  = var.storage_account_name
  container_access_type = "private"
}
# Send the name of the container back to the root module
output "container_name" {
  value = azurerm_storage_container.container.name
}
Back in the root module main.tf, add the following code to the end of the configuration. This code block adds another module referencing the container module. The module block references the name generated from the storage_account using the code module.sa.sa_name.
module "container" {
  source = "./modules/container"
  storage_account_name = module.sa.sa_name
}
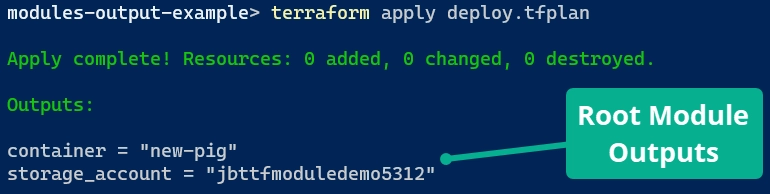
Finally, add outputs to show the name of the storage account and container since each module dynamically generated all or parts of those resource names. Outputs from child modules are not displayed as outputs in the main module. You need to explicitly create outputs in the main module if you want to output any child module outputs.
output "storage_account" {
  value = module.sa.sa_name
}
output "container" {
  value = module.container.container_name
}
Run your Terraform init, plan, and apply commands again. The root module outputs the results of the child modules. The screenshot below does not display any resource changes as the changes have already been applied.
Closing
In this article, you learned about Terraform modules, how to create modules, and how to use outputs from one module to another. Hopefully, this information helps you in developing your Terraform skills to the next level! Remember to check out the full code example here in my GitHub repository.