Do you have an on-premises file server or an application requiring using a file share you want to move to the cloud? Azure Files might be the solution for you! In this article, you will learn all about Azure Files, where you can use this cloud service, and how to create your first file share and mount it to a Windows server.
What is Azure Files?
Azure Files is fully managed file share in the cloud. You can find Azure Files in storage accounts, which also offer services like blob, queue, and table storage. Azure Files use the Server Message Block (SMB) or Network File System (NFS) protocols to match any of your workloads. Windows, Linux, and macOS clients can access SMB file shares while Linux and macOS clients can access NFS file shares.
You deploy Azure Files from a storage account, and storage accounts can host multiple file shares. The file share utilizes the same disk type as the storage account (Standard for hard disk-based (HDD) hardware or Premium for solid-state disk (SSD) hardware). Like a storage account, file shares have multiple tiers depending on the storage requirements.
- Cool: Optimized for online archive storage scenarios. The storage cost is lower but the transaction cost is higher.
- Hot: Optimized for general purpose file sharing scenarios. The storage cost is higher but the transaction cost is lower.
- Transaction optimized: Optimized for transaction-heavy workloads that don’t require premium-level latency. Recommended for applications that require file storage as a backend store.
- Premium: Only available in premium storage accounts.
The type of protocol available depends on the file share type and the storage account replication model. The table below outlines both SMB and NFS file shares and when the protocol is available for use.
Azure automatically encrypts file share data using server-side encryption (SSE). Data encryption and decryption actions are transparent using 256-bit AES encryption and FIPS 140-2 compliant. You cannot disable this encryption, but you can use your own keys to encrypt the data rather than the Microsoft-managed keys.
For more tips on how to secure Azure storage accounts, check out Securing Azure Blob Storage: Set-Up Guide.
You can take snapshots of your SMB file shares using the built-in Azure functionality. Snapshots are a point-in-time, read-only copy of the file share data. The snapshot can be read, copied, or deleted, and you can move individual snapshot files to a new storage account using a tool like AzCopy. Microsoft recommends using Azure file share backup as a backup solution for automating and managing your snapshots.
Azure Files have many advantages to use in your environment.
- Replace or supplement on-premises file servers: You can use Azure Files to replace or supplement your on-premises file servers or NAS devices.
- Application support: Azure Files can provide storage for applications requiring a file share to store file application or user data. On-premises applications can take advantage of cloud scalability and performance.
- Active Directory Authentication: SMB Azure file shares continue to work with Active Directory hosted on-premises for access control.
- Fully managed: Cloud storage removes the need to manage complex storage hardware or an operating system. No more patching the server operating system or replacing failing hard drives.
- Resiliency: Microsoft builds Azure Files on top of highly available and redundant systems.
While Azure Files provide many benefits, there are a few things to consider when implementing in your environment.
- Size limitations: By default, a file share is 5 TiB and 100 TiB when large file share featured is enabled.
- File system limitations: The maximum file size is 4TiB with a maximum concurrent request rate at 1,000 IOPS in a standard file share and up to 8,000 IOPS in a premium file share. There is also a 2,000 maximum concurrent handles limitation.
- SMB Protocol availability: Many organizations and internet service providers (ISPs) block port 445 used by the SMB protocol. While SMB 3.x is an Internet-safe protocol, you may need to modify existing policies and practices.
- File access limitations: Azure Files implements a quota of 2,000 simultaneous open handles on a single file. When you have more than 2,000 open handles, Azure responds with a message saying the quota has your request has exceeded the quota.
Pricing Azure Files
Azure Files has two billing models: provisioned and pay-as-you-go. The provisioned model is for premium file shares, including both SMB and NFS protocols using the FileStorage storage account kind. The pay-as-you-go model is for standard file shares deployed using the SMB protocol and the General Purpose v2 (GPv2) storage account kind.
Understanding the Provisioned Model
Azure bills premium file shares using the provisioned model, where you specify to the service what your storage requirements are. You provision the Azure file share with a specific amount of storage, and you pay for the entire storage amount regardless of whether you use it or not.
While you initially provision a file share to a set size, you can still dynamically scale the size up or down depending on your storage and IO performance characteristics. You can increase the size of the file share at any time, but you can only decrease the size 24 hours after the last increase.
Understanding the Pay-As-You-Go Model
In the pay-as-you-go model, you pay based on how much storage you are using and not based on a set provisioned storage size. You pay for the amount of data stored on a disk as well as an amount based on the usage or transactions of the data.
The pay-as-you-go model is more cost-efficient as you don’t need to over-provision to account for future growth or performance requirements like you would in a provisioned model. However, since you cannot fully predict how much data you will store or how much you will access the data, pay-as-you-go can be difficult to budget.
Planning with Storage Capacity Reservations
Azure Files also support storage capacity reservations. This billing method achieves a discount by pre-committing to a storage reservation for one year or three years. The reservation provides a specific storage capacity for the reservation term.
Capacity reservations are suitable for any production workload or a development or test workload with a consistent storage footprint. If you use more than what you have reserved, you pay the list price for the balance not covered by the capacity reservation. If your storage capacity is not consistent or widely variable, capacity reservations are not a good idea.
Other Factors Affecting Pricing
Besides the two pricing models, other factors affect the pricing of your Azure Files deployment.
The first factor is redundancy. Azure file shares store multiple copies of each file as Azure writes the file. Azure provides four different redundancy options, each more expensive than the previous:
- Locally Redundant (LRS): Every file is stored three times within an Azure storage cluster in the same data center.
- Zone Redundant (ZRS): Every file is stored three times across three different Azure storage clusters. Azure physically isolates the file into different availability zones or datacenters within an Azure region.
- Geo-redundant (GRS): Every file is stored three times within an Azure storage cluster in a primary region. Azure then asynchronously replicates the file to a Microsoft-defined secondary region. GRS provides six copies of the file across two Azure regions. GRS is like having LRS in two different regions.
- Geo-zone Redundant (GZRS): Every file is stored across three Azure storage clusters and then asynchronously replicated to three distinct storage clusters in a Microsoft-defined secondary region. GZRS is like having ZRS in two different regions.
Another factor is transactions and data transfers. Transactions are requests to upload, download, or manipulate the contents of data in the file share. Transaction pricing varies based on the data tier you are accessing and whether a premium or standard file share backs Azure Files.
Azure Files Deployment
With an understanding of Azure Files complete, it is time to create your first file share! In this tutorial, you will create a storage account, a file share, and map the file share to a Windows Server 2019 instance.
To follow along with this tutorial, you will need:
- Access to an Azure tenant and sufficient administrator credentials, like Owner or Contributor.
- A Windows Server 2019 server (or equivalent Windows-based operating system).
Step 1: Create a Storage Account
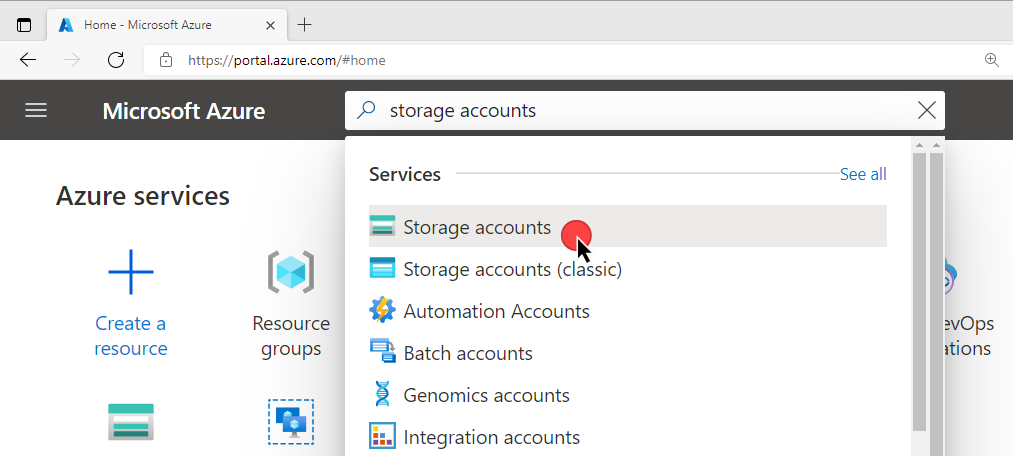
On the Azure portal homepage, search for storage accounts in the search bar, and select the Storage accounts service in the results.
In the storage account resource window, select + Create to start the storage creation wizard. On the Basics, select the subscription (Demo) and resource group (rg-filesharedemo) to hold the storage account.

In the Instance details section, enter a globally unique name for the storage account name (azfileshareprod01) and choose a region to host the storage account (WestUS2). Next, select the performance (Standard for HDD, Premium for SSD) and the redundancy option (LRS).
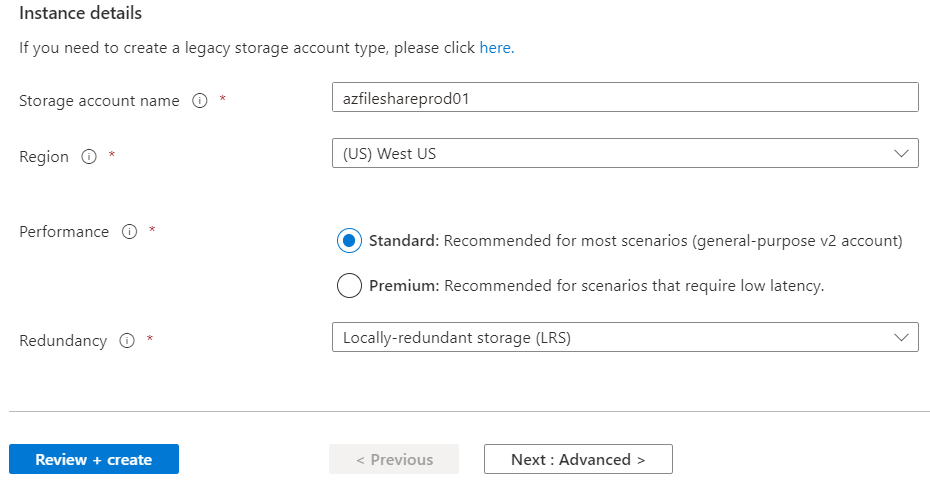
Once all options are configured, select Review + create. Once the validation passes with a green checkmark, select Create to create the storage account. When Azure completes the deployment, select Go to Resource.
Check out this ARM template tutorial where you deploy a storage account using an ARM template.
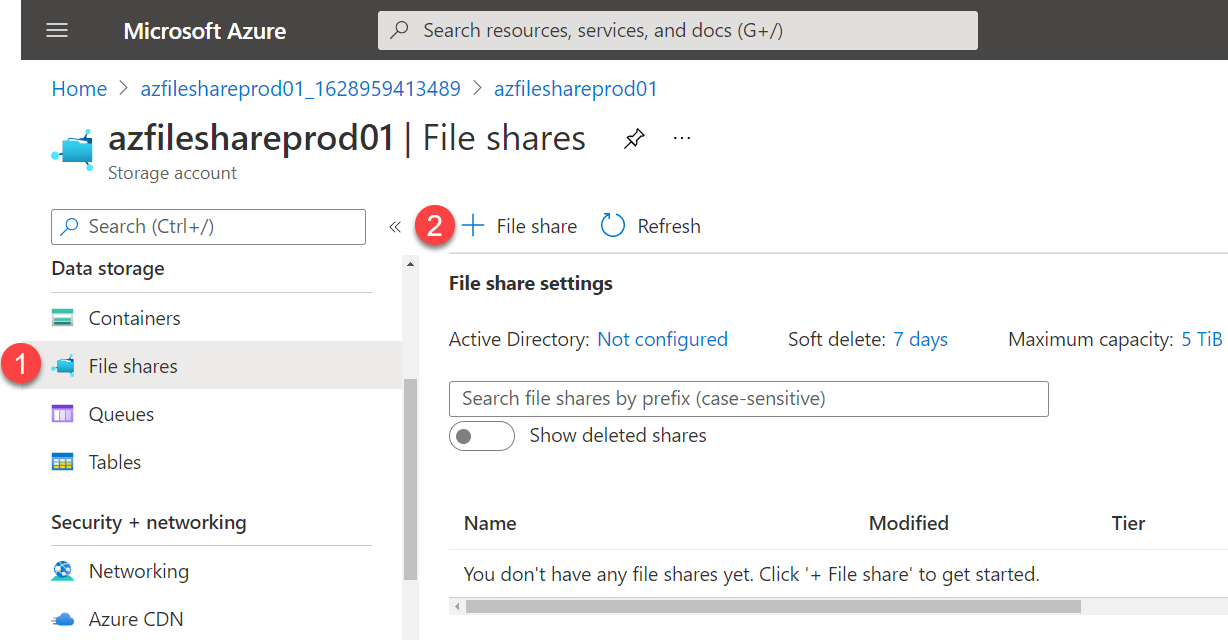
In the storage account resource window, on the left sidebar, navigate to Data Storage, then select File shares. In the file share pane, select + File share to create a new file share.
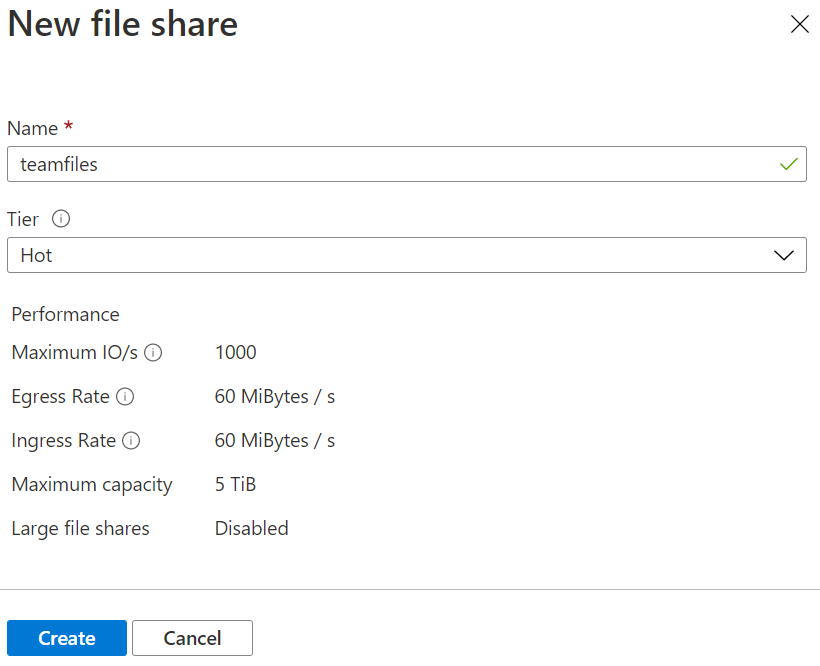
In the New file share flyout window, enter a name for the file share (teamfiles) and select the performance tier (Hot). With all the options configured, select Create.
With the file share created, you can now connect the share to your server! In the storage account under Data storage > File shares, select the file share created in the previous step to access its properties.
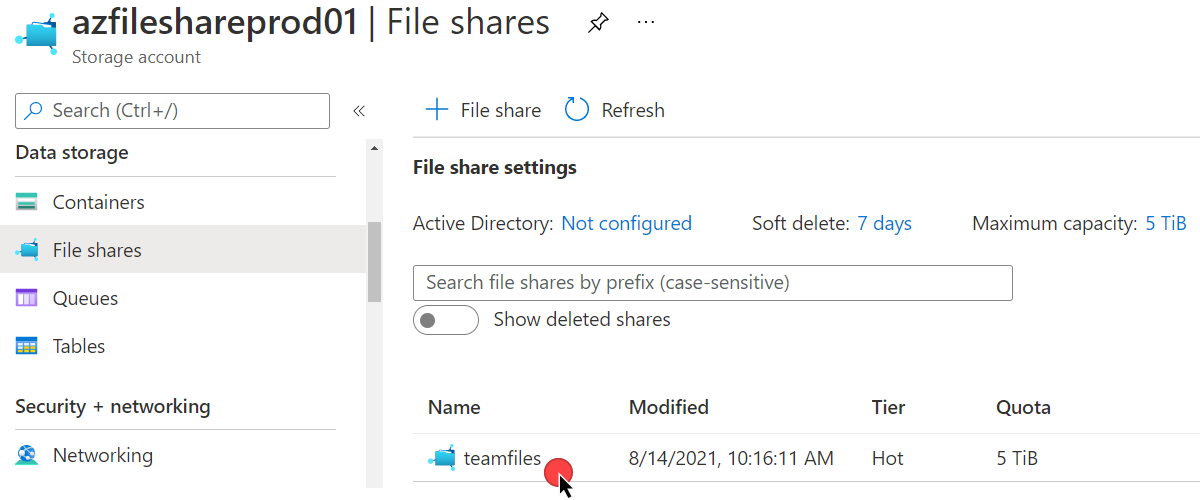
In the file share Overview section, the menu has several options for managing your file share. You can upload files directly to the share from the Azure portal, add directories, change the performance tier, or edit the quota.
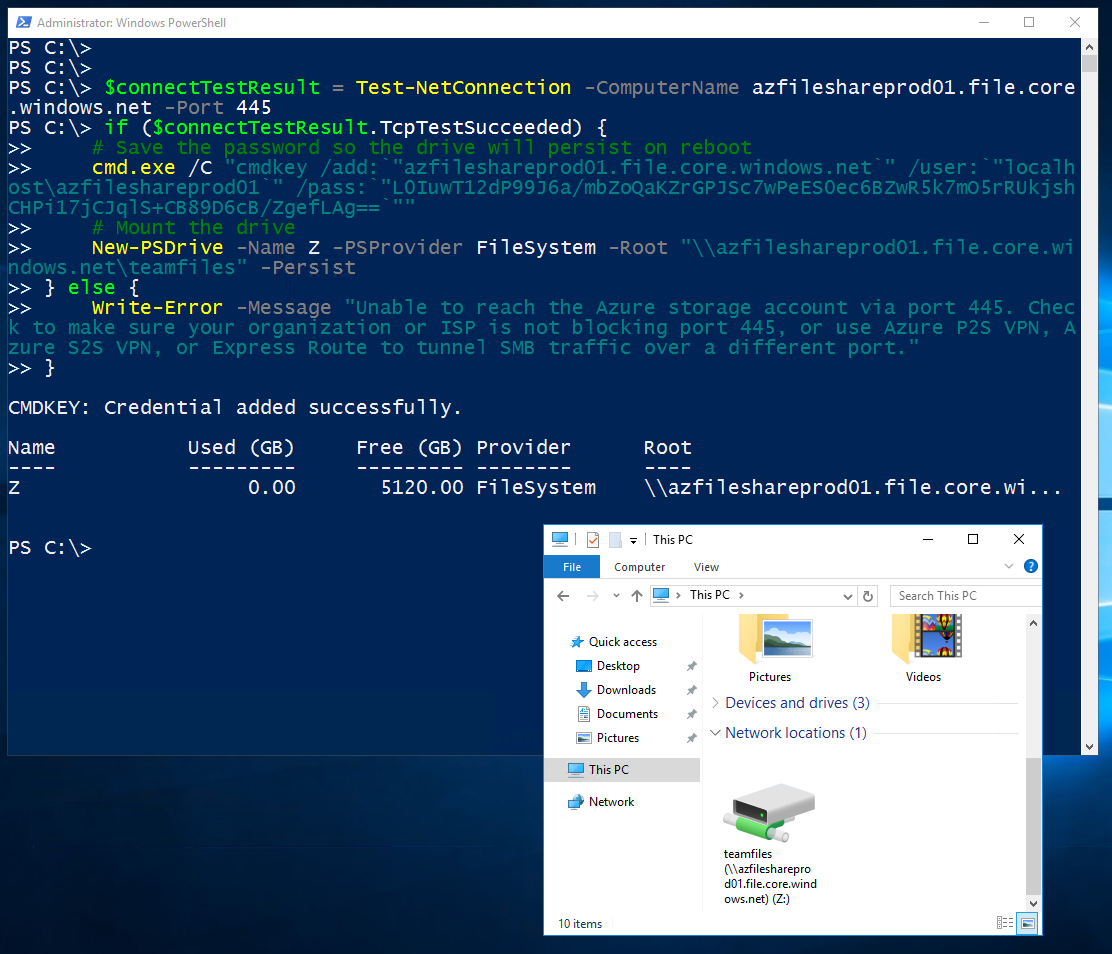
To connect to a server, select the Connect menu option. A flyout window appears with instructions on how to connect the file share to Windows, Linux, or macOS. Ensure the Windows option is selected, then choose the drive letter (Z) and authentication method (Storage account key).
Next, Azure displays PowerShell code that you can use to map the file share automatically. The code checks whether the server can connect to the file share URI over port TCP 445. If that test is successful, PowerShell saves the storage account key to the local system so the drive will stay mapped between reboots. Finally, the script uses the New-PSDrive command to map the file share.
Copy this connection script as you will need it when mapping the drive on the server.

Next, log onto the Windows server where you want to map the file share. Open a PowerShell window and paste the script copy earlier (you may need to hit Enter after the last line). If successful, the server will connect to the file share. Open Windows Explorer to verify the connection.
Congratulations! You just created and mapped your first Azure file share!
Azure Files FAQ
What is Azure Files?
Azure Files is fully managed file share in the cloud. Azure Files are a component of storage accounts.
What port does Azure Files use?
Azure file shares built using the SMB protocol use port 445.
You can mount Azure file shares on Windows, Linux, and macOS operating systems.
Closing
Azure Files is a great way to start your transition from on-premies to the cloud. File shares are easy to set up and configure, and you can mount them on multiple platforms. Most of all, your files are now backed by the highly available and redundant Azure cloud.
