PowerShell commands can have lots of parameters. It can be difficult typing all of them out with their values or using backticks to perform line continuation. Sounds like a case for PowerShell splatting!
In this article, you will learn about PowerShell splatting, how to implement splatting in your scripts and functions, and improvements made in PowerShell 7.
What is PowerShell Splatting?
PowerShell Splatting is an alternative to listing each parameter and value alongside the command. Splatting works by creating a collection of parameter names and values. You store the collection in a variable that you later pass to the command.
Splatting makes commands shorter and easier to read. You can use the same splatting value against different commands and avoid making multiline commands using excessive backticks (`).
You store the parameter values in a regular variable using the traditional dollar sign ($). When passing the variable collection to the PowerShell command, you use the same variable name but with an At sign (@) instead of a dollar sign.
Syntax
Here is the basic syntax for using splatting. You use the regular PowerShell command (<CommandName>) followed by the variable name indicating the splatted values (@<SplattedValues>). Not all parameters need to be included in the splat. You can pass other parameters (<parameters>) before or after the splat.
<CommandName> <parameters> @<SplattedValues> <parameters>
You define the PowerShell splatting object using two methods: hashtables and arrays.
Using Hash Tables
You use a hash table to define parameter names and values using key/value pairs. The key is the parameter name along with its value. These key/value pairs are contained in a block define using an At sign (@) and curly brackets { }.
Here is an example syntax for defining a splat using a hash table:
$argHashTable = @{
    <parameter> = <value>
    <parameter> = <value>
}
Note: The At symbol (@) in the above example defines a hash table and does not have anything to do with the splatted value.
Let’s look at an example using the New-Item command. This command creates new files or directories on the file system. Some common parameters include -Path for specifying the location of the new item, -Name for the new item name, and -ItemType which accepts values like File, Directory, or SymbolicLink.
Here is a hash table creating a new file in C:temp with the name errors.log. Then use the splatted value with the New-Item command, swapping the variable’s dollar sign ($) with an At sign (@).
$argHashTable = @{
    "Name" = "errors.log"
    "Path" = "C:temp"
    "ItemType" = "File"
}
New-Item @argHashTable
As mentioned earlier, you do not need to define all the parameter names and values in the hash table. You can pass additional parameters with the command. For example, when creating a file like you just did, you can use -Value to add content to the file.
Use the same hash table from the previous example and add the -Value parameter to pass a string to the file.
New-Item @argHashTable -Value "Error! The program did not install."
While using key/value pairs is excellent for parameters with values, what about switch parameters? You still specify the name of the switch parameter as the key, then use $true or $false as the value. For example, if you want to add -WhatIf to the command, set the value to $true.
$argHashTable = @{
    "Name" = "errors.log"
    "Path" = "C:temp"
    "ItemType" = "File"
    "WhatIf" = $true
}
New-Item @argHashTable
Using Arrays
You can also use arrays when dealing with positional parameters. Positional parameters do not require parameters names as the PowerShell command accepts values in a specific order.
For example, the Rename-Item command has two parameters you can use, -Path at position 0, and -NewName at position 1. Both of these commands are equivalent and have the same effect:
# Using named parameters
Rename-Item -Path errors.log -NewName errors-archived.log
# Using positional parameters
Rename-Item errors.log errors-archived.log
Since an array is just a collection of objects in a specific order, you define an array containing the value of the parameters in the same order. For example, here is an array with errors.log at index 0 and errors-archived.log at index 1, matching the positional parameters -Path and -NewName respectively. Note that when using the array splatted value, you still use the At symbol (@).
# Define array with values in the correct positions
$argArray = "errors.log", "errors-archived.log"
# Call the command using the splatted value
Rename-Item @argArray
Override Splatted Parameter Values
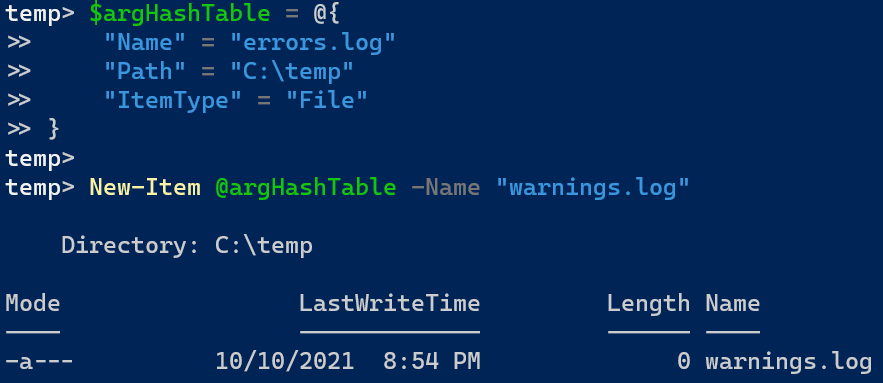
In PowerShell 7.1, you can override splatted parameters in line with the command. Going back to the New-Item example, change the file’s name from what is in the hash table (errors.log) to warnings.log when calling the command.
$argHashTable = @{
    "Name" = "errors.log"
    "Path" = "C:temp"
    "ItemType" = "File"
}
New-Item @argHashTable -Name "warnings.log"
Scripting with PowerShell Splatting
Splatting using a hash table can make your scripts more dynamic. You define a hash table with the parameter names and values, then update those depending on other conditions in the script.
Here is an example of creating a storage account depending on the environment. The script has three parameters: $StorageAccountName, $ResourceGroup, and $Environment that only accepts “Dev”, “Test”, and “Prod” as values.
[CmdletBinding()]
param (
    [Parameter(Mandatory)]
    [string]
    $StorageAccountName,
    [Parameter(Mandatory)]
    [string]
    $ResourceGroup,
    [Parameter(Mandatory)]
    [ValidateSet("Dev", "Test", "Prod")]
    [string]
    $Environment
)
Next, create a hash table to store parameters and values for creating the storage account. The first two parameters are known from the script parameters: AccountName and ResourceGroupName. The other two parameters, Location and SkuName, will later depend on the value of $Environment.
$stgAcctArgs = @{
    "AccountName" = $StorageAccountName
    "ResourceGroupName" = $ResourceGroup
    "Location" = $null
    "SkuName" = $null
}
Finally, use a switch() statement to test against the $Environment variable with three conditions for “Dev”, “Test”, and “Prod”. Each condition block updates key/value pairs in the hash table, like appending to the storage account name, setting the location, and configuring the storage account SKU.
Note that the “Prod” condition even adds new information to the hash table! This action means you don’t have to define the hash table with every key/value pair you need. You can add (or even remove) key/value pairs based on different conditions in the script. In this example, for “Prod”, you ensure the storage account only uses HTTPS traffic and the minimum TLS version is 1.2.
Finally, pass the splatted value to the New-AzStorageAccount command to create the storage account.
switch ($Environment) {
    "Dev" {
        $stgAcctArgs.AccountName += "dev"
        $stgAcctArgs.Location = "westus"
        $stgAcctArgs.SkuName = "Standard_LRS"
        break
    }

    "Test" {
        $stgAcctArgs.AccountName += "test"
        $stgAcctArgs.Location = "eastus"
        $stgAcctArgs.SkuName = "Standard_LRS"
        break
    }
    "Prod" {
        $stgAcctArgs.AccountName += "prod"
        $stgAcctArgs.Location = "southcentralus"
        $stgAcctArgs.SkuName = "Premium_LRS"
        $stgAcctArgs.EnableHttpsTrafficOnly = $true
        $stgAcctArgs.MinimumTlsVersion = "TLS1_2"
        break
    }
}
New-AzStorageAccount @stgAcctArgs
Here is an example of calling the script to create the storage account:
Create-AzureStorageAccount.ps1 `
    -StorageAccountName "myStorageAccount" `
    -ResourceGroup "rg-storageaccounts" `
    -Environment "Prod"
To see the entire script, check it out in the GitHub repository below. You can add more storage account parameters to the hash table for further customization!
GitHub | JeffBrownTech | powershell-splatting-example | Create-AzureStorageAccount.ps1
Closing
In this guide, you learned what PowerShell splatting is, the different ways to define a splat (hash table and array), and how to implement splatting in a PowerShell script. How will you implement splatting in your next PowerShell endeavor? Leave a comment below!
Enjoyed this article? Check out more of my PowerShell content here!
