PowerShell scripting empowers the IT administrator to automate tasks and streamline operations within the PowerShell environment. It offers a robust solution for efficiently executing complex tasks.
This article explores executing scripts, the role of variables, string interpolation, working with parameters, controlling script flow, and implementing error handling to enhance the effectiveness of PowerShell scripts.
To follow along with this tutorial, you will need any version of PowerShell installed, but preferably use v5.1 or higher.
Executing a PowerShell Script
You can use the “dot sourcing” method to run a script from the PowerShell console. This involves using the dot operator followed by the path to the script file. For example, if your script file is in the current directory, you can run it by typing .\myScript.ps1 in the console. This method allows you to execute the commands and instructions in the script file within the current PowerShell session.
Another way to run a script is by specifying the full path to the script file. This can be done by typing the full path in the console, such as C:\Scripts\myScript.ps1. This method allows you to run the script from any location on your computer.
Before continuing the tutorial, create a file named myScript.ps1 and open it in an editor like Visual Studio Code. If using Visual Studio Code, You should also install the PowerShell extension to assist in developing PowerShell scripts. The extension provides IntelliSense and applies formatting to your code.
Variables
Variables are crucial in PowerShell scripting, as variables allow you to store and manipulate data. Variables in PowerShell are designated by a dollar sign ($) followed by the variable name.
For instance, you can define a variable called “name” and assign it the value “Jeff” like this:
$name = "Jeff"
Once defined, you can use the variable $name throughout your script to refer to the value “Jeff”.
Compare the two different code examples with and without using the $name variable. Add the following code to myScript.ps1 created earlier in the tutorial. This code references my name “Jeff” in the hello and goodbye messages.
"Hello, Jeff!"
"The current date and time is:"
Get-Date
"Goodbye, Jeff!"
However, if you need to run this script for someone other than Jeff, you must change the name in both messages. Imagine doing this in a script with hundreds of lines of code and dozens of references!
To make this easier, define a variable called $name with the value of your name. Substitute the names in the hello and goodbye messages with the variable name. The script output displays the variable contents, and you can update the script with a new name by changing the variable value. Rerun the script and see the results where PowerShell displays the $name value in the messages.
$name = "Jeff"
"Hello, $name!"
"The current date and time is:"
Get-Date
"Goodbye, $name!"

String Interpolation
String interpolation allows you to embed the values of variables and expressions directly into a string. The behavior of string interpolation differs between single-quoted strings (') and double-quoted strings (").
Single-quoted strings do not allow for interpolation. PowerShell treats the string as a literal string and displays the content exactly as shown. For example, set the $name variable again and use single quotes to display the hello message. PowerShell does not show the $name variable value.

However, changing the message to double quotations allows PowerShell to expand the variable’s contents. PowerShell inserts the variable value into the string.

In myScript.ps1, the $name variable is enclosed in double quotations, which allowed PowerShell to expand its value and display the name in the hello and goodbye messages.
Parameters
In addition to variables, PowerShell scripting allows you to work with parameters. Parameters allow you to pass values into a script or function, making your scripts more versatile and customizable.
To define a parameter in PowerShell, you need to specify its name and data type within the parentheses of the script or function declaration. For example, you can define a parameter called $Name of type [String] like this:
param(
    [string]
    $Name
)
This definition allows you to pass a value for the $Name parameter when executing the script or function. Update myScript.ps1 to include the $Name parameter, and update references in the hello and goodbye messages.
param(
    [string]
    $Name
)
"Hello, $Name!"
"The current date and time is:"
Get-Date
"Goodbye, $Name!"
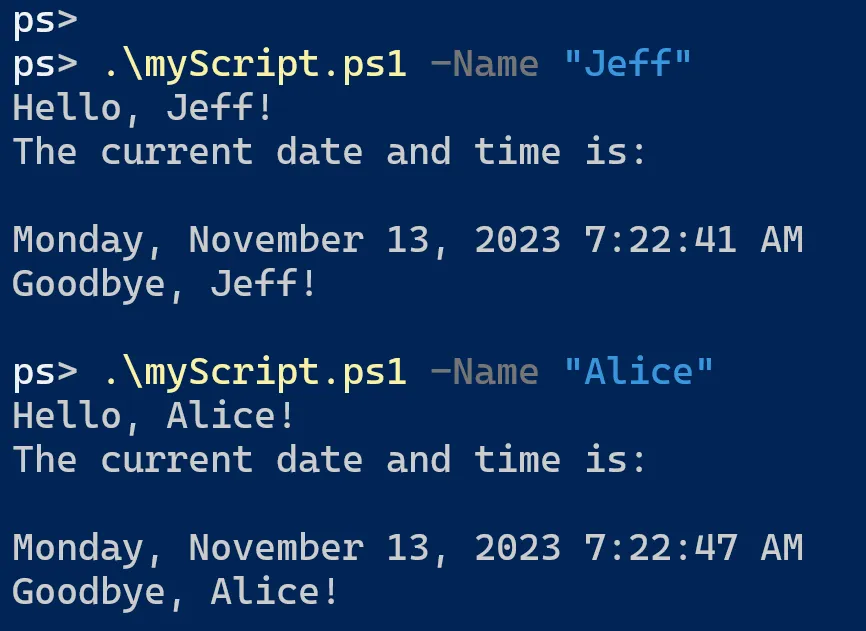
Execute the script by calling .\myScript.ps1 along with the -Name parameter value. In fact, call it multiple times with different values to see the script output change!
.\myScript.ps1 -Name "Jeff"
.\myScript.ps1 -Name "Alice"
Optional vs. Mandatory Parameters
By default, parameters are optional, meaning they do not require a value to be provided. However, you can make a parameter mandatory by using the Parameter() attribute. The Parameter attribute is used to add features to the parameter definition.
The syntax for making the parameter mandatory is [Parameter(Mandatory=$true)]. This attribute ensures that the user must provide a value for the parameter when running the script or function.
Here is the updated myScript.ps1 file making the $Name parameter mandatory.
param(
    [Parameter(Mandatory)]
    [string]
    $Name
)
"Hello, $Name!"
"The current date and time is:"
Get-Date
"Goodbye, $Name!"
Note: [Parameter(Mandatory=$true)] and [Parameter(Mandatory)] are equivalent for configuring the mandatory parameter.
In addition to making parameters mandatory, you can also validate the user’s input. PowerShell offers various validation attributes that allow you to define constraints on parameter values. For example, you can use the “[ValidateRange()]” attribute to specify a range of acceptable values for a numeric parameter.
Read more about validating parameter input at Validating Parameter Input.
Leveraging parameters in your PowerShell scripts can create more interactive and user-friendly tools. Parameters allow users to customize the behavior of your scripts without modifying the script code itself. Whether you need to prompt for user input, validate input values, or make certain parameters mandatory, PowerShell provides the flexibility and control you need to build robust and efficient scripts.
Controlling Script Flow
In PowerShell scripting, it is essential to have control over the flow of your scripts. Flow control allows you to make decisions and execute specific actions based on certain conditions. A common flow control method is the if statement.
Learn about a different type of flow control in PowerShell 7 Ternary Operator: Introduction & Examples!
If statements provide a way to execute different code blocks based on a condition. The syntax for an if statement is as follows. Note the if statement has a condition, meaning something you want to test to see if it is true or false. If the condition is true, then PowerShell executes the code in the first statement block. If the condition is false, then PowerShell executes the code in the second statement.
if (<condition = true>) {
    <code to execute if condition matches>
}
else {
    <code to execute if condition does not match>
}
By using if statements, you create scripts that perform different actions depending on the values of variables or other conditions. This flexibility allows you to build more dynamic and responsive scripts.
Let’s add an if statement to check the time of day to customize the greeting message. There are three conditions to check followed by a default response.
- If the hour is between 5 and 11, then say “Good morning”.
- If the hour is between 12 and 16, then say “Good afternoon”.
- If the time is between 17 and 22, then say “Good evening”.
- Otherwise, say “Good night”.
Here is the updated myScript.ps1 to reflect the changes above. Notice how you can check multiple conditions in a single if statement using comparison operators like greater than or equal to (-ge) and less than or equal to (-le).
Read more about different comparison operators in about_Comparison_Operators.
Note that you can continue adding elseif statements to check conditions multiple times. We also save the current date and time to a variable named $now and check the Hour property for the time of day.
param(
    [Parameter(Mandatory)]
    [string]
    $Name
)
$now = Get-Date
if ($now.Hour -ge 5 -and $now.Hour -le 11) {
    "Good morning, $Name!"
}
elseif ($now.Hour -ge 12 -and $now.Hour -le 16) {
    "Good afternoon, $Name!"
}
elseif ($now.Hour -ge 17 -and $now.Hour -le 22) {
    "Good evening, $Name!"
}
else {
    "Good night, $Name."
}
"The current date and time is:"
$now
Here is the script output multiple times throughout the day showing the different messages.

Error Handling
In PowerShell scripting, error handling is crucial to writing robust and reliable scripts. Errors can occur for various reasons, such as invalid input, network issues, or file access problems. To handle these errors effectively, PowerShell provides the try/catch/finally blocks.
The try/catch/finally blocks allow you to handle exceptions that may occur during the execution of your script. The try block contains the code that may throw an exception. If an exception occurs, it is caught by the catch block, where you can specify the actions to take to handle the exception. This can include displaying an error message, logging the error, or performing any necessary cleanup tasks.
The finally block is optional and is used to specify code that will always execute, regardless of whether an exception occurred. This block is commonly used to release resources or perform cleanup operations.
try {
    # code that may throw an exception
}
catch {
    # code to handle the exception
}
finally {
    # code that will always execute
}
By using try/catch/finally blocks, you can gracefully handle errors in your scripts and prevent them from causing the script to terminate abruptly. Instead, you can manage the error in a controlled manner and take appropriate actions to recover or gracefully exit the script.
Learn more about using try/catch blocks by reading Mastering PowerShell Try Catch with Exception Messages!
PowerShell Scripting Summary
In this article, you learned some essential components of building a PowerShell script. You learned how to save information to variables, harness string interpolation, use parameters to pass information to your script, take different actions using if statements, and handle errors.
Understanding these elements enhances the efficiency and reliability of PowerShell scripts, making them versatile tools for various tasks within the PowerShell environment. This article only introduces you to the basics of PowerShell scripting, and it is up to you to dive into each topic in more depth to make your PowerShell scripts even better!
