In a previous article (PowerShell SecretManagement: Getting Started), you learned about a new module from Microsoft named SecretManagement. This module provides an abstraction layer to an extension vault for storing and retrieving secrets. In this tutorial, you will learn how to use SecretManagement with Azure Key Vault.
For this tutorial, you will need the following:
- PowerShell 7. This tutorial uses version 7.3.0. While not tested, the following steps should also work in Windows PowerShell 5.1.
- The Microsoft.PowerShell.SecretManagement module. This tutorial uses version 1.3.0.
- The Az.KeyVault module, version 3.3.0 or higher, and the Az.Accounts module. Both of these modules can be installed as a part of the Azure (Az) PowerShell module.
- An Azure Key Vault
Installing Modules
First, open PowerShell and install the Microsoft.PowerShell.SecretManagement and Az modules using the Install-Module command. You can install both at the same using a comma-separated list of module names.
If you already have one or more of these modules installed, add the Force parameter to install a newer version.
Install-Module -Name Microsoft.PowerShell.SecretManagement, Az -Force
Connecting to Azure
Next, use the Connect-AzAccount to log in to your Azure tenant. PowerShell should open a browser window to prompt for your administrator credentials.
If you have more than one subscription, use Set-AzContext to set the current context to the subscription where a current Key Vault exists or where you will be creating a new one. This example sets the context to a subscription named Demo.
# Authenticate to Azure tenant
Connect-AzAccount
# Set the current context to Demo subscription
Set-AzContext -Subscription 'Demo'
Creating a Key Vault
You will need a Key Vault for storing and retrieving secrets. If you do not have one available, follow the steps below to create a Key Vault using PowerShell.
First, create a resource group to hold the Key Vault using the New-AzResourceGroup command. Supply a Name (keyvaultdemo-rg) and a Location (WestUS2). Save the output to a variable named $rg for later use.
$rg = New-AzResourceGroup -Name 'keyvaultdemo-rg' -Location 'WestUS2'
Next, create a Key Vault using the New-AzKeyVault cmdlet. Specify a globally unique VaultName (mykvdemo), and use the $rg variable to set the ResourceGroupName ($rg.ResourceGroupName) and Location ($rg.Location). Save the output to a variable named $kv for later use.
$kv = New-AzKeyVault `
        -VaultName 'mykvdemo' `
        -ResourceGroupName $rg.ResourceGroupName `
        -Location $rg.Location
Registering Key Vault Extension with SecretManagement
To utilize Key Vault with SecretManagement, register the vault with the SecretManagement module. The Key Vault extension is available as a part of the Az.KeyVault module.
First, create a variable named $subID and store the GUID of the Key Vault’s subscription ID. If you don’t know the subscription ID, use the Get-AzContext cmdlet and select the Subscription property.
# Find subscription ID
Get-AzContext | Select-Object Subscription
# Create $subID variable
$subID = '00000000-0000-0000-0000-000000000000'
Next, use the Register-SecretVault cmdlet to register the Key Vault extension. Supply a reference Name for the vault (mykvdemo) and the vault extension Module (Az.KeyVault). For VaultParameters, create a hashtable with the following keys and values:
AZKVaultName = $kv.VaultNameSubscriptionId = $subID
Register-SecretVault `
  -Name 'mykvdemo' `
  -ModuleName 'Az.KeyVault' `
  -VaultParameters @{ AZKVaultName = $kv.VaultName; SubscriptionId = $subID }
Verify PowerShell created the vault using the Get-SecretVault command. Note in the screenshot below that the Azure Key Vault is not the default vault. This means you must specify the vault name when creating or retrieving secrets in the rest of the tutorial.

Managing Secrets in Key Vault through PowerShell
Finally, you can create and retrieve secrets using PowerShell to the Key Vault in Azure.
Use the Set-Secret command and supply a secret Name (SecretFromPowerShell), the secret Value (SecretManagement_module_is_cool), and the Vault name (mykvdemo).
Note: The Vault name value supplied here is the name of the local vault registration performed in the previous step. Depending on how you registered the vault, this name could be the same or different from Azure’s actual Key Vault resource.
Set-Secret `
  -Name 'SecretFromPowerShell' `
  -Secret 'SecretManagement_module_is_cool' `
  -Vault 'mykvdemo'
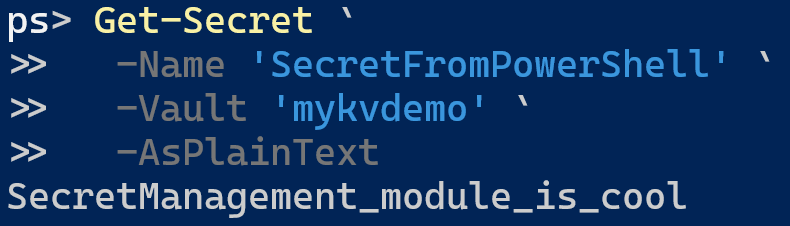
Next, retrieve the secret value using the Get-Secret command supply the secret Name (SecretFromPowerShell) and the registered Vault name (mykvdemo). Include AsPlainText to view the secret not as a secured string.
Get-Secret `
  -Name 'SecretFromPowerShell' `
  -Vault 'mykvdemo' `
  -AsPlainText
Note how you did not need to authenticate while creating or setting secrets. You have already authenticated when you used the Connect-AzAccount cmdlet earlier in the tutorial. You can manage secrets in the remote Key Vault as long as the session is valid.
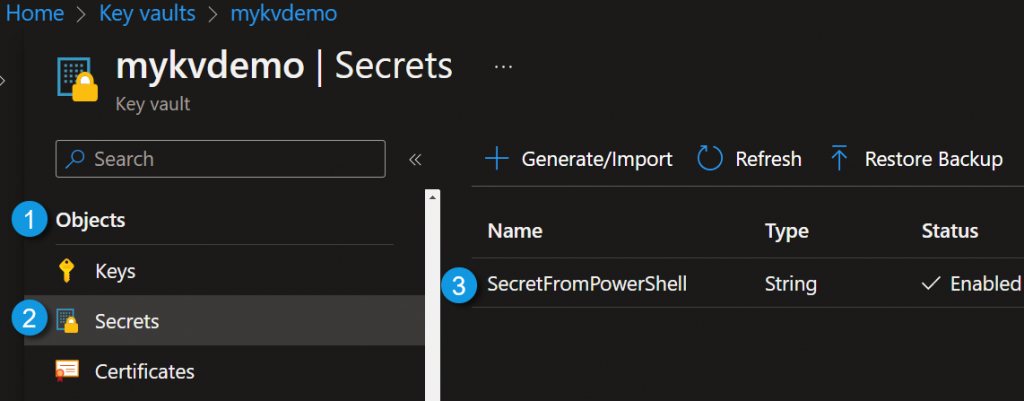
To bring it all together, navigate to the Key Vault in the Azure portal (https://portal.azure.com). In the Key Vault, go to Objects > Secrets, and the secret you created using the SecretManagement PowerShell module should be listed.
SecretManagement Key Vault Summary
In this tutorial, you learned how to create a Key Vault and then register that Key Vault with the SecretManagement module. This integration allows you to manage Key Vault secrets using agnostic commands from the SecretManagement module.
While it is possible to set and to get secrets from a Key Vault using cmdlets from the Az.KeyVault module (tutorial), using the SecretManagement module provides flexibility in case you change to a different secret provider. The only thing you would need to change in your PowerShell script is the name of the registered vault to use. The Get-Secret and Set-Secret commands will work the same regardless of the vault.