In a previous article, you already learned how to use ARM template copy functionality to perform dynamic Azure deployments. One example demonstrated how to deploy multiple data disks to a virtual machine using the copy loop. However, each data disk was the same size. What if you could also dynamically create different sizes of disks? Enter the ARM template array and objects!
In this post, you’ll learn how to create an array of objects representing different data disks. You will then use the copy loop to create each virtual machine data disk.
Creating a Parameter for an Array of Objects
Instead of using a data disk count parameter, use an ARM template parameter that is an array of objects. An array is a list of different elements. In the parameter’s section of the ARM template, create a new parameter named dataDisks of type array.
"parameters": {
    "dataDisks": {
        "type": "array",
        "metadata": {
            "description": "Array of data disk information."
        }
    }
}
In the ARM template, each object in the array represents a set of data disk properties: disk size in gigabytes and data disk name. In an ARM parameters file, specify the array value enclosed in brackets { }. Note that the entire array of objects is enclosed in square brackets [ ]. This example has three data disks named “logs,” “data,” and “apps” of varying sizes.
"parameters": {
    "dataDisks": {
        "value": [
            {
                "name": "logs",
                "diskSizeGB": 32
            },
            {
                "name": "data",
                "diskSizeGB": 128
            },
            {
                "name": "apps",
                "diskSizeGB": 64
            }
        ]
    }
}
Creating the Data Disk Copy Loop
The data disk copy loop is largely unchanged from the previous tutorial. However, there are a couple of key changes. Instead of using a parameter to specify the number of data disks, you will instead use the length() function to find the number of array elements. For the above array, there are 3 elements, so the length (or count) is 3.
Here is the first part of the new copy loop so far with the count property determined by the length of the dataDisks array.
"copy": [
    {
        "name": "dataDisks",
        "count": "[length(parameters('dataDisks'))]",
        "input": { }
]
Using Copy Indexes with the Array
Next, you need to access each element’s properties and values. Arrays use indexes to identify their elements, starting at 0. For example, if you wanted to access the first data disk object, you use index 0 like this:
# Accessing array element
dataDisks[0]
# Would return:
"name": "logs"
"diskSizeGB": 32
Since the copyIndex() also starts at 0, you use it to indicate which data disk to create. As the copy loop goes through the array elements, the copy loop increases the index by one. This increment allows you to access the next data disk object.
Array Object Properties
Each data disk also has two properties: name and diskSizeGB. While you can use the copy index to access the object, you also specify the property using dot notation. Since you defined the array as a parameter, use the parameter() function to access the array, then the copyIndex() in square brackets, followed by the property name.
parameter('dataDisks')[copyIndex('dataDisks')].name
Here is the updated copy loop with the lun, name, createOption, and diskDizeGB using the copy index to access the array element and dot notation for the property. Check out lines 7 and 9 for the syntax.
Putting together names can get complicated especially if you are using the contact() function. Here you connect the string “ubuntuVM-datadisk-” followed by that data disk name from the array.
"copy": [
    {
        "name": "dataDisks",
        "count": "[length(parameters('dataDisks'))]",
        "input": {
            "lun": "[copyIndex('dataDisks')]",
            "name": "[concat('ubuntuVM-datadisk-', parameters('dataDisks')[copyIndex('dataDisks')].name)]",
            "createOption": "Empty",
            "diskSizeGB": "[parameters('dataDisks')[copyIndex('dataDisks')].diskSizeGB]"
        }
    }
]
Check out the full ARM template and parameter file in GitHub:
JeffBrownTech / Azure-ARM-Templates / copyLoopExamples / linux-vm-dynamic-data-disks.json
JeffBrownTech / Azure-ARM-Templates / copyLoopExamples / linux-vm-dynamic-data-disks.parameters.json
Deploying the ARM Template with Array Objects
Using the New-AzResourceGroupDeployment command, specify the updated template and parameter file to deploy the virtual machine and data disks:
New-AzResourceGroupDeployment `
    -ResourceGroupName "<resource group name>" `
    -TemplateFile linux-vm-dynamic-data-disks.json `
    -TemplateParameterFile linux-vm-dynamic-data-disks.parameters.json
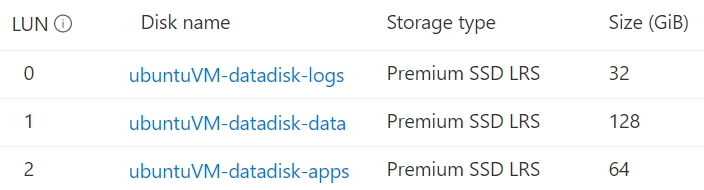
The result is a virtual machine with three data disks using different names and disk sizes:
Summary
By using an array of objects, you can dynamically deploy resources without modifying the ARM template. You write the template in such a way as to handle one or more data disks, and all you have to do is specify the value in the parameters file.
Additional Reading:
Parameters in ARM template | Objects as Parameters
