To deploy Terraform configurations to Azure, you first need to perform authentication. Without authentication, Terraform will not have the permissions necessary to deploy the defined resources. In this tutorial, you will learn two ways to perform Azure authentication for Terraform: Azure CLI and Service Principal.
To follow along with this tutorial, you will need:
- Azure subscription with sufficient permissions, like Owner or Contributor
- Terraform (open source version) installed on local system
- Here is a guide to Install and Configure Terraform on Windows
Authentication with Azure CLI
Terraform can use the current account logged into Azure CLI for authentication. The account needs permissions on the Azure subscription to create resources. Terraform uses this account for authentication to create the resources you define in the Terraform configuration. Terraform supports two login types with Azure CLI: User Account and Service Principal.
Note that Terraform currently does not support Azure PowerShell for authentication.
User Account
A User Account is a username with credentials in the Azure tenant. The following steps outline how to authenticate using Azure CLI and a User Account when running Terraform locally.
- Login using the Azure CLI command az login without any parameters and follow the instructions to log in to Azure. This command will most likely open a browser to authenticate to the tenant.
az login - Upon a successful login, Azure displays subscriptions associated with your account, including the default subscription. To confirm which subscription is active, run the az account show command.
az account show - If needed, set the active Azure subscription for the Terraform deployment using the az account set command. The subscription value can be the subscription ID or the subscription name.
az account set --subscription "<subscription_ID_or_name>" - Once logged in using the Azure CLI, Terraform is ready to use these credentials for the deployment. The following code example shows a Provider block that specifies the azurerm provider with the source and version requirements. You can use the
azurermprovider block to specify a specific Subscription ID for the deployment if needed.
# Configure the azurerm provider source and version requirements
terraform {
  required_providers {
    azurerm = {
      source  = "hashicorp/azurerm"
      version = "~2.88.0"
    }
  }
}
# Configure the Microsoft Azure Provider
provider "azurerm" {
  features {}
  # Configure a specific Subscription ID (optional)
  subscription_id = "00000000-0000-0000-0000-000000000000"
}
Service Principal
You can also use a Service Principal in Azure CLI for authentication. An Azure Service Principal represents a registered application in the Azure AD tenant. The Service Principal is the identity configuration for the application, and you grant the Service Principal permissions to Azure resources.
Service Principals authenticate using a client ID (like a username) and either a client secret (password) or certificate. Service Principals are preferred if you are deploying Terraform templates non-interactively or using an automation tool.
This tutorial uses a Service Principal and a client secret for authentication. If you don’t have an existing Service Principal, use the steps below to create one using the Azure CLI.
- To create a Service Principal, use the az ad sp create-for-rbac Azure CLI command. Specify the
--nameof the Service Principal, in this case,sp-terraform-demo-contributorwhere “Demo” refers to the name of the subscription the Service Principal has access to and “Contributor” refers to the rights the Service Principal has.
Next, use the--roleparameter to define the permissions you are assigning (Contributor) and the--scopeparameter, which refers to the subscription the Service Principal should have permissions for the deployment.
az ad sp create-for-rbac --name "sp-terraform-demo-contributor" \
  --role="Contributor" \
  --scopes="/subscriptions/<subscription ID>"
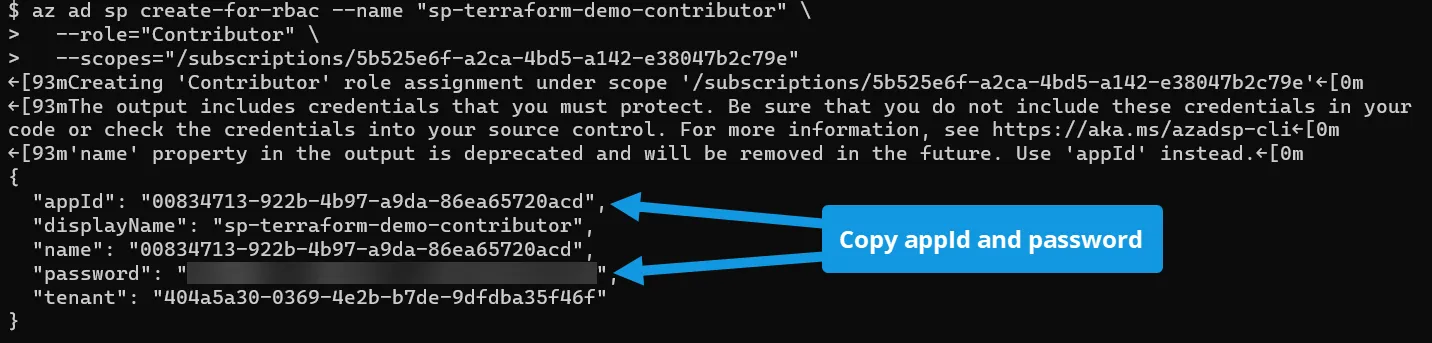
- Copy the
appIdandpasswordproperties from the previous command’s output. Store the password in a safe place, like Azure Key Vault or other password manager, as you will not be able to retrieve this password again.
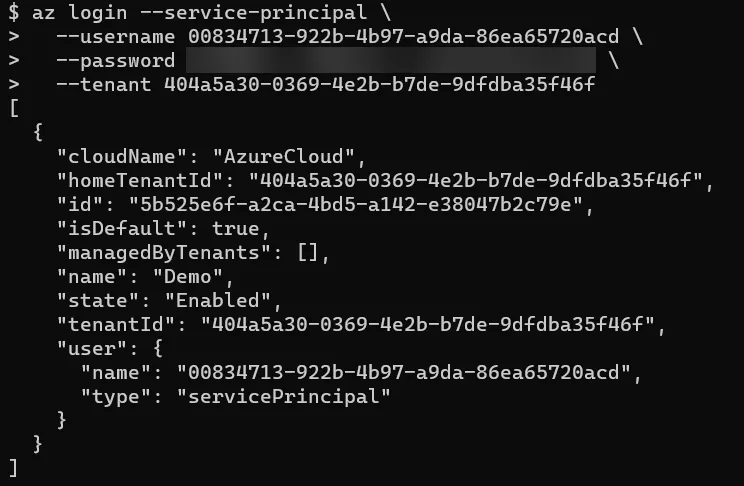
Once you have a Service Principal available, follow these steps to log in with its credentials using Azure CLI.
- Use the
az logincommand to log into the Azure tenant as the Service Principal. Add the--service-principalparameter to indicate the credentials represent a Service Principal. Use the--usernameparameter with the value of appId and the –password parameter with the password value. Finally, use the--tenantparameter and add your tenant ID. A successful login displays the Azure subscriptions associated with the Service Principal.
az login --service-principal \
  --username "<appId>" \
  --password "<password>" \
  --tenant "<tenantId>"
- Repeat Step 3 and Step 4 from the previous section to select an Azure subscription and set up the
azurermprovider in your Terraform template files.
Authentication with Azure Service Principal in Terraform
Another option for Azure authentication involves configuring credentials directly within the Terraform template. The Terraform AzureRM provider supports many fields for authenticating to Azure, and there are multiple methods for providing these values. The following steps use the same Service Principal and client secret from the previous steps.
Provider Block
You defined an Azure Subscription ID in the provider block in the earlier example. This configuration avoided setting the preferred subscription for the deployment inside Azure CLI. In addition to the subscription, you can also set authentication information such as the Tenant ID and Service Principal App ID and Secret using the following fields:
- tenant_id: Azure tenant ID
- client_id: The Service Principal App ID
- client_secret: The Service Principal App Secret
Using this method, the Terraform template configuration looks like this:
# Configure the azurerm provider source and version requirements
terraform {
  required_providers {
    azurerm = {
      source  = "hashicorp/azurerm"
      version = "~2.88.0"
    }
  }
}
# Configure the Microsoft Azure Provider
provider "azurerm" {
  features {}
  subscription_id = "<subscription id>"
  tenant_id       = "<tenant id>"
  client_id       = "<app id>"
  client_secret   = "<app secret>"
}
However, this method can be troublesome as you store the Service Principal’s credentials in plain text. If you were to sync this to a Git repository, anyone with access to that repository could see the credentials. This method is best used when working with Terraform locally on your system with no intention of sharing the template or synchronizing the code to a central repository.
Alternatively, you can pass any of these values in as input variables with the value provided at runtime. Here is an example where client_secret is a variable, and you give the value when applying the configuration.
# Configure the azurerm provider source and version requirements
terraform {
  required_providers {
    azurerm = {
      source  = "hashicorp/azurerm"
      version = "~2.88.0"
    }
  }
}
variable "client_secret" {
  type = string
  sensitive = true
}
# Configure the Microsoft Azure Provider
provider "azurerm" {
  features {}
  subscription_id = "<subscription id>"
  tenant_id       = "<tenant id>"
  client_id       = "<app id>"
  client_secret   = var.client_secret
}
Environment Variables
Another option is to use environment variables. Environment variables store information about the operating system, computer, and shell environment. You save the provider information as environment variables, and Terraform uses these for the deployment.
Read more about Terraform and environment variables in Getting to Know Terraform Environment Variables.
For example, in a Bash shell, use the export command to create environment variables for the Subscription ID, Tenant ID, and Client ID and Secret. Note that these environment variables begin with “ARM.” These variables or arguments are specific to the azurerm provider, and you use these to provide information to the provider in the Terraform template. Read more about other supported azurerm provider arguments here.
export ARM_SUBSCRIPTION_ID="<azure_subscription_id>"
export ARM_TENANT_ID="<azure_subscription_tenant_id>"
export ARM_CLIENT_ID="<service_principal_appid>"
export ARM_CLIENT_SECRET="<service_principal_password>"
In the Terraform template, you no longer need to include these arguments in the azurerm provider block like the previous example. At this point, you can run terraform plan or terraform apply, and Terraform can use the Service Principal credentials to authenticate and perform the deployment.
# Configure the azurerm provider source and version requirements
terraform {
  required_providers {
    azurerm = {
      source  = "hashicorp/azurerm"
      version = "~2.88.0"
    }
  }
}
# Configure the Microsoft Azure Provider, no need to specify subscription, tenant, or client ID and secret.
provider "azurerm" {
  features {}
}
Environment variables are typically short-lived and only available in the current shell session. If you restart the shell or open a new one, you most likely need to set these values again for each deployment.
Pipeline Variables
If you have a service principal, another option is using pipeline variables. Instead of defining the arguments on the local system’s shell, you create variables to store the information. You then reference the variables in the pipeline steps.
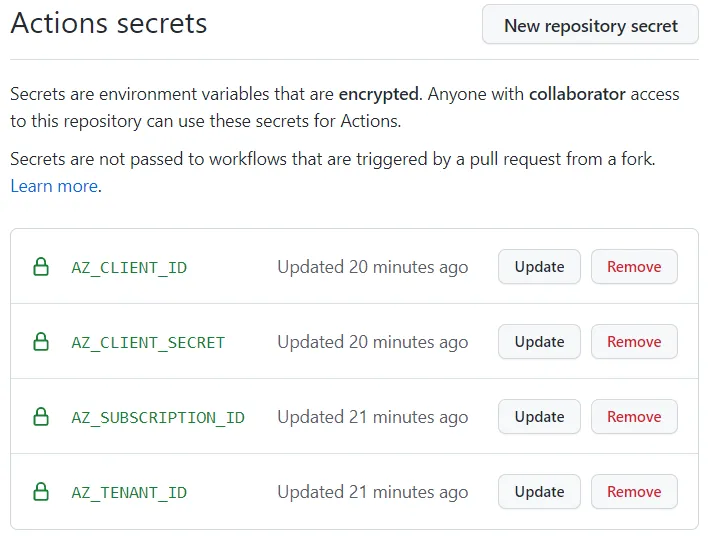
GitHub Actions is an example of a CI/CD tool for organizing workflows. GitHub Actions uses secrets for storing environment variables. You use these secrets to pass information to your workflow for authentication and other deployment tasks.
For example, here are several secrets created in a GitHub repository for the Tenant ID (AZ_TENANT_ID), Subscription ID (AZ_SUBSCRIPTION_ID), and Service Principal credentials (AZ_CLIENT_ID and AZ_CLIENT_SECRET).
In your workflow YAML file, you reference these variables as environment variables in each step. Terraform then uses these as input for the azurerm provider, just like in the previous examples in this tutorial.
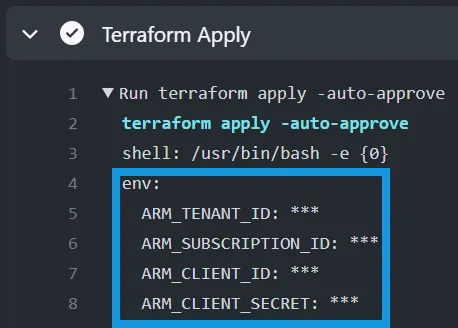
For example, here is a step to perform terraform apply to deploy a Terraform template. Note the env: section which maps the azurerm provider arguments (starting with “ARM_”) to the secrets stored in the GitHub repository. To reference a secret, use the syntax ${{ secrets.<variable name> }}.
- name: Terraform Apply
  env:
    ARM_TENANT_ID: ${{ secrets.AZ_TENANT_ID }}
    ARM_SUBSCRIPTION_ID: ${{ secrets.AZ_SUBSCRIPTION_ID }}
    ARM_CLIENT_ID: ${{ secrets.AZ_CLIENT_ID }}
    ARM_CLIENT_SECRET: ${{ secrets.AZ_CLIENT_SECRET }}
  run: terraform apply -auto-approve
The workflow retrieves the stored variables and keeps them encrypted, so GitHub does not display the values. Here is the output of the Terraform Apply step where GitHub does not display the values.
Terraform Azure Authentication Summary
In this tutorial, you learned about the different ways to perform authentication to Azure to deploy Terraform templates. You can authenticate directly in the Azure CLI with an Azure User Account or Service Principal. You can also use that same Service Principal to embed the authentication directly in the Terraform configuration through environment or pipeline variables.
Enjoyed this article? Check out more Terraform articles here!