Microsoft Teams PSTN usage records are available as reports in the Teams admin center. However, you have to manually export the records into an Excel file. How would you like to automatically export the data into a centralized location? I’ve got the solution for you!
Last year, Microsoft released into beta the ability to programmatically retrieve Microsoft Teams PSTN Usage Records. These records represent PSTN calls made by Microsoft Teams users, both through Calling Plans and Direct Routing. Following this, I wrote the TeamsCloudCommunicationsApi PowerShell module to simplify exporting these records using PowerShell.
This tutorial shares a modified version of the module code for use in Azure Functions. You will create a function to automatically export the Teams PSTN usage records into Azure table storage once a day. Exporting the records into a central repository allows the records to be stored for historical purposes and dashboard integration, such as Power BI.
Prerequisites
- Azure Subscription and sufficient permissions, such as Owner or Contributor
- Microsoft Teams with Calling Plans or Direct Routing to generate call records
Registering an Azure Application
This solution utilizes Graph API calls to retrieve the Teams PSTN Usage records. To programmatically access the Graph API, you need to create an Azure Application registration. This application registration will authenticate to Graph API and retrieve the information.
This tutorial does not cover how to create an Azure Application registration. This other post will take you to the section on creating the registration:
Getting Started with Microsoft Teams and Graph API
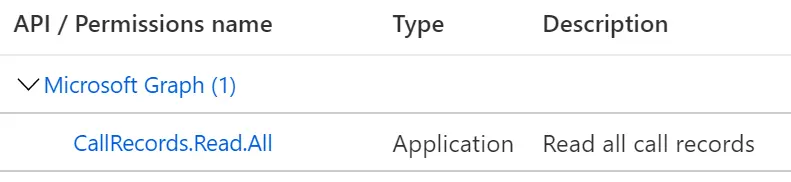
The application registration for this solution requires CallRecords.Read.PstnCalls permissions.
When you create the application registration and generate the client secret, be sure to save the secret value. The secret value is needed in the next section as you will store the value in an Azure Key Vault.
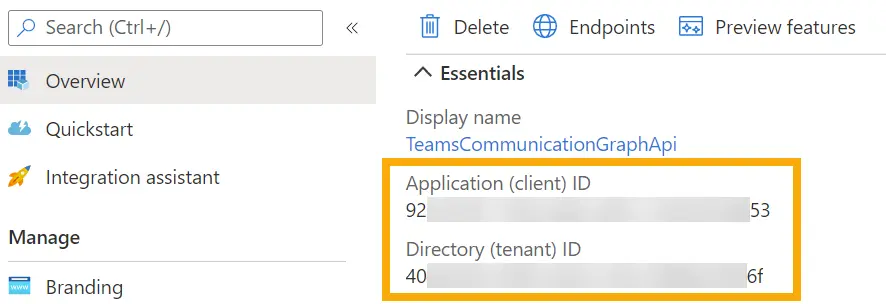
You also need to document the Application (client) ID and the Directory (tenant) ID on the application registration overview page. You will use these later when configuring the Function App’s application settings.
Storing Secrets in Azure Key Vault
An Azure Key Vault is a place to store keys, secrets, and certificates that Azure resources can access. Instead of storing these assets inside of application code or configuration files, you can securely retrieve these assets from a vault. This practice keeps these valuable pieces of information out of the application.
The function code requires using the client secret created in the previous section. Instead of hard-coding the secret value in the script, you can save it as an application setting in the function. For now, store the secret in an Azure Key Vault, and the tutorial will later cover how to retrieve it.
In the spirit of brevity, here is a Microsoft Docs article on creating an Azure Key Vault (if you don’t have an existing one) and storing a secret in the vault. Later in this article, you’ll return to the key vault to configure an access policy and retrieve the secret’s URI. For now, go ahead and store the secret from the previous section.
Azure Quickstart – Set and retrieve a key from Key Vault using Azure portal | Microsoft Docs
Creating the Azure Function
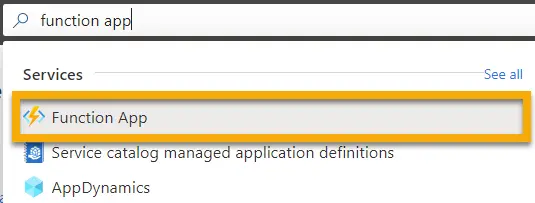
Next, create an Azure Function App, which is responsible for executing the code to retrieve the Teams PSTN Usage Records. In the Azure portal home page, use the search box to search for Function App and select the resource from the results.
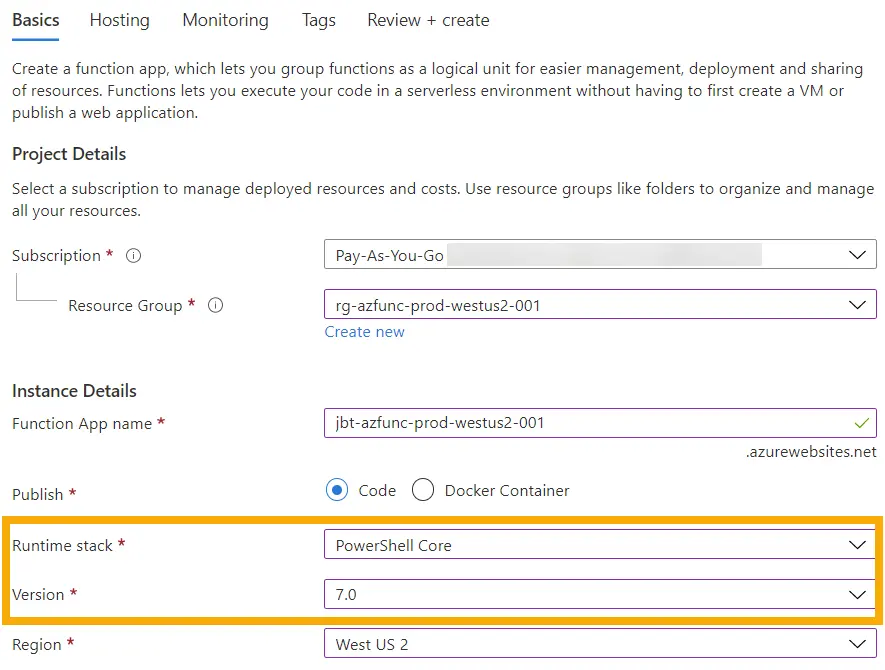
In the Function App page, select + Create to create a new function app. In the Create Function App window, you need to fill out the information to define the function. This includes the Azure Subscription, Resource Group, Function App name, runtime stack, version, and region. To run this solution, set the runtime stack to PowerShell Core.
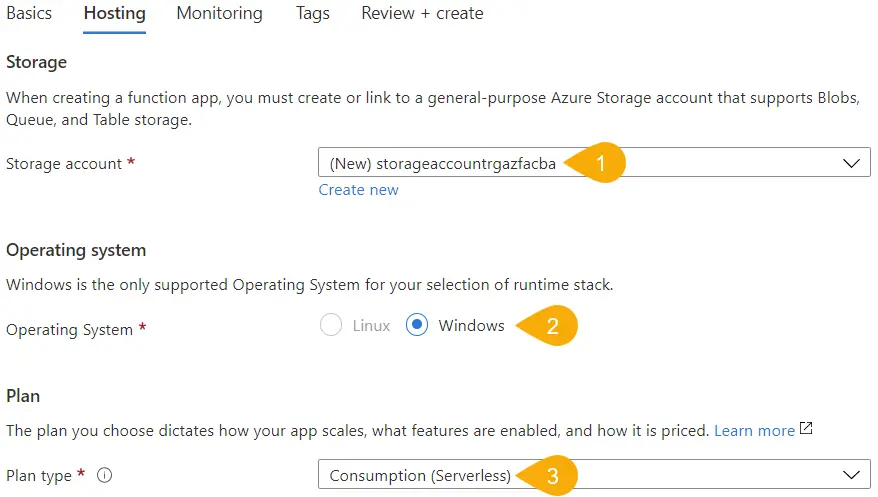
On the Hosting tab, you can have the wizard create a new storage account or select an existing one. The storage account holds configuration files for the Function App and function code. This tutorial is letting the wizard create a new storage account, and the storage account is stored in the same resource account as the Function App.
Since the Function App is using PowerShell, the operating system should default to Windows (since it is version 7, maybe Linux will be an option someday). Continue by selecting the Consumption (Serverless) option for the plan type, but if you require more features or scalability, consider one of the other plans.
Finally, on the Monitoring, do not enable Application Insights. This Function App is currently a proof-of-concept and does not require in-depth monitoring. However, if the application requirements change, you can enable Application Insights later on.
Once the configuration is completed, select Review + create, then Create to complete the setup.
Function App Configuration
Before creating the function and importing the code, configure a few things within the Function App.
Managed Identity
To retrieve the value of the client secret from the Azure Key Vault, the Function App needs a way to authenticate to the vault. For this, create a managed identity for the Function App. A managed identity is almost like a user identity in that you can assign permissions to Azure resources to managed identity so it can access it.
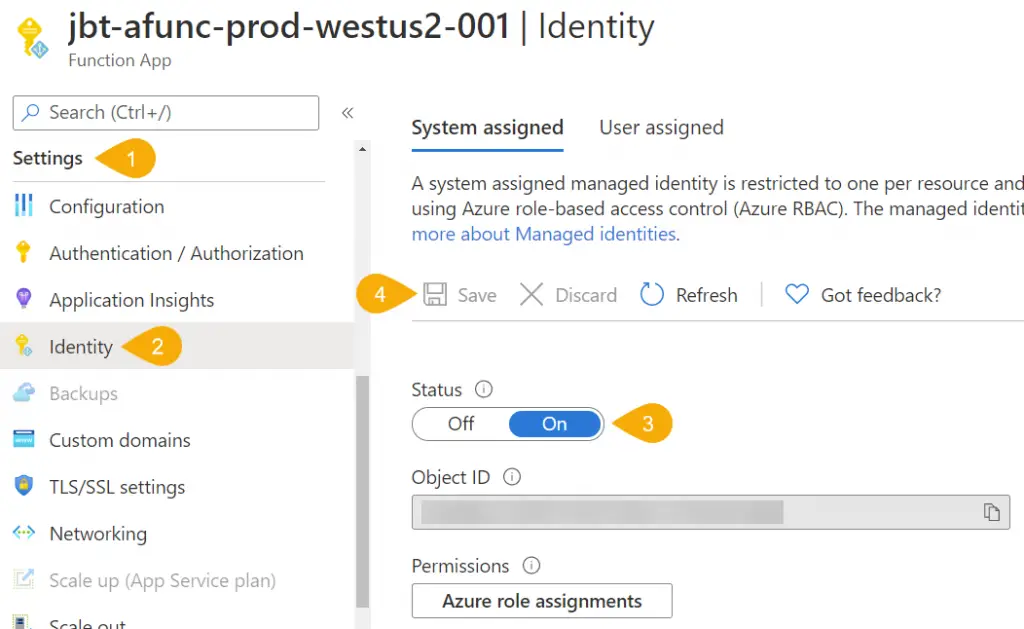
To create a managed identity, inside the Function App, navigate to Settings > Identity. There are two options here: System assigned and User Assigned. A system assigned identity is tied to the Function App resource. If you delete the Function App later, the managed identity will also be deleted. For this tutorial, select the System assigned identity.
Once you set the Status to On, save the changes to enabled the identity. If prompted, select Yes to enable the identity.
Azure Key Vault
Now that you have a managed identity for the Function App, you assign permissions for the identity in the Azure Key Vault. Setting permissions allows the Function App to access the stored secrets in the vault. You also need to get the secret’s URI for the next section.
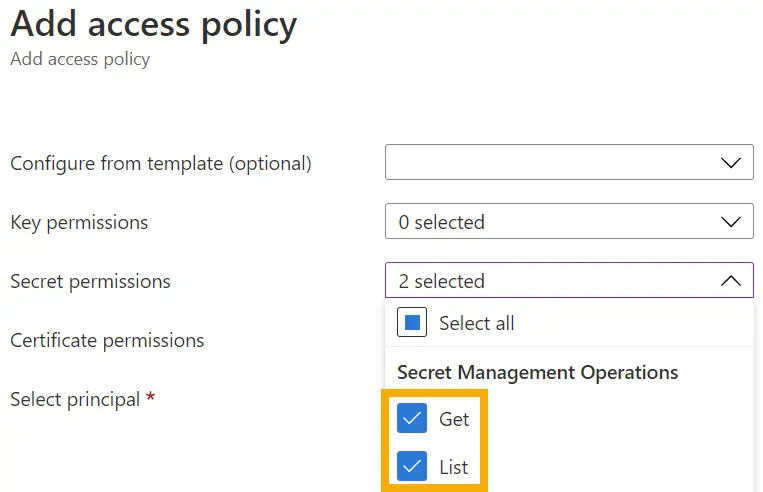
Navigating back to the key vault, go to Settings > Access policies. In the pane on the right, select + Add Access Policy. In the Add access policy windows, select the dropdown for Secret permissions and check the Get and List boxes.
Next, select the link next to Select principal to display the Principal pane. In the search box, search for the name of the Azure Function, and the results should show the managed identity previously created. Once the identity is selected, click on Select.
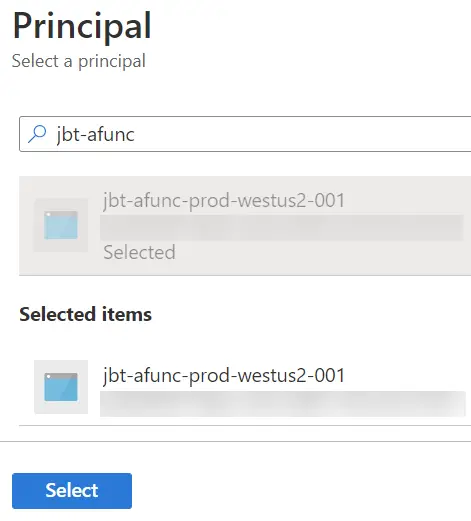
With the new policy permissions and principal selected, click Add to create the access policy. Back in the access policies list, you should see the Function App name listed with 2 secret permissions. To complete the configuration, click the Save button to finalize the access policy.
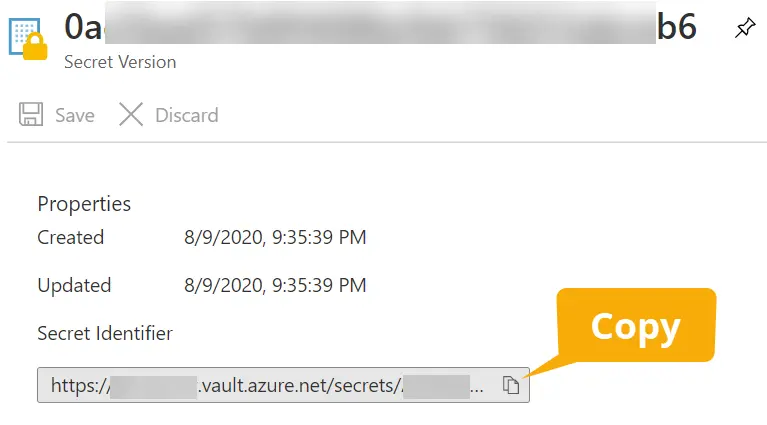
Next, still in the key vault, navigate back to Settings > Secrets and select the item’s name for the app secret created earlier. From here, select the identifier for the current version of the secret. In the secret version property page, copy the Secret Identifier value and save it for later. You will use this to create an application setting in the next section.
Application Settings
You need to create application settings to use within the function itself, like the client ID, secret, and tenant ID. By storing these values as application settings, you avoid coding them into the function code and can reuse these values in other functions created in the Function App.
In the newly created Function App, navigate to Settings > Configuration, then the Application settings tab on the right. Ccreate three new application settings:
- ClientId : stores the application registration client Id
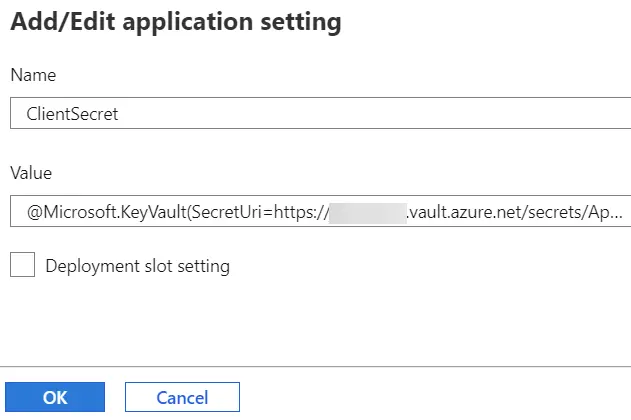
- ClientSecret : stores the application registration client secret
- TenantId : stores the tenant Id
While ClientId and TenantId are just the GUID strings, I’m going to reference the secret in the key vault using special syntax where {secret uri} is replaced by the secret URI copied from the previous section:
@Microsoft.KeyVault(SecretUri={secret uri})
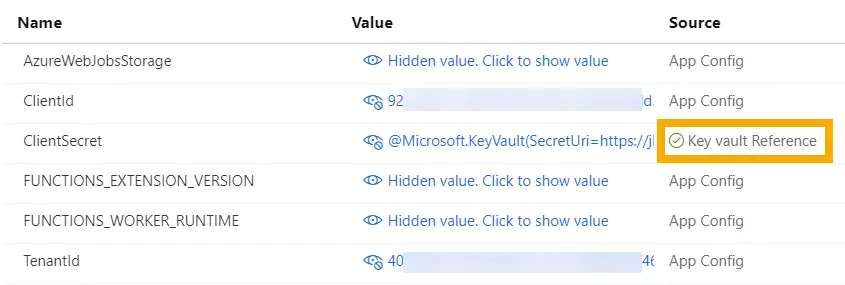
Once all three application settings are created, click on the Save button. Once the new settings are saved, the setting for the ClientSecret will update the Source column to reflect if it was successful in retrieving the secret from the vault.
If you do not see a green checkmark here, verify the Function App has permissions to the key vault and the secret URI is correct. You can also select each value to reveal what is stored in each application setting.
Creating a Timer Function
Finally, you have all the components the function needs to operate. The next step is to create the function, create an output binding, and input the code.
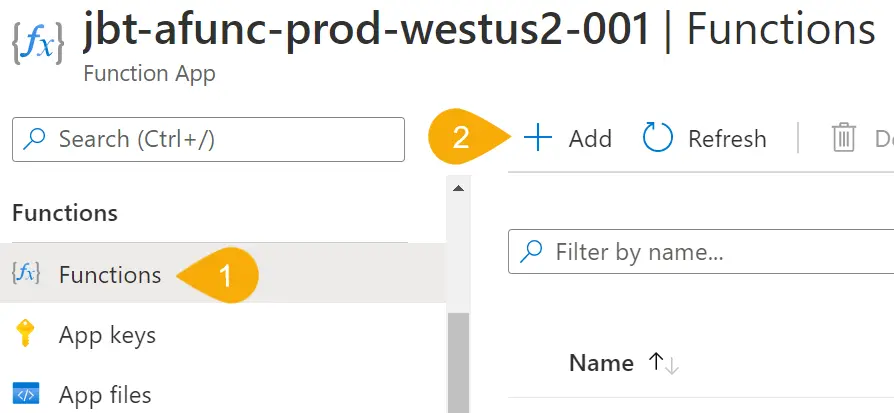
In the Function App, navigate to Functions > Functions, then select + Add to create a new function.
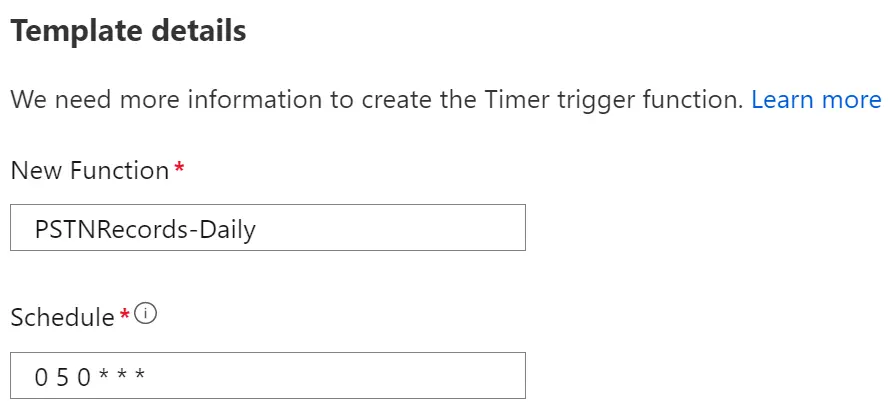
In the Add function window, select Develop in portal for the Development environment. In the next section, select the Timer trigger for the template, which will execute on a schedule. For the Template details, enter a function name, such as PSTNRecords-Daily.
Finally, define the function’s schedule using an NCRONTAB expression. The expression is made up of six parts in the format: {second} {minute} {hour} {day} {month} {day of week}. The default time zone for executing the timer function is in Coordinate Universal Time (UTC).
Since the function gathers the previous day’s worth of records, schedule this just after midnight using the expression 0 5 0 * * *. For more examples of how to format these expressions, check out the Microsoft Docs article below:
Microsoft Docs: Timer trigger for Azure Functions | NCRONTAB expressions
Output Binding
The function is going to output the Teams PSTN usage records to table storage in an Azure storage account. You accomplish this by adding an output binding to the function and using a PowerShell cmdlet to push the data to the table.
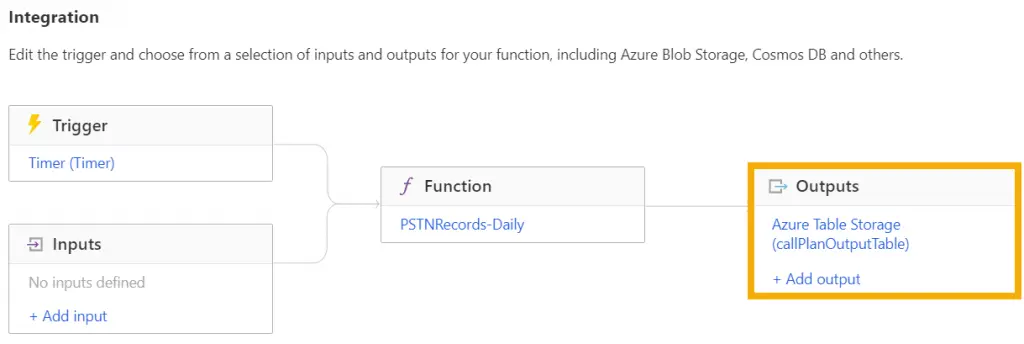
After the function was created in the previous section, the Azure portal redirects to the function developer page. On this page, select Integration on the left. Integration displays the trigger for the function, inputs to the function, and outputs out of the function. In the Outputs box, select + Add output.
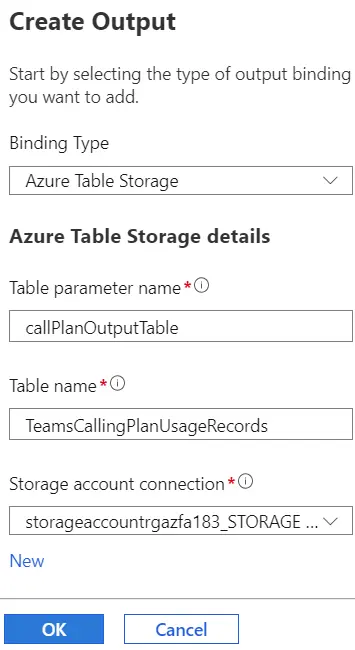
In the Create Output window, for the Binding Type, select Azure Table Storage. The Table parameter name refers to the variable name you will use inside the function code to reference the output binding. This tutorial is naming the parameter callPlanOutputTable.
Finally, enter the table name in the storage account to input records. The table doesn’t have to exist before running the function code for the first time. For this tutorial, the table name is TeamsCallingPlanUsageRecords since the function retrieves calling plans PSTN usage records.
Since this is a new function, the function doesn’t have a storage account connection to connect to the table. Select New and select the storage account created with the function app, but you could select any storage account available. This action will create a new storage account connection and application setting for the Function App. Click OK to complete the setup.
The Integration windows should now have a new Outputs item showing the connection to the Azure Table Storage using the variable name callPlanOutputTable.
Function Code
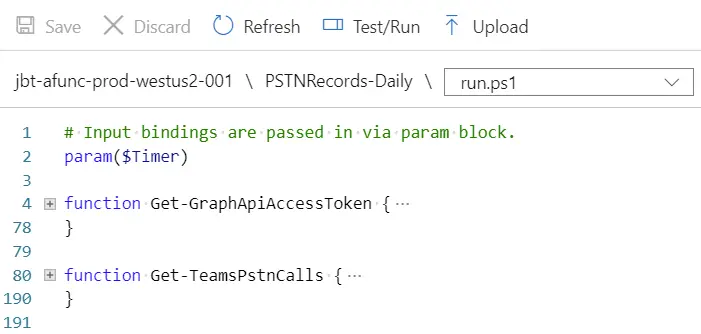
Finally, you’re down to the important part: inputting the function code. In the function developer page, select Code + Test in the left menu. The Azure portal will navigate to a basic code editor page for the language selected during the Function App’s creation. In the example code provided, you only need to keep line 2, which contains the input timer trigger parameter definition.
param($Timer)
Next, copy code from the TeamsCloudCommunicationApi module so the function can retrieve the records. The code should include the Get-GraphApiAccessToken function and the functions to retrieve different kinds of PSTN usage records. The link below will take you to the raw format of the module code in my GitHub repository:
GitHub | JeffBrownTech | TeamsCloudCommunicationApi.psm1
Since this function is only retrieving the PSTN Usage records made using Calling Plans, the function will not contain the Get-TeamsDirectRoutingCalls function from the code. Here is what the code editor looks like now with two functions collapsed for readability:
With the base code from the module available, create a PSCredential object using the ClientId, ClientSecret, and TenantId application settings configured earlier. Use the PScredential object to call the Get-GraphApiAccessToken function and save the token to $accessToken. You can reference each application setting by prepending the name with “$env:”, like this:
$secureClientSecret = ConvertTo-SecureString -String $env:ClientSecret -AsPlainText -Force
$graphApiCreds = New-Object `
System.Management.Automation.PSCredential($env:ClientId, $secureClientSecret)
$accessToken = Get-GraphApiAccessToken -Credential $graphApiCreds -TenantId $env:TenantId
With the access token available, call the Get-TeamsPstnCalls and retrieve the last 2 days of records. Remember, the timer function is set to run just after midnight UTC. Selecting 2 days of records will retrieve any calls made on the day the function runs, which should be minimal, and the previous day’s records.
$pstnRecords = Get-TeamsPstnCalls -Days 2 -AccessToken $accessToken
From here, perform some log output housekeeping, like showing how many records are found and setting a counter to keep track of how many records have been processed.
$pstnRecords = Get-TeamsPstnCalls -Days 2 -AccessToken $accessToken
$pstnRecordCount = $pstnRecords.Count
$counter = 1
Write-Information -MessageData "Found $pstnRecordCount records"
Finally, to iterate through each record and create a PowerShell object to inject into the table storage. This solution uses the current date in format year-month-day as the partition key for the table entity. The partition key combined with the row key (set to the unique GUID of the record) will form a unique identity for each entity within the table. The function then takes the property of each record and adds it to the object.
After the object is created, push the object to the Azure Table storage using the Push-OutputBinding cmdlet. You also reference the output binding made earlier using the name callPlanOutputTable. Notice how you don’t have to specify a connection string or even the name of the table. The function has this information stored in its settings to know how to connect and which table to use. By creating the output binding, you can keep the command simple to add the data.
foreach ($record in $pstnRecords) {
    Write-Information -MessageData "Processing PSTN record $counter of $pstnRecordCount"
    $partitionKey = $record.startDateTime.ToString('yyyy-MM-dd')
    $tableData = [PsCustomObject]@{
        partitionKey = $partitionKey
        rowKey = $record.id
        callId = $record.callId
        userId = $record.userId
        userPrincipalName = $record.userPrincipalName
        userDisplayName = $record.userDisplayName
        startDateTime = $record.startDateTime
        endDateTime = $record.endDateTime
        durationSeconds = $record.duration
        charge = $record.charge
        currency = $record.currency
        callType = $record.callType
        calleeNumber = $record.calleeNumber
        callerNumber = $record.callerNumber
        usageCountryCode = $record.usageCountryCode
        tenantCountryCode = $record.tenantCountryCode
        connectionCharge = $record.connectionCharge
        destinationContext = $record.destinationContext
        destinationName = $record.destinationName
        conferenceId = $record.conferenceId
        licenseCapability = $record.licenseCapability
        inventoryType = $record.inventoryType
    }

    Push-OutputBinding -Name callPlanOutputTable -Value $tableData
    $counter++
}
Here is a GitHub gist of all the code added to the original module’s code for the function:
Exporting Teams PSTN Usage Records
The moment at last: running the function and verifying the table data is populated. When you save the code on the function developer page, the Logs pane should automatically appear at the bottom of the code. This console will show the output of the function when it runs.
In the Code + Test window, select Test/Run to run the code. A window will appear with an option to add anything to the Inputs for the function. Since this is a timer function, there are no additional inputs to make. Click Run, then Close.
Here is an example output from the Log window. It shows the function processed two call records and executed the function successfully:

If you rerun the function, it will process the records again, and the log window will display that the function failed. The function will fail because it is trying to add records to the table storage that already exists. This is fine and expected, so you don’t have to worry about adding duplicate records to the table storage.
Finally, navigate out to the Azure Storage Account the function is using to store the records. In the storage account, navigate to Storage Explorer (preview) in the left menu. Expand the Tables menu, and the new table entity has been created with two new PSTN usage records.

Summary
Azure Functions are a great serverless feature inside of Azure. Functions provide the ability to execute code based on several different triggers, and the ease of outputting the data through bindings is really great. Combining this serverless solution with Graph API to export Teams PSTN usage records helps solves the problem of going back to the Teams admin center to export records.
If you want to view a copy of the run.ps1 file from the function, check out the my TeamsCloudCommunicationAPI repository out in GitHub:
Jeff Brown Tech | TeamsCloudCommunicationApi/AzureFunction
Questions or comments? If so, leave a comment below or find me on Twitter or LinkedIn to discuss further.