While PowerShell concepts hash table and PSCustomObject may look similar, they are pretty different. Both have value, but which one you use depends on the situation. In this post, you will learn what each of these PowerShell artifacts is and their differences.
Understanding Hash Tables
PowerShell hash tables are data structures that store one or more key-value pairs. Hash tables are efficient for finding and retrieving data. You use hash tables to store lists of information or to create calculated properties.
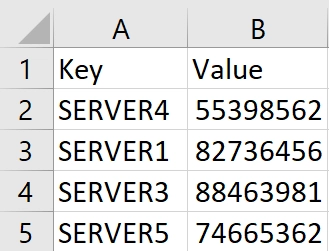
For example, let’s look at a hash table named $myHashTable with a list of computer names and serial numbers. To define a hash table, use an At (@) sign followed by curly braces { }. Within the curly braces, use an equal sign (=) to assign the key-value pairs. If the hash table is small, you can define it on a single line with each key/value pair separated by a semicolon (;), like this:
# Creating a hash table on a single line
$myHashTable = @{ "SERVER1" = "82736456"; "SERVER2" = "48329067" }
If the hash table is larger, use a multi-line block to create it, like this:
# Creating a hash table using multiple lines
$myHashTable = @{
    "SERVER1" = "82736456"
    "SERVER2" = "48329067"
    "SERVER3" = "88463981"
    "SERVER4" = "55398562"
}
You can also start with a blank hash table and add values to it later (see the next section for adding and removing items). You define an empty hash table using an At (@) sign followed by curly brackets { }.
# Create an empty hash table
$myHashTable = @{}
Adding and Removing Keys and Values
You add key/value pairs to a hash table using the Add() method. The first argument is the key, followed by the value. You remove items using the Remove() method when you specify the key name. You can use both ways to manage key/value pairs on existing hash tables.
# Add a key/value pair
$myHashTable.Add("SERVER5", "74665362")
# Remove a key/value pair
$myHashTable.Remove("SERVER2")
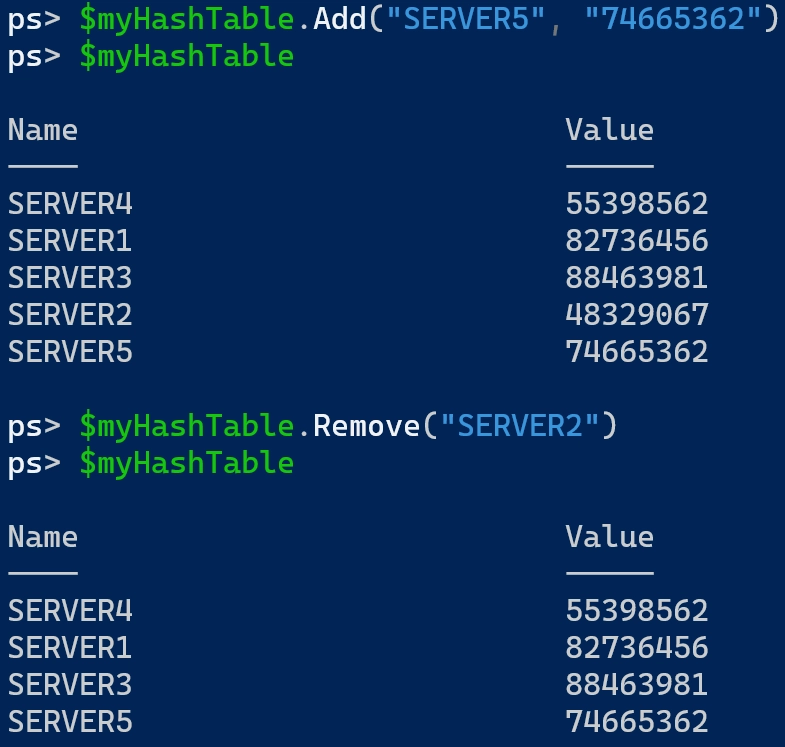
However, a hash table limitation is you cannot have duplicate keys. For example, try adding another key named “SERVER1” with a different value. PowerShell displays an error that the key already exists.

Copying hash tables is also tricky. Learn how to by reading Copying PowerShell Hash Tables the Right Way!
Putting Hash Tables in Order
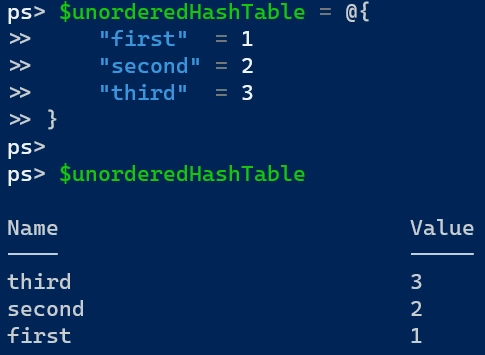
Hash tables are not ordered, meaning PowerShell does not always display the key/values pairs in the same order you defined them. Take a look at the example below, where “first,” “second,” and “third” are defined in order but not displayed the same.
$unorderedHashTable = @{
    "first"  = 1
    "second" = 2
    "third"  = 3
}
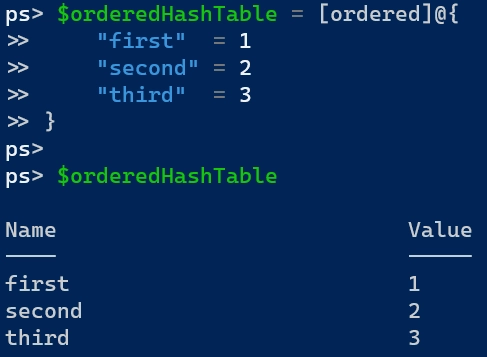
To keep the hash table order, you turn it into an ordered dictionary using the [ordered] keyword. Place the [ordered] keyword before the At (@) sign in the definition.
$orderedHashTable = [ordered]@{
    "first"  = 1
    "second" = 2
    "third"  = 3
}
Displaying Hash Tables
This issue with hash tables is in the display. To display a hash table, input the variable name, much like you see in the screenshots in the previous section. However, notice that the column names are “Name” (or key) and “Value.” Hash tables will only have these two columns.
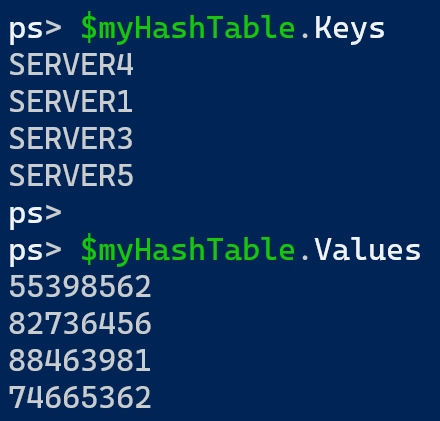
You can display only the Keys or Values properties using dot notation. Use the variable name representing the hash table followed by .keys or .values to show either property.
# Display hash table keys
$myHashTable.keys
# Display hash table values
$myHashTable.values
Unlike arrays, you cannot use an integer as an index in the hash table to display a key/value pair. Instead, use the key name enclosed in square brackets [ ] and quotes.

Exporting Hash Tables to CSV
It can be challenging to export hash tables to a CSV file. If you try to export by piping a hash table to the Export-Csv command like this:
$myHashTable | Export-Csv demo.csv -NoTypeInformation
You end up with an output that looks like this, which does not display the key/value pairs saved in the hash table.

To resolve this, you use the hash table’s GetEnumerator method, which iterates through the hash table items. Next, use the Select-Object command to grab the Key and Value properties. If you skip this step, you end up with two columns of “Name” and “Key” that are duplicates. Finally, pipe this to the Export-Csv command.
# Export hash table correctly
$myHashTable.GetEnumerator() |
    Select-Object -Property Key,Value |
    Export-Csv .\demo.csv -NoTypeInformation
Hash tables serve as the basis for PowerShell Splatting. Learn more in PowerShell Splatting: Introduction & Demo.
Understanding PSCustomObject
Objects are what make PowerShell great. Everything you do in PowerShell happens within the context of objects. Data transferring from one command to the next moves as one or more identifiable objects. Objects are a collection of data representing an item and have data types like the object type, methods, and properties.
PSCustomObjects differ from hash tables in that the object represents an entity. Remember from earlier when outputting a hash table. The column names are still “Name” and “Value,” representing the key pair, but the hash table cannot hold additional information about each server. The hash table items only represent each server and its serial number. While the hash table is technically an object, it is limited in functionality and unsuitable for representing anything of structure.
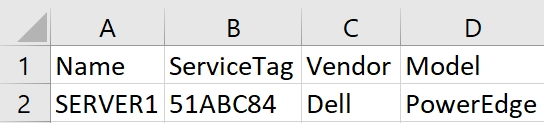
However, creating a custom PowerShell object makes the information more usable and displays the data more clearly. Custom objects are better for creating structured data. Here is an object using the [PSCustomObject] keyword representing a server with more than just the serial number as a property. This server object contains the name, service tag, vendor, and model.
# Creating custom PowerShell object
$myCustomObject = [PSCustomObject]@{
    "Name"       = "SERVER1"
    "ServiceTag" = "51ABC84"
    "Vendor"     = "Dell"
    "Model"      = "PowerEdge"
}
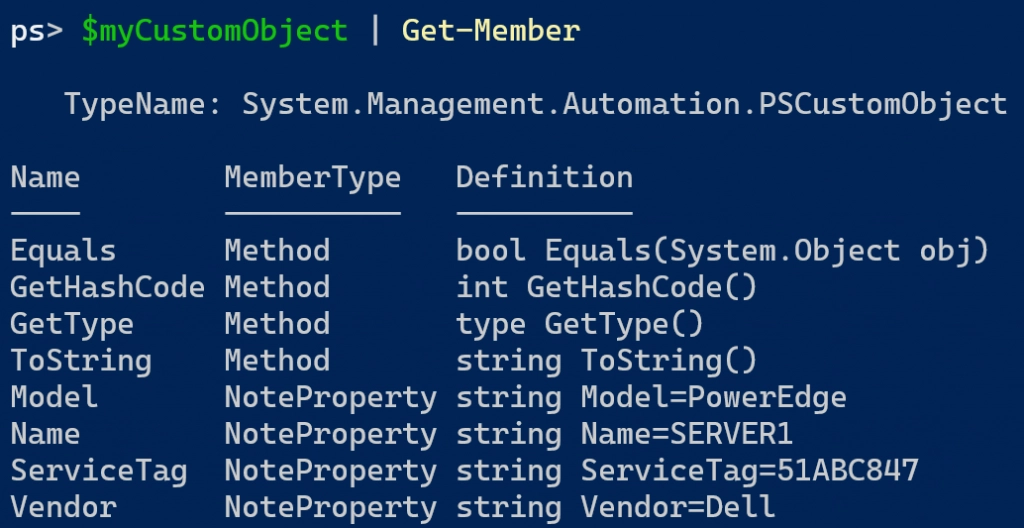
You can also view the custom object’s members and methods by passing the object to the Get-Member command. Note how entries such as Name, Serial, Vendor, and Model are listed as NoteProperty. The NoteProperty member contains a description of the object.
Managing Object Properties
Like hash tables, you can add new properties to the object and remove them. To add a property, pass the object to the Add-Member command, specifying the -Name, -Value, and -MemberType (NoteProperty).
$myCustomObject | Add-Member `
    -Name "Owner" `
    -Value "Jeff Brown" `
    -MemberType NoteProperty

Removing a member property is a bit trickier. You access the object properties and use the Remove() method by accessing the PSObject’s Properties attribute.
$myCustomObject.PSObject.Properties.Remove("Owner")
Displaying Objects
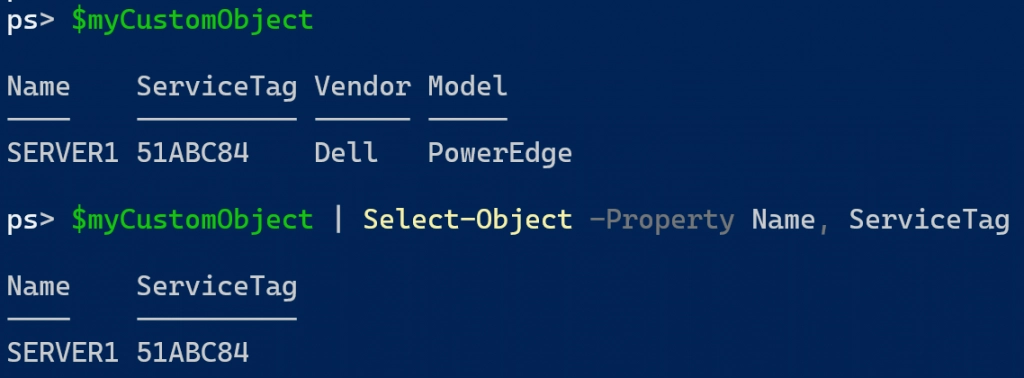
Outputting the object to the screen now displays each key as a column name followed by its value. You can also now choose specific object properties using the Select-Object command. Unlike hash tables, the custom object displays the values in the order you defined them.
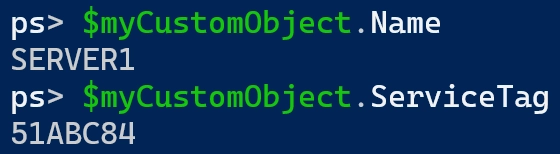
Like hash tables, you can view specific property values, but you use dot notation followed by the property name.
# Access object properties and values
$myCustomObject.Name
$myCustomObject.ServiceTag
Filtering an Array of Objects
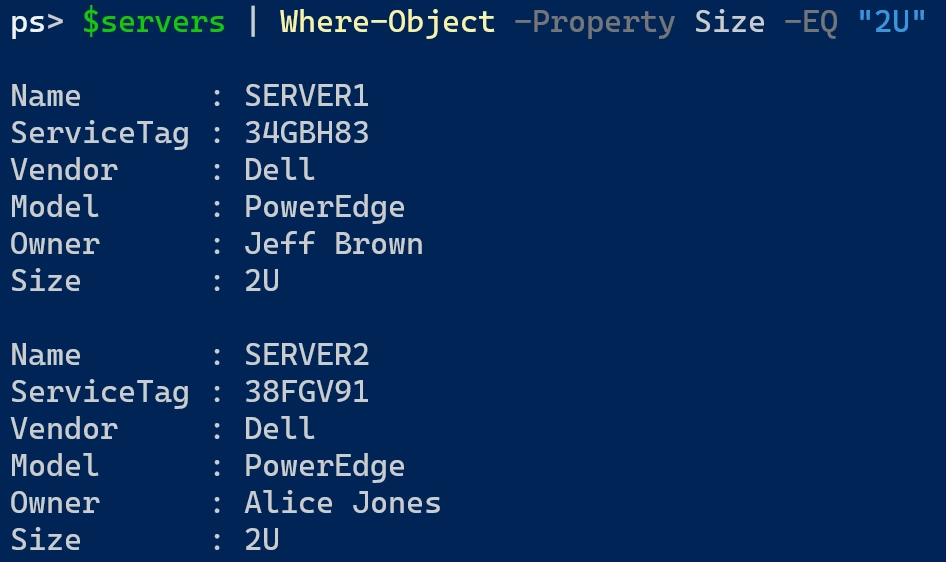
You can also filter objects based on different properties. Here you have an array of objects names $servers. The array contains three separate server objects with multiple properties. Review the code below, noting each property and its value.
$servers = @(
    [PSCustomObject]@{
        Name = "SERVER1"
        ServiceTag = "34GBH83"
        Vendor = "Dell"
        Model = "PowerEdge"
        Owner = "Jeff Brown"
        Size = "2U"
    },
    [PSCustomObject]@{
        Name = "SERVER2"
        ServiceTag = "38FGV91"
        Vendor = "Dell"
        Model = "PowerEdge"
        Owner = "Alice Jones"
        Size = "2U"
    },
    [PSCustomObject]@{
        Name = "SERVER2"
        ServiceTag = "83WUG49"
        Vendor = "Dell"
        Model = "PowerEdge"
        Owner = "Jeff Brown"
        Size = "1U"
    }
)
From here, you can filter out objects based on different property values. For example, use the Select-Object command to find servers that have a Size equal (EQ) to 2U.
$server | Where-Object -Property Size -EQ "2U"
Or filter based on Owner not equal (NE) to "Jeff Brown".
$servers | Where-Object -Property Owner -NE "Jeff Brown"

Adding Methods to Properties
One advantage PowerShell objects have over hash tables is adding custom methods. Methods are actions you perform on the object. If you review the Get-Member output from earlier, the $myCustomObject has methods such as Equals(), GetType(), and ToString().
To add a custom method, create a script block containing the method code. This script block uses the $this automatic variable to reference the current object. Use $this anytime you use the object variable name in the script. In this example, this code converts a Dell service tag to an express service code. Credit John Tyndall for the conversion code; check it out in his GitHub repo here.
$convertScriptBlock = {
    $serviceTag = $this.ServiceTag
    $alphabet = "0123456789ABCDEFGHIJKLMNOPQRSTUVWXYZ"
    $serviceTagCharArray = $serviceTag.ToUpper().ToCharArray()
    [System.Array]::Reverse($serviceTagCharArray)
    [System.Int64]$expressServiceCode = 0
    $count = 0
    foreach($char in $serviceTagCharArray){
        $expressServiceCode += $alphabet.IndexOf($char) * [System.Int64][System.Math]::Pow(36,$count)
        $count += 1
    }
    $expressServiceCode
}
Next, use the Add-Member command to add $convertScriptBlock to the object as a script property. The -Name parameter value should reflect the name of the new method. In this case, the method name is ToExpressServiceCode.
Add-Member `
    -MemberType "ScriptMethod" `
    -InputObject $myCustomObject `
    -Name "ToExpressServiceCode" `
    -Value $convertScriptBlock
With this new method added, you call it by appending .ToExpressServiceCode() to the object variable name.

Exporting Objects to CSV
Unlike hash tables, PowerShell objects are much easier to export to CSV. You can pipe the object to the Export-Csv command without making any modifications. If you are using PowerShell v5.1 or earlier, add the -NoTypeInformation parameter. In PowerShell 7, this parameter is enabled by default. The output in the CSV file has column headers with their values instead of a list of key/value pairs like hash tables.
# Export object to CSV
$myCustomObject | Export-Csv .\demo.csv
Closing
PowerShell hash table and PSCustomObject look similar in definition, but custom objects have more capabilities. Use hash tables if you work with a list of information where the key/value pairs are unrelated. However, if you need more structured data, you’ll most likely create your own object for storing the information.
Enjoyed this article? Check out more of my PowerShell content here!